TopPodcast.com
Menu
  • Home
  • Top Charts
  • Top Networks
  • Top Apps
  • Top Independents
  • Top Podfluencers
  • Top Picks
    • Top Business Podcasts
    • Top True Crime Podcasts
    • Top Finance Podcasts
    • Top Comedy Podcasts
    • Top Music Podcasts
    • Top Womens Podcasts
    • Top Kids Podcasts
    • Top Sports Podcasts
    • Top News Podcasts
    • Top Tech Podcasts
    • Top Crypto Podcasts
    • Top Entrepreneurial Podcasts
    • Top Fantasy Sports Podcasts
    • Top Political Podcasts
    • Top Science Podcasts
    • Top Self Help Podcasts
    • Top Sports Betting Podcasts
    • Top Stocks Podcasts
  • Podcast News
  • About Us
  • Podcast Advertising
  • Contact
Not in our directory?
Add Show Here
Podcast Equipment
Center

toppodcastlogoOur TOPPODCAST Picks

  • Comedy
  • Crypto
  • Sports
  • News
  • Politics
  • True Crime
  • Business
  • Finance

Follow Us

toppodcastlogoStay Connected

    View Top 200 Chart
    Back to Rankings Page
    Education

    Q&A Coffee Podcast with Scott Rao

    Beginner and advanced questions about coffee brewing and roasting.

    Advertise
    • Apple Podcasts
    • Google Play
    • Spotify

    Latest Episodes:
    Extraction Curve Analysis Apr 07, 2019
    Show notes

    Most of my work over the past ten years has involved analyzing roast-curve data for clients. Those years spent analyzing tens of thousands of curves have helped me identify consistent, verifiable relationships between curve shape and cup quality. Regardless of a clients’ roasting goals, that experience has usually made it easy to help the client immediately improve upon a roast simply by looking at a curve and suggesting alternative settings.

    As I gain experience on the DE1, I’m learning to read its tablet’s curves and benefit from them. Below is a discussion of the most typical curve shape (ie a bad one). I think of this shot as the espresso equivalent of a roast curve with an ROR crash and flick. Mind you, the art and science of analyzing extraction curves is much more immature and speculative than that of analyzing roast curves; we’re still deciphering what all of this means.

    typical decent curve.png

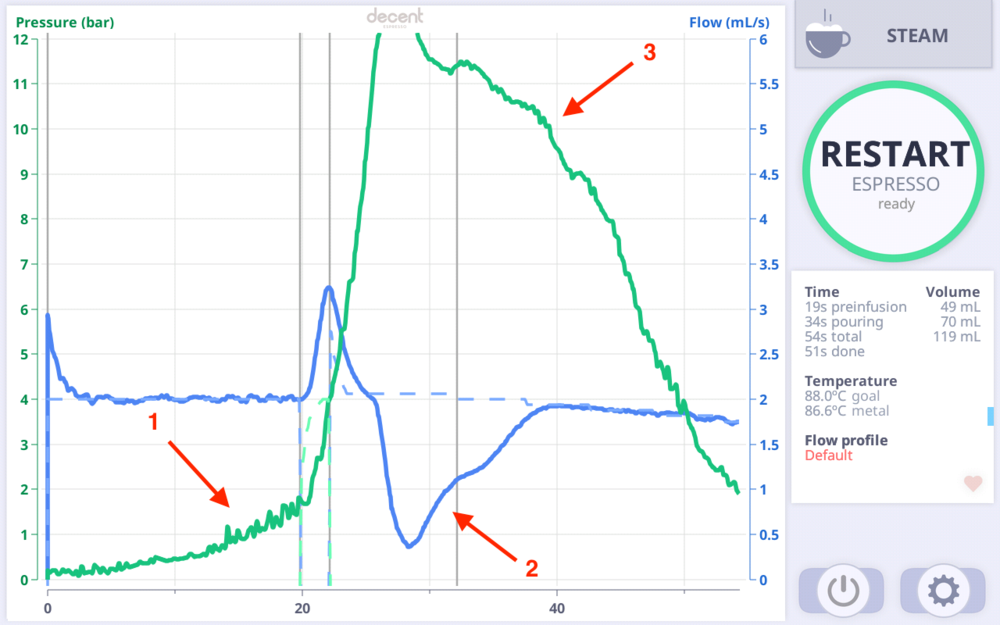
    This shot was generated using a flow profile. The green line represents pressure and the blue line indicates flow. The red numbers indicate important feedback.

    1. The volatility in the pressure curve indicates channeling during preinfusion. Despite being in flow mode— which helps “fix” channels as they form— a fair amount of channeling still occurred. I have little doubt this shot suffered from poor puck prep or too many clumps in the dry grounds.

    2. The collapse in flow after preinfusion likely indicates the grind is too fine (note the peak pressure of twelve bar), causing too much puck compression to allow the desired flow rate to occur. The high pressure could also be due to too large of a dose, but I’m assuming we use a consistent, appropriate dose.

    3. The phase from 25s to 40s where the pressure declined gradually is what John calls the “healthy extraction phase.” On some shots, the gradually declining pressure does, in fact, seem healthy— we believe it indicates no significant channeling while the puck erodes. On this shot, it’s debatable how much of this phase reflects “healthy extraction” and how much it indicates the puck is too compressed and/or still absorbing liquid (ie incomplete preinfusion). The steep pressure drop after #3 almost certainly indicates the formation of channels as the puck erodes.

      We are confident that we prefer shots with smoother pressure curves, steadier flow after preinfusion, more gradual pressure decline after the pressure peak, and smoother pressure curves. Those observations have proven valid in both directions— when we see those curve features, the shots generally taste better. And when we taste numerous shots of a given coffee, the best-tasting shots turn out to have had such curves.

      It’s still early days in my Decent Education, but the DE1’s graphs have already made me a better barista, and it’s a lot more fun and interesting to pull shots with the feedback of the DE1’s graphs.

      For reference, the graph below is what I would consider “excellent',” and it coincidentally (?) looks quite a bit like a steadily declining ROR curve. Cropster for espresso, indeed.

    great pressure profile curve.png

    Introducing the Litmus XTS Spray Head Mar 11, 2019
    Show notes
    fetco XTS Mod CAD.png

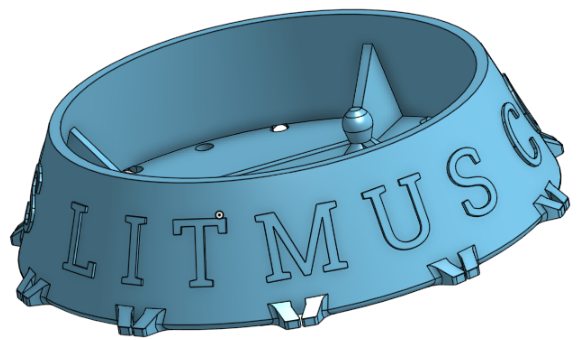
    Litmus Coffee Labs is excited to announce that we’re finally ready to sell our spray head compatible with the Fetco XTS batch brewer. Dan has been refining the spray head for the better part of a year and it has been in the hands of approximately fifty beta testers for a few months. All of the testers have been thrilled with the improvements in their Fetco batch brews, and through their experience we’ve learned how to optimize the product. We’re offering a limited production run of 100 spray heads that will ship immediately. The next several hundred orders will ship within a couple of weeks, on a first-come, first-serve basis.

    Why the Litmus XTS Spray Head?

    For years, baristas have lamented Fetco’s change from the old flat-plate spray head to the Cascading Spray Dome (CSD). Our spray head radically improves the CSD’s performance by providing a more uniform spray to yield a higher and more even extraction with more clarity and less astringency.

    Testimonials

    From Kris Wood of Black Fox Coffee

    "From a coffee lover’s perspective, the clarity of my filter coffees has improved drastically due to the even extraction. Coffees that were already very good are now excellent. From a business side, our TDS went up by 0.12. That brought our dose weight down by 3.9% saving thousands a year. It should be triple the price."

    From Dave Stallings, Passenger Coffee

    "It is hard to exaggerate the positive impact that the spray head has had on our batch brewed coffees. Of course we expected a more even bed and thus more even and balanced extraction, but this spray head has delivered on levels far beyond that: our extractions have increased across the board while also finding a focus, clarity, depth of sweetness, and cleanliness of finish that we have never before experienced on our batch brewer."

    From Will Shurtz, Methodical Coffee

    "I really love how much of an impact the spray head had on the quality of our batch brew coffee. There was a noticeable increase in the clarity of flavor of our coffee. So much so that multiple customers mentioned the difference they detected once we applied the spray head to our brewer."

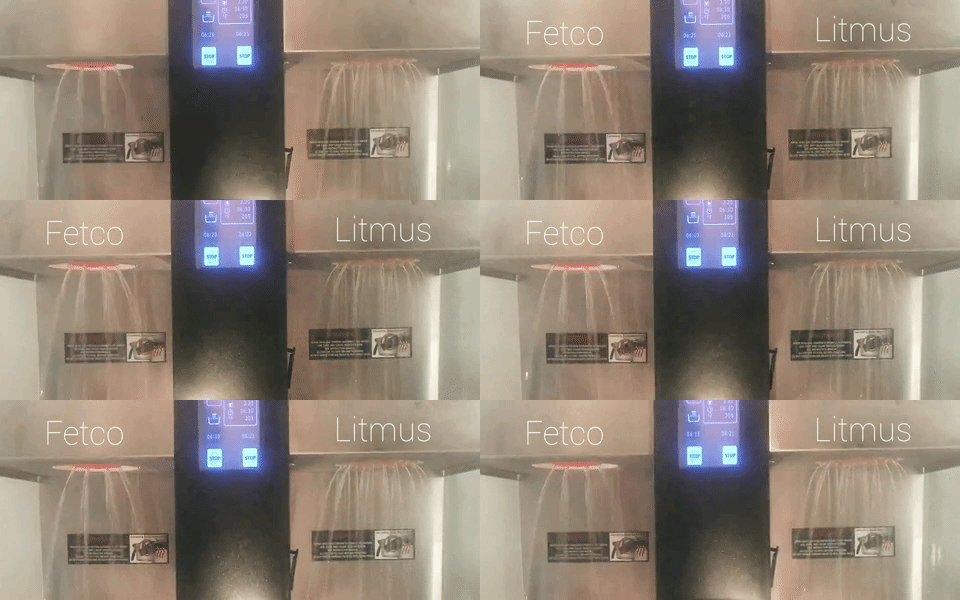
    Flow Comparison: The original CSD sprays in 12 large streams, while the Litmus device catches all the flow from the CSD and distributes it in 19 streams (apologies for the steamy video)

    litmusfetcocompare.gif

    Caution before ordering:

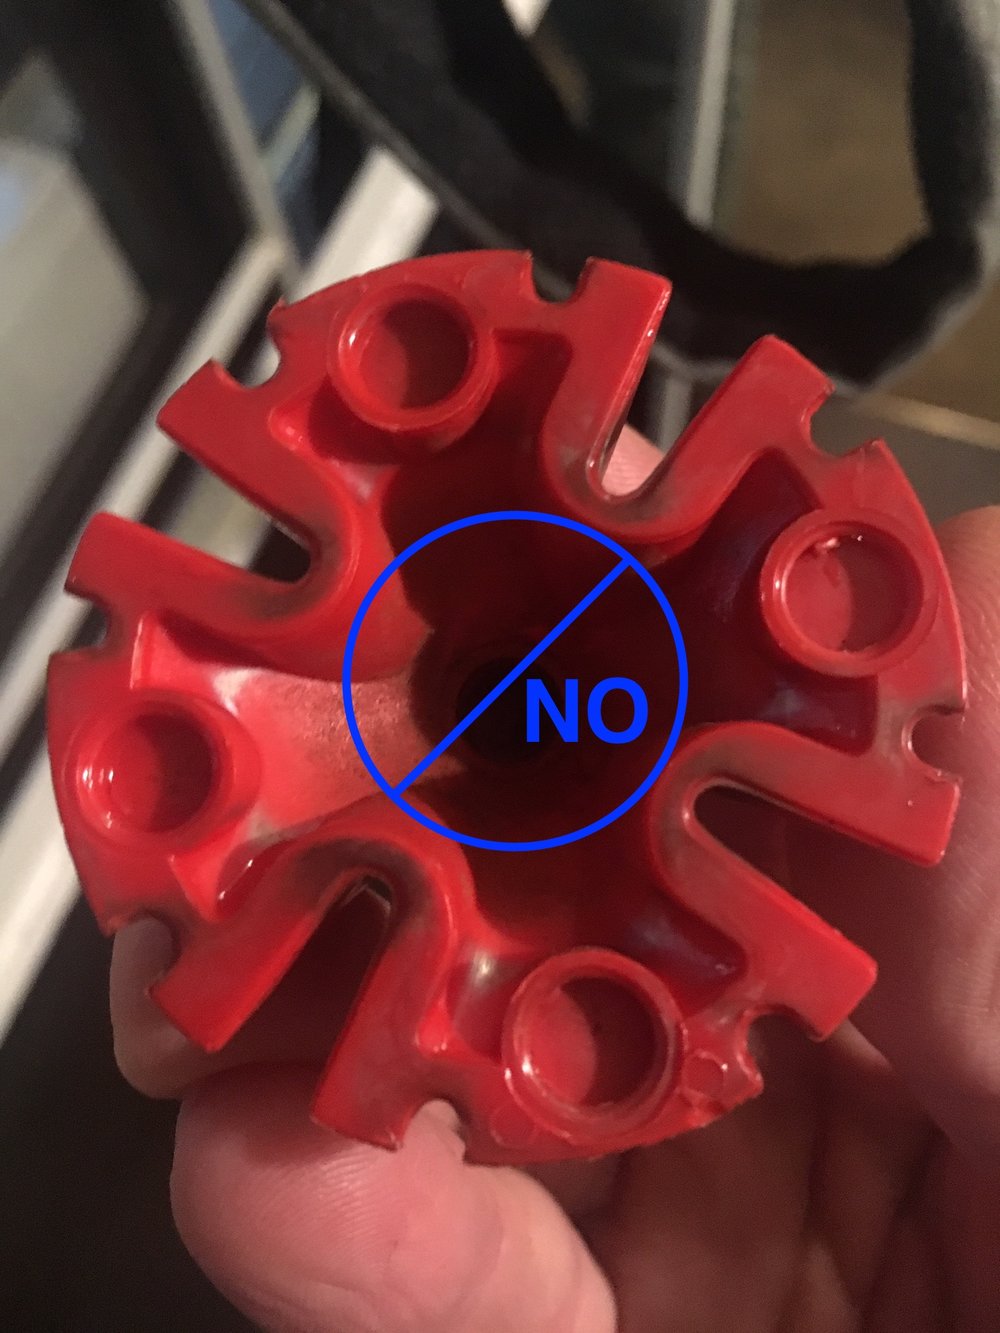
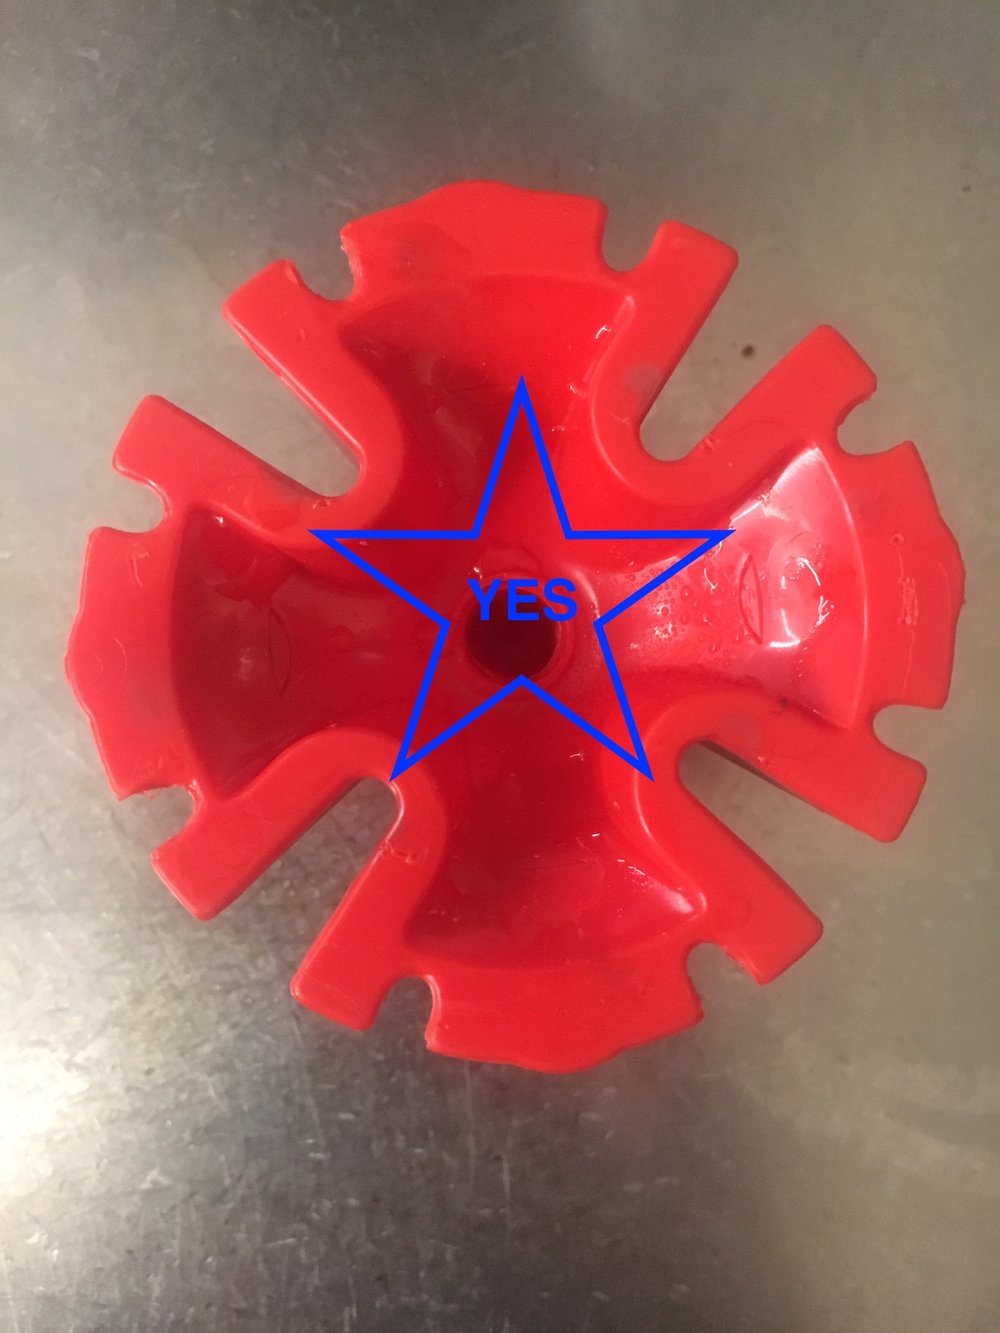
    We've encountered a small percentage of CSDs with an unusual design. Please take a look at your CSD before ordering. If you have one of the CSD's with the small circles on the bottom, it is not compatible with our mod. Please let us know if you have such a CSD, we’d like to know how many are out there.

    NO CSD.jpeg
    YES CSD.JPG

    Here's a short video showing how to install the part


    The Litmus XTS Spray Head snaps easily onto your existing CSD. Before snapping it in, please ensure the two parts are aligned such that the four middle holes are exposed, as shown in the video.

    Please click HERE to purchase the Litmus XTS Spray Head.


    Roasting Classes during SCA Boston! Mar 11, 2019
    Show notes

    I’m pleased to announce I will be holding two roasting masterclasses in Boston this April during the SCA Expo.

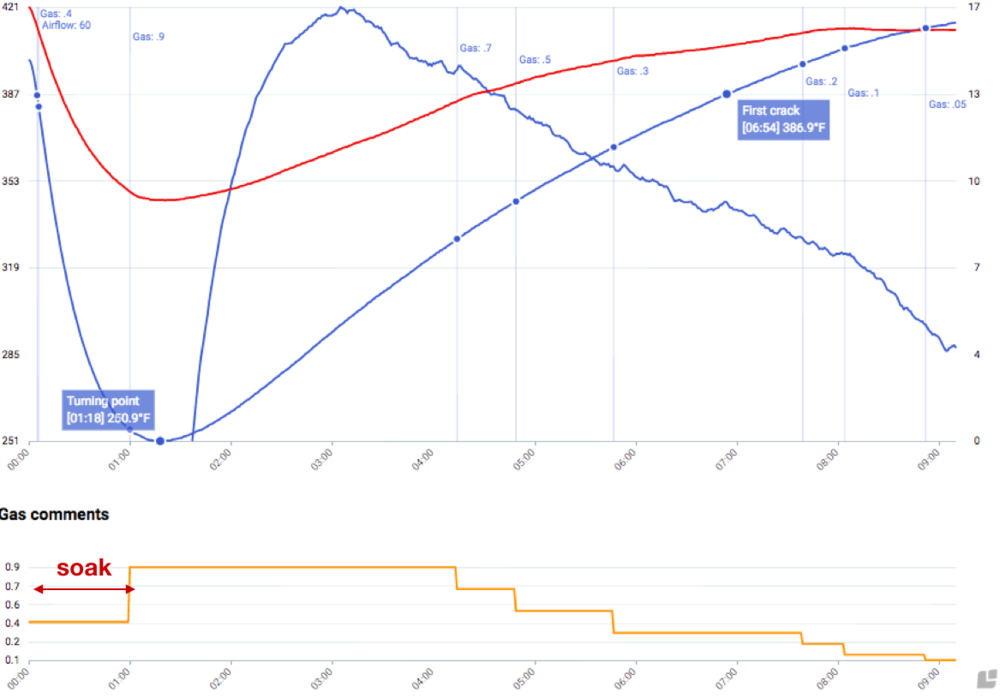
    These will be very advanced classes, complete with a tasting of the newest Roast Defect Kit and some new strategies for managing ROR crashes. I’m getting closer to being able to completely prevent ROR crashes, and I’m excited to share these new findings and strategies with advanced roasters.

    Among other topics will be a strategy that argues for ignoring first crack on some roasts :0. It will be an interesting conversation.

    You won’t want to miss this. Details HERE


    A more effective way to align your grinder Jan 30, 2019
    Show notes
    EK alignment diagram.png

    From Scott

    I recently ranted, I mean posted, on Instagram about the unnecessary frustrations of aligning the burrs of an EK grinder. Mahlkonig designed the EK for grinding spices (not coffee) and was flat-out lucky that I took a chance on buying an EK for coffee in 2010. The first day I used the EK in Montreal I achieved 23% extractions in my Fetco and word spread rapidly throughout the coffee industry. Cafes all over Montreal began buying EK’s and then Mahlkonig lucked out again when Matt Perger used the EK in his excellent World Brewers Cup routine. Since those events, Mahlkonig has sold many thousands of EK’s and has had the nerve to raise the price without addressing the issue of the machine’s atrocious alignment. I’ve used over 100 EK’s and would estimate that at most 10% of them were well-aligned right out of the box. The terrible QC of EK manufacturing has cost us collectively tens of thousands of hours trying— often unsuccessfully— to accomplish something that Mahlkonig could have accomplished in minutes per grinder sold.

    When someone has manufactured a commercial grinder for less than $5000 USD that grinds better than the EK and is also well aligned out of the box, please contact me: I will happily promote your machine for free after testing it to my own satisfaction.

    Over the past nine years baristas have become more aware of the issue, and some homegrown re-alignment methods have partially solved the problem. Unfortunately, those methods require an hour or two each time the burrs are removed or replaced. (Matt’s tutorial HERE is excellent.)

    Upon reading my rant/post, Mitchell Hale commented on the Instagram thread about a method of sanding the burr carriers to realign the burrs. I asked Mitchell to share that method as a guest blog post and he graciously gave his time to writing this how-to. I have not tried the method yet (I don’t have an EK at home and my current home grinder is well aligned) but I have faith that it will become the new standard for burr alignment for many flat-burr grinders, not just the EK. This method may take three to four hours, but once it is done, you will not have to repeat it each time you remove or replace burrs. This seems like an excellent investment of time.

    Mitchell has agreed to reply to some comments here, but please be sure to read this post several times before asking questions. Please don’t ask questions such as “will this work on some other type of flat-burr grinder?” The answer is: “probably” but neither Mitchell nor I have tested this method on a variety of grinders. Posts like this are to spur ideas and conversation, nothing more. Do some research, try at your own risk, and give back to the community by sharing your results and insights. Thank you.

    Guest Post by Mitchell Hale

    Before we begin I want to give credit and thanks to the community at kaffee-netz.de, and to Jürgen Peter Ohler (Jupe3.0) in particular, for coming up with this idea in the first place. I’d have never been able to put together this guide without their pioneering of the method.

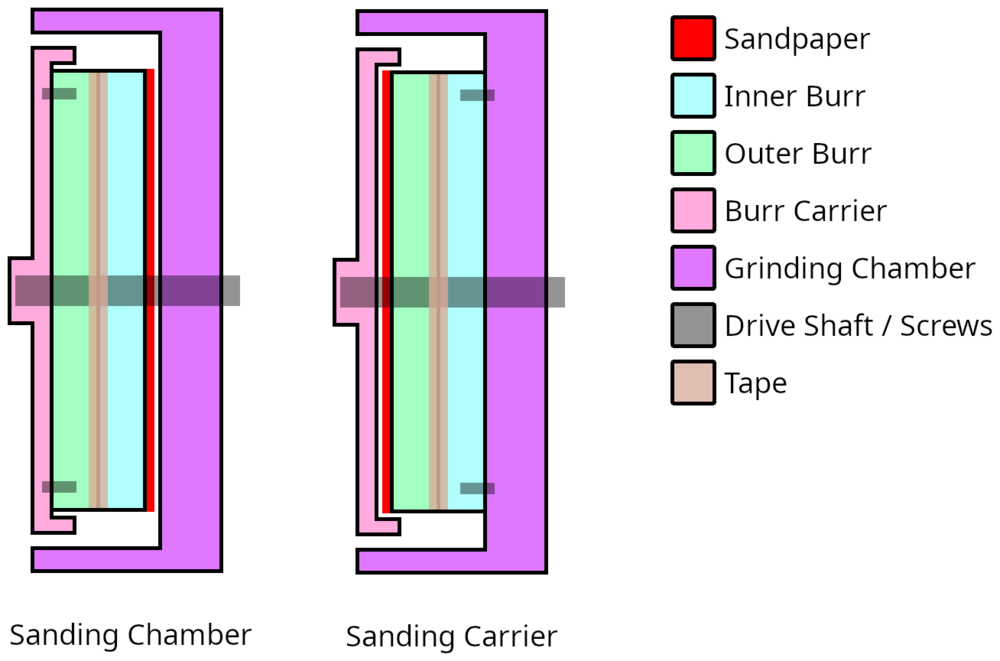
    I’d like to introduce you to a simple and straightforward way to align your grinder that uses the inherent properties of the grinder itself, rather than relying on user observations like methods such as marker alignment. This method uses readily available supplies to allow the burrs to alter the grind chamber and the burr carrier so that the burrs are aligned parallel to each other and perpendicular to the drive shaft without shims. To achieve this, we’ll be attaching sandpaper flat to the back of the burrs in two different configurations (see diagram) to sand both mounting surfaces.

    This method works easily with any grinder with an EK-like burr pattern. With the inner burr fixed in the grinder chamber and the outer burr on a spinning carrier that goes over the drive shaft. EK43, Bunn G1, etc.

    First, you're going to need a few supplies

    -----

    • Spray adhesive, I used "Loctite General Performance Lightweight Bonding adhesive", available at https://www.amazon.com/Loctite-1712314-13-5-Ounce-Aerosol-Adhesive/dp/B003VWJ5GO or most hardware stores. You want something light since it'll be coming off frequently.

    • Oil for the sanding, I used "3-IN-ONE oil", available at https://www.amazon.com/3-IN-ONE-Multi-Purpose-Oil-8-OZ/dp/B0083V8MAS or most hardware stores.

    • Sandpaper of several grits, I used a bunch of big packs from the hardware store, but a multi-pack would be ideal. We’re only going to need a couple sheets of each grit size. Make sure it's wide enough for your burrs. 98mm for EKs, 80mm for Bunns, etc.

    • Adhesive remover, I used Goo Gone, available at https://www.amazon.com/Goo-Gone-Pro-Power-Spray-Gel/dp/B00SPHYQXM and most anywhere you can get cleaners. I do want to note that Goo Gone is not a food safe product, but you can clean it off thoroughly. If you do feel concerned, I find that canola oil does a good job of stripping the adhesive as well. Be sure to clean it thoroughly too, for different reasons.

    • An X-Acto style knife. Most hobby stores, hardware stores, and office supply stores will have something suitable.

    • Some rags to wipe up the metal filled cutting oil. Expect to throw them away after, so get something cheap.

    • Masking tape.

    • The thinnest tape you can find. It has to fit between the sweepers on the burr carrier and the outer burr.

    • A screwdriver for the burr chamber and another for the burrs themselves. I highly recommend a torque screwdriver for the burrs to put them in with more even tension. It's not strictly needed, but if you can get even a cheap one you can be a lot more confident you’re not over tightening one side.

    UNPLUG YOUR GRINDER AT THIS POINT. LEAVE IT UNPLUGGED UNTIL FINISHED.

    Now, for the chamber sanding

    -----

    1. Cut out 6 squares each of about 220 grit, 320 grit, 400 grit, and 800 grit sandpaper that will fit the entire burr on them. If you like shine and don't mind the time it takes, throw some higher grit in there too.

    2. Take the outer burr carrier out of your grinder, remove the spring from it, and set it aside. Then unscrew the inner burr, you'll be attaching the sandpaper to this burr first.

    3. Take one of the squares of your 220 grit and spray the back lightly with spray adhesive, then press your inner burr on it. Wait for it to dry. Then cut off the excess sandpaper from the edges and middle leaving only a ring of it.

    4. Tape your inner burr to the outer burr that's still screwed into the burr carrier. You can work around the sweeper post things with masking tape, or try to get the tape under them with the thin tape.

    5. Apply cutting oil to the sandpaper.

    6. Put the assembly of two burrs in the burr chamber (making sure the spring is out of the carrier) and spin it around with gentle pressure. Take it out from time to time to wipe off the oil and metal. Continue until the sandpaper is worn out.

    7. Repeat 3-6 two more times to use 3 discs. You'll need the adhesive remover to clean the burr to attach the next disc.

    8. Repeat steps 3-7 for each size of sandpaper. You should use 3 discs for at least 220 and 320, and can probably go down from there. Those sizes do most of the work and the rest polish.

    Now your chamber is sanded to be perpendicular with the driveshaft. But your carrier does not perfectly match, not yet.

    Now, for the carrier sanding

    -----

    1. Screw your inner burr back into the grinder. Ideally with a torque screwdriver to keep things even. Unscrew the outer burr from the carrier

    2. Take one of the squares of your 220 grit and spray the back lightly with spray adhesive, then press your outer burr on it. Wait for it to dry. Then cut off the excess sandpaper from the edges and middle leaving only a ring of it.

    3. Tape the outer burr, without carrier, to the inner burr. This can be a pain to pull off depending on the individual grinder, and you'll need some thin tape. The sweeper posts will need to be able to fit over the tape this time.

    4. Apply cutting oil to the sandpaper.

    5. Put the carrier over the two burrs that are affixed to the chamber, apply gentle pressure and spin it to sand down the carrier. Same way you did with the chamber sanding.

    6. Repeat with multiple grits and multiple discs of each grit the same way you did with the chamber.

      Your carrier now has a parallel surface to your chamber. Which is also perpendicular to the driveshaft! Congratulations, your grinder is aligned the best it can be this side of a machine shop!

    Final steps and notes

    -----

    • Don’t worry about matching things like my grit numbers exactly. They’re there as guidelines for cutting grits and finishing grits.

    • Your zero will change significantly. We’ve removed material from both burr mounting surfaces, so they will be physically further apart at the same settings until rezeroed.

    • Make sure to clean your grinder before using it.

    • Make sure to clean your burrs thoroughly of both adhesive and adhesive remover before reinstalling them.

    • Make sure to flush your grinder with at least a few doses of coffee, ideally more, before using it.

    • When you're applying spray adhesive, have it in a box or other contained area to not make a mess.

    • Rubbing alcohol, acetone, dish soap, etc all do nothing on the spray adhesive. You do need an adhesive remover or oil. Trust me, I thought I wouldn’t need it.

    • If you use any water on your burrs for cleaning, dry it off right away. Especially for standard uncoated tool steel burrs.

    • You can repeat the chamber sanding once the carrier is done for a theoretically slightly more perfect surface, but it's not really necessary.

    • Sanding times are for standard sandpaper, and should last several minutes to 10-20 minutes tops for a sheet. If using any especially long lasting sandpaper and it isn’t wearing out at all over several minutes, you can stop after a few normal sheets would have worn out and move on to the next grit.

    • When cutting sandpaper around the burrs, make sure not to get it too tight. Remember, the burrs have to fit into the sanded area. If the sandpaper is cut too tight and leaves some of the burr face uncovered, the burr will end up sitting on the unsanded edge around the burr. It’s ok if it goes just slightly beyond as well. So if in doubt, it’s better to have a disc slightly larger than needed, than one slightly too small to work.


    Sydney Masterclass, February 3rd Jan 17, 2019
    Show notes

    I’m pleased to announce that I’ll be offering a Roasting Masterclass in Sydney at Collective Roasting Solutions on February 3.

    This will be a very advanced class, complete with a few new strategies for managing ROR crashes. I’m getting closer to being able to completely prevent ROR crashes, and I’m excited to share some new findings and strategies with Australia’s best roasters this February.

    Among other topics will be a strategy that argues for completely ignoring first crack. :0

    You won’t want to miss this. Details HERE

    21-DSC_0040 copy.jpeg

    The best cascara I have ever tasted Jan 17, 2019
    Show notes

    (Thumbnail photo credit: Lucia Solis)

    I like cascara. It’s not the most “interesting” beverage, as it often lacks nuance and liveliness. However, there is something comforting and (energetically) warm about cascara that makes me want to drink it every morning.

    My partner Paolo at Regalia often includes a bag of cascara as a treat when he mails me roasted coffee samples. The cascara he sent me last week is like no other I have ever tasted. This cascara is the first one I have ever found to be interesting, with some zingy acidity and crispness reminiscent of some African coffees.

    Here is Paolo’s description of the cascara and a link to Regalia’s website. Enjoy.

    Region: Sabanilla del Poas
    Altitude: 1500 MASL
    Process: Red Honey
    Varietal: Villa Sarchi, Caturra, Catuai

    Perhaps one of the finest cascaras on the market: the Chacon's cascara is incredibly clean, with a honey-like sweetness, and a fruit quality that resembles peach and kumquat.

    Dona Francisca and her husband Oscar Chacon of the Cumbres del Poas micro mill are 3rd generation coffee producers. The Cumbres del Poas micro mill is located in the Sabanillia de Alajuela in the Central Valley region of Costa Rica. Both Francisca and Oscar believe in preservation of the environment. They were some of the first pioneers of high-quality honey and natural-process coffees in Central America back in 2009 when they started experimenting with special processes. Water use at the mill is minimal, since their coffees do not undergo the washed process. During the harvest of their coffees they will measure the Brix content in the coffee cherries to determine the best time to pick their coffees to obtain the sweetest and most fruit forward profiles.

    Rather than processing their cascara like they would their normal parchment, the Chacons treat theirs like one would approach dried fruits. These are lightly washed and quickly dried on parabolic driers.

    RECIPE

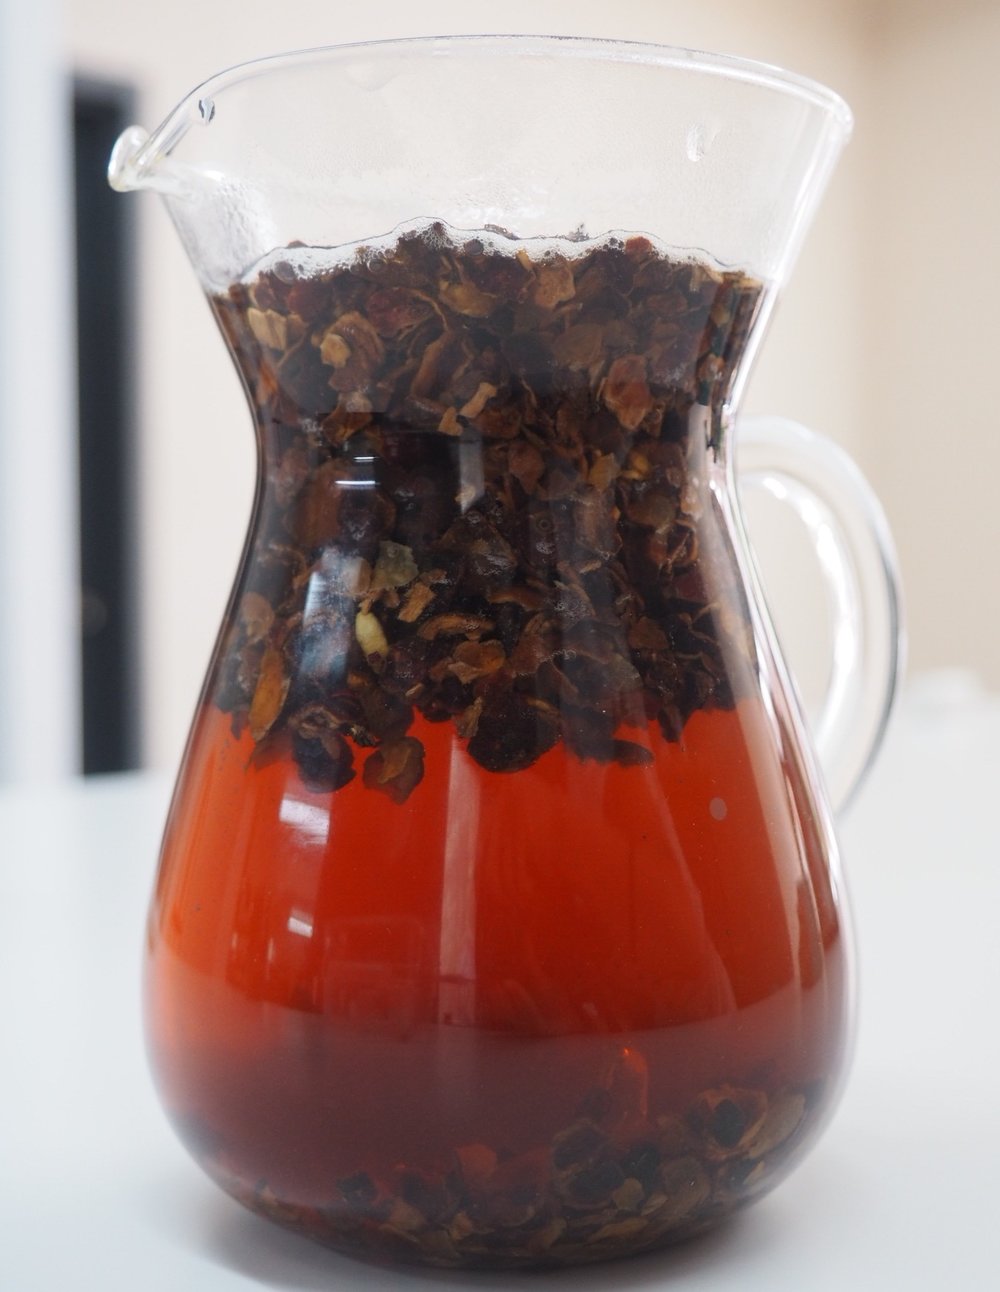
    If you're new to brewing cascara, note that you are easily able to do so like one would steep tea in a satchel:

    20g Cascara

    360ml boiling water

    8:00 steep time

    Pro Tip: If you filter the final product through a paper filter, it will enhance the cascara's fruit-quality.

    (Note from Scott: I use a little lower ratio of cascara:water but steep it longer than Paolo does. Cascara doesn’t “overextract” so don’t be afraid to leave it in a thermal mug all day.)

    cascara+brewing+copy.jpg

    Why Spin the Slurry? Jan 09, 2019
    Show notes

    Why Spin the Slurry?

    A guest post by Jonathan Gagné

    From Scott: The history of The Spin is murky…although it’s often called the “Rao Spin,” I did not invent the spin. It’s likely that James Hoffmann was the first person to spin the slurry. Almost everyone to whom I’ve shown The Spin has immediately adopted it. It’s easy to execute well and it works, pretty much every time.

    Jonathan Gagné, an astrophysicist based in Montreal, came to my roasting masterclass this past November. I’ve been fortunate to befriend Jonathan, as I’ve always wanted to have an astrophysicist on speed dial to call when I have a question about how things work :). I’ve been helping Jonathan with his coffee making and he’s been providing some great coffee-analysis resources, some of which I hope appear on this blog.

    I asked Jonathan to explain why he believes The Spin works and we decided to publish his answer as a guest post here. This post and a few more technical discussions on coffee brewing are also available on his blog at https://coffeeadastra.com.

    Why Spin the Slurry ?

    Summary

    In this post we will discuss the physics behind why spinning the V60 during a brew is a useful method to obtain a more uniform extraction. While spinning is helpful, it’s important not to overdo it - it can cause fine coffee grounds to migrate to the bottom of the slurry and clog the filter, slowing the drawdown and imitating a brew made with a lower-quality grinder.

    Spinning the slurry during a V60 brew is useful to minimize the channeling of water that can lead to an uneven extraction. The reason why this is true can be understood with the help of physics.

    A rotating slurry will experience a centrifugal force*, which means that every drop of water and every particle of coffee will suffer a force that pushes them outwards. In physics, the strength of centrifugal force is more important for heavier objects, and because of this, water will tend to migrate outward more than coffee because water is heavier.

    When you brew coffee, the main cause of channeling is that dry coffee repels water more than wet coffee does. The physics behind this effect are not fully understood: they are related to the fact that molecules of water bond with each other, and dry coffee doesn’t bond with them in the same way. At first pour, water might begin travelling through a tiny hollow on the surface of the dry coffee, and then it will prefer to keep traveling through that same tunnel, because the rest of the coffee bed is still dry and repels water. In practice, a coffee bed will often develop several channels if you don’t take steps to avoid it.

    When you rotate a channeled coffee bed, the water flowing down the narrow tunnels is forced out of them by the centrifugal force, and the water will wet some of the dry coffee. This horizontal re-mixing of the slurry will cause channeling to decrease overall.

    There is, however, a drawback if you spin too much. As mentioned earlier, heavier things are more affected by the centrifugal force. The largest coffee particles will thus experience a stronger pull toward the walls of the V60. In a slurry where coffee is mixed with water, this effect will be slightly reduced by water friction. Think of trying to run in the sea - the friction water exerts on you will slow down your movement, especially if you present it with a large surface, for example by wearing saggy pants. The friction is however not strong enough to completely stop the migration of particles based on their size, and the larger coffee particles will be sent outwards.**

    This whole situation presents the smallest particles with an opportunity: the larger ones having moved out of the way, fines will sink down to the bottom of the V60, where they will be free to do their worst at clogging the paper filter. This will significantly slow down the flow of your brew.

    As an illustration of this, I recently brewed a few V60s with a prewet-plus-two-pours method, performing a spin right after the prewet, and right after each of the two pours. At first I did not pay too much attention to how long or how strong I was spinning, and I experienced large inconsistencies in my brew time (up to ~20 seconds), which led to inconsistencies in average extraction yields by about 0.7%. I was controlling everything else, including the height from which I poured, the flow rate, timing, grind size, slurry temperature, etc.

    I then tried timing my spins, and found that using seven-second spins resulted in a 5:18 drawdown time, while two-second spins resulted in a much shorter 4:28 drawdown time! This is a nice demonstration that fines can migrate and clog your filter if you spin too much. Adjusting the grind size appropriately to maximize extraction yield and avoid astringency, I found that the two-second spins resulted in a brighter and more enjoyable cup.

    In summary, you want to spin just enough to break the up channels, but not so much that fines clog the bottom of the filter.

    *NB: I can already hear the interwebs shouting “CENTRIPETAL NOT CENTRIFUGAL”. Both concepts are valid and useful tools: when you stand outside of a rotating system and want to describe forces acting on that system that keep it together, the concept of a centripetal force (directed toward the center) is appropriate. It describes the external force that allows the system to keep going in this rotating motion without splattering everywhere around. In our case, this force is provided by the walls of the V60, preventing the slurry from flying around and messing up your counter. If, however, you take the point of view of the things rotating (the water and coffee), then the concept of a centrifugal force becomes very useful. You can then describe the system as if it was not rotating, by just adding a slight modification: you add an artificial “pseudo force”, also called an “inertial force” that points toward the outside, in our case the “centrifugal force”. It is often called an “inertial force” because it arises from the fact that your frame of reference (the V60 in this case) is rotating (in technical terms, it is “not inertial”). A “pseudo force” is by no means a false thing or an invalid concept, as long as you understand where it arises from and use it carefully — in fact, one can even see gravity as a pseudo force (Einstein realized that), yet it is very useful in everyday situations to view gravity as just a normal force.

    ** The mass of a coffee particle is proportional to its volume, which is itself proportional to the cube of its size. The water friction that the particle experiences is proportional to its surface, or to the square of its size. As a consequence, a particle three times larger will be nine times more massive and will feel nine times more centrifugal force, but only six times more water friction. If you combine the two effects, it will therefore be pushed outwards 9 - 6 = 3 times more.



    Melbourne Masterclass, February 9 Jan 08, 2019
    Show notes


    I’m excited to visit Melbourne during MICE this February, because:

    • It’s a blast to explore Melbourne’s food and coffee scene.

    • I’m still hoping some Australian family will adopt me and save me from Trump

    • Veneziano Coffee Roasters is hosting my Masterclass on February 9 at their gorgeous headquarters and roastery.

    If you’re in Melbourne during MICE, bring your most pressing questions about roasting and prepare to be challenged by some radical new ideas about controlling roast curves.


    Please click HERE for details and tickets.

    View fullsize Screen Shot 2019-01-07 at 8.58.51 PM.png
    View fullsize Screen Shot 2019-01-07 at 9.00.11 PM.png
    View fullsize Screen Shot 2019-01-07 at 8.59.20 PM.png


    Also, please visit Decent Espresso at MICE. We will be demonstrating both espresso and filter brewing on the DE1+. You won’t want to miss it.


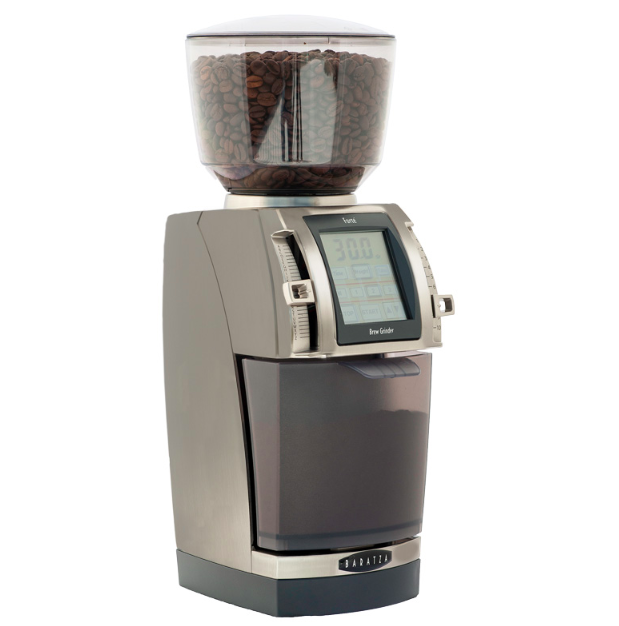
    BARATZA FORTE VS EK43: WHICH IS BETTER? Jan 06, 2019
    Show notes
    Screen Shot 2019-01-05 at 6.37.18 PM.png

    Disclaimer: While I don’t take requests for equipment recommendations on social media, occasionally I like to share my experiences with various coffee equipment. I do not have a financial relationship with Baratza or Mahlkonig, but Baratza was once kind enough to upgrade a grinder for me because the first model I bought wasn’t quite right for my needs (I bought a Sette, which is designed for espresso, but I wanted a grinder that would be equally good for espresso and filter brewing.)

    *****

    For the past few months I’ve been using a Baratza Forté at home. I chose the Forté because I wanted a grinder that would do a good job grinding for both drip coffee and espresso. In addition, I needed a grinder capable of producing extremely fine grinds to pull “blooming espresso” shots on the DE1PRO. (A blooming espresso shot involves a 30-second pause after preinfusion, and requires an extremely fine grind.) Neither an EK43 nor most professional or consumer grinders can grind fine enough to pull a good blooming espresso shot. Perhaps an EK43 with perfectly aligned burrs could do it, but such an EK43 is virtually a unicorn.)

    I had expected the Forté to do an adequate job, and to eventually want to replace it with a professional grinder, but I dreaded putting a large machine on my small kitchen counter. Much to my surprise, the Forté has not only performed better than any pro grinder I have ever owned, but I have been making the best v60’s of my life using the DE1PRO + Forté. (More on the DE1PRO as the world’s best drip brewer in a future post.)

    For reference, I’ve owned well over forty professional grinders and I was the first person in specialty to use an EK43 and recognize its ability to achieve exceptionally high extractions. (Note: Mahlkonig did not design the EK43 for coffee and the machine’s success was a lucky accident.) I used to be fond of the EK43 but now avoid it whenever possible.

    While the first EK43 I owned happened to produce impressive results, I’ve since used about one hundred EK’s and I’ve realized that I was lucky: that first machine happened to have been well aligned. Only about 10% of the Ek43’s I’ve used since then have had such good alignment. Poorly aligned Ek43’s are the norm, a problem Mahlkonig has chosen not to resolve, and a problem that has caused their quality-oriented users endless grief and wasted time, as users have had to personally realign the burrs both out of the box and upon each burr change, a frustrating process. There is no excuse for selling such an expensive grinder that usually underperforms right out of the box. Nor should customers have to spend so much precious time bringing the grinder’s performance up to a reasonable standard.

    Because of the Ek43’s alignment issue, I desperately wanted to avoid overpaying for a machine that would give me fits. I’m pleased to report that the Forté extracts higher than any EK43 I have ever used, makes tastier coffee than any EK43 I have ever used, and can grind much finer than most EK43’s.

    The Forté also has a few clever features such as a built-in scale for accurate grinding by weight, an anti-static receptacle (EK43’s produce so much static that their exit chutes look like chia pets), and the option to grind by time or by weight, with multiple programmable presets for each. I can’t say whether most Fortés are well-aligned straight from the factory. I can only report on my experience.

    Sure, I probably wouldn’t grind 100 lbs/day in a Forté in a busy café, but if you’re looking for a great home grinder, just know you don’t have to buy a commercial machine or convince your spouse that it’s reasonable to have an enormous, $3000 grinder on the kitchen counter.

    Thanks for reading.

    NB: Please do not ask for equipment recommendations in the comments section. I don’t claim to know much about Baratza’s product line, competitors’ offerings, etc. Also, I have the Forté AP but also have both burr sets and both receptacle styles (portafilter holder and plastic bin). Sorry for the confusion about those details.


    Online All-levels Roasting Class, January 19 Jan 06, 2019
    Show notes

    students in Montreal class.jpeg

    I’m pleased to announce that I will offer an online roasting course this January 19th. With the help of my friend Lee Safar of Map It Forward and Elixir Specialty Coffee, we will broadcast the class through a private Facebook group. All ticket holders will have access to the class video and discussion forum for one month after the class airs.

    Please join us online, or if you’re in Southern California, we’d love to see you in person. Live seating will be limited, so claim your seat ASAP. The class will be held at Steady State Roasting Co in Carlsbad, CA at 2pm.

    Online tickets are $125 USD, live tickets will cost $175. During the class we will cup samples from the upcoming Roast Defect Kit by Regalia Company. The RDK’s coffee will be the Jeremias Lasso Gesha from Colombia. If you buy a virtual ticket and would like to receive the Roast Defect Kit in the mail to cup along with us at home, the kit will cost an additional $50 USD (making online and live tickets the same price.) Please click HERE to order the RDK. (Note: we are terribly sorry but cannot ship the RDK to South Africa, China, Russia, Greece, or Brazil.)

    All ticket holders, live and virtual, will have access to the class video for one month through Facebook. Please note that if you live outside of the US and purchase the Roast Defect Kit, it will take approximately two weeks to arrive. I guarantee you will receive the RDK before your online class access expires (given that you will have access to the class for one month, there is no particular benefit to cupping the RDK on the day of the live broadcast.).

    **ONLINE CLASS ACCESS WILL BE FROM JANUARY 19 -- FEBRUARY 18, 2019**

    All ticket holders will also have access to a discussion forum on the private Facebook group for one month. I will field questions every day on the forum. The forum will provide a safe, friendly space for a high-level discussion about roasting, something difficult to find anywhere else. Students of past online courses have found the forum helpful for solidifying the class lessons, have enjoyed the community feeling, and many have shared their roast-curve progress on the forum.

    The course will be appropriate for roasters of all levels. Although I am calling it an “all levels” class, this course will touch on methods more advanced than anything in the level-three SCA roasting course (those classes are basic) , and I guarantee your satisfaction.

    The class will include:

    • Three hours of lecture and Q&A

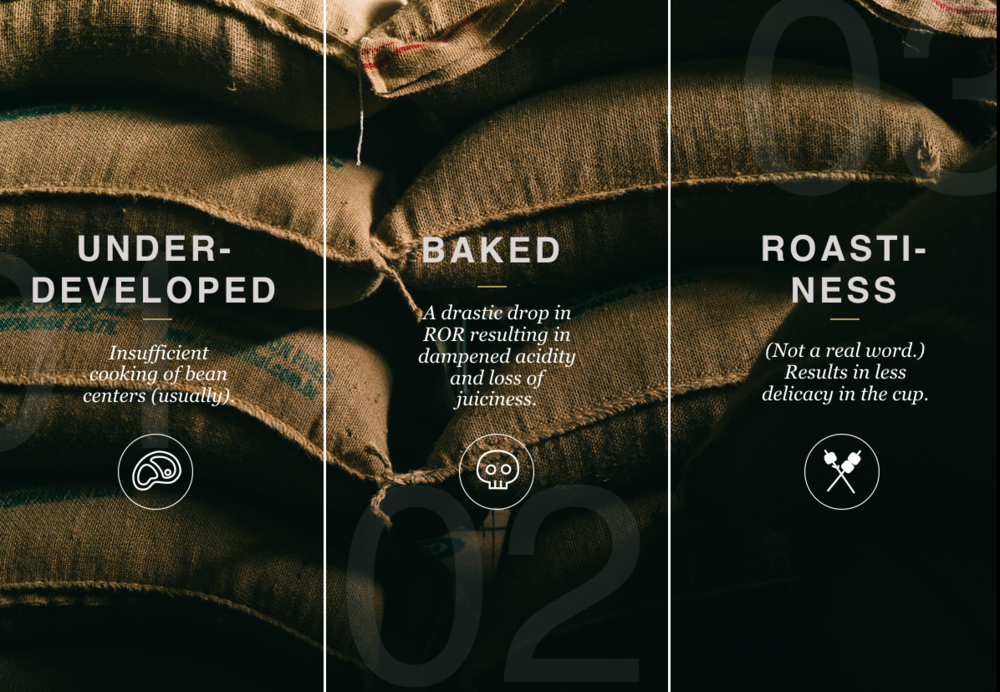
    • Cupping and curve analysis of the "Roast Defect Kit" featuring good, baked, and underdeveloped roasts.

    • Methods to manage ROR curves

    • Advanced methods to prevent ROR crashes and flicks

    • How to modify roasting machines for better performance.

    • Pro tips to get the most out of Cropster and other roasting software.

    • How to adapt various strategies to different types of machines.

    Click HERE for more information and to purchase tickets.

    Screen Shot 2019-01-05 at 4.03.24 PM.png
    Screen Shot 2019-01-05 at 3.46.11 PM.png
    Screen Shot 2019-01-05 at 3.47.12 PM.png
    Screen Shot 2019-01-05 at 3.46.31 PM.png
    Screen Shot 2019-01-05 at 3.50.48 PM.png


    Previous 1 3 4 5 6 7 10 Next

    Related Podcasts

    Making Sense with Sam Harris

    1

    Making Sense with Sam Harris Education
    Grammar Girl

    2

    Grammar Girl Education
    Good Life Project

    3

    Good Life Project Education
    Explain It to Me

    4

    Explain It to Me Education
    Team Never Quit

    5

    Team Never Quit Comedy
    Optimal Living Daily – Personal Development and Self-Improvement

    6

    Optimal Living Daily – Personal Development and Self-Improvement Alternative Health
    footer-logo

    Contact Us

    Toll Free: 844-670-7747

    Links

    • Home
    • Top Charts
    • Networks
    • Apps
    • Independents Podcasts
    • Podcast Advertising
    • Podcast News
    • Contact Us
    • About Us
    • Analytics & Insights

    Stay Connected

      Privacy, Terms of Use & Our Code of Ethics Protecting Content Creators Copyrights