What are the best dose and brewing ratio?
Feb 05, 2020
Show notes
How should you determine the optimal dose and brewing ratio for espresso or filter? Ongoing conversations I’ve been having with Jonathan Gagné and the recently published piece of espresso research by Chris Hendon et al, have been keeping this issue top of mind. I hope this post will provide readers with food for thought when making brewing decisions.
Rather than always relying on standard, popular ratios (eg 2:1 for espresso, 17:1 for filter), I recommend baristas consider a few factors when deciding on a ratio for a brewing method.
Desired TDS and Extraction Yield: each particular combination of EY and TDS can only be achieved by a unique brewing ratio. If for some reason you desire a specific TDS and EY combination, such as 1.4% TDS and 22% EY, there is only one ratio that can produce that pair of numbers. This also means that you may want to use different brewing ratios with different grinders. I recently brewed the same coffee as a v60 on my DE1 using two different grinders; one grinder achieved 24.5% EY/ 1.6 TDS. The other grinder could achieve only 21% EY/ 1.4 TDS. If my goal is to always have a TDS of 1.4 at the highest possible EY, I would consider using a higher brewing ratio with the first grinder.
Channeling: In percolation methods, it’s important to use a ratio that won’t lead to noticeable channeling or astringency. In espresso brewing, better puck prep will allow a barista to use a higher ratio (say, 3:1 as opposed to 2:1) without channeling. If you have poor puck prep, or if your grinder produces a lot of clumps, you may want to consider decreasing your brewing ratio to avoid astringency due to channels. In drip brewing, the more evenly you spray or pour the water over the coffee bed, the less channeling will occur. The more evenly the water extracts from the coffee bed, the higher the ratio (within reason) you can use without channeling.
Bed Depth: Whether pulling an espresso, brewing in a v60 or using a Fetco, each basket you use has an optimal range of bed depths. Batch brew bed depth should typically be 3cm—5cm. A device such as a v60 generally brews best in a range of 15g—22g of coffee (5cm—6 cm.) Coffees of extremely high or low density may require small adjustments in dose to maximize extraction. Note that many cafes that serve two-liter batch brews use baskets designed for larger brews. If you brew two-liter batches, the smallest-diameter baskets available for your batch brewer may help to increase the bed depth of your doses into the recommended range.
Flavor defects If you’re brewing a defective or poorly roasted coffee, you may improve flavor and mask some of flavor defects by lowering your ratio and extraction level. Intentionally underextracting charred, baked, or underdeveloped coffee can sometimes make it more palatable.
Beverage Sizes When planning a dose and ratio for espresso, it’s important to consider the sizes of your milk drinks, and how much total dissolved solids your shots will contain. For example, a 15g dose at 22% extraction would provide 3.3g of dissolved solids, while a 22g dose at a more modest 22% would provide 4.84g solids. While the 15g dose may be appropriate for a cappuccino or a cortado, its 3.3g of dissolved solids would nearly disappear in a 12oz latte. The 22g shot may be just right (for some) in the latte. Some cafes choose to use larger (20—22g) doses and to “split” the shots so they can use a single shot for straight espresso and very small milk drinks and two shots for larger milk drinks.
Do you have some thoughts on other factors to consider when determining a dose and brewing ratio? Please share your thoughts in the comments section. Thanks for reading.
Australian and American coffee bars: Their differences, and what they can learn from each other
Dec 22, 2019
Show notes
There are two significant differences in how third-wave baristas serve coffee in the US and Australia. I believe if baristas in each country adopt the other’s practices, it would improve labor efficiency and speed of service in both countries.
Batch brew makes up perhaps 40% of coffee orders in the US, but less than 5% in Australia.
Most Australian baristas “split shots,” while few Americans do.
I believe Australian and American cafes could benefit from adopting some of each other’s practices.
Batch Brew
The obvious benefit of batch brewing is it requires much less time and labor to serve. Given the high cost of labor in Australia, many cafe owners have expressed a desire for customers to embrace batch brew. Unfortunately, customer acceptance has been slower than many in the Australian coffee industry would like. While I’m not an expert on the Australian market, I’d like to make a few suggestions to help customers warm to batch brew:
Do it well. Unfortunately, the popular Aussie choice to use a Moccamaster in a cafe is not good enough. Moccamasters do a poor job of achieving even extractions, and their brewer/carafe design causes excessive heat loss during brewing. That heat loss, compounded by suboptimal brewing-water temperature, greatly accelerates the aging rate of the brewed coffee. (If you must use a Moccamaster, please use the commercial version with the round spray head and find a way to prevent heat loss from the carafe during brewing.)
Don’t serve old coffee. Most Australian third-wave cafes that serve batch brew hold the brewed coffee too long (as do most Americans). Serving two-hour old batch brew is not going to win converts. I feel for Aussie cafes here: batch-brew machines are generally designed to brew at least two liters at a time, but the cafes don’t serve enough batch brew to brew that much coffee without having to pour most of it down the drain. (The good news is I believe in the next year there will be at least two new batch brewers designed to produce excellent batches smaller than two liters.)
Talk it up. Explain to customers that batch brews offer great extraction quality. Give them free samples while they wait in line, especially to those who order long blacks and americanos. Offer an interesting coffee exclusively on batch brew. Hold events featuring your best coffees on batch brew. Familiarity is the key to acceptance.
Splitting Shots
Italian espresso developed around small doses of 7-ish grams and beverages no larger than 150ml (5 ounces). In the 90s many specialty-coffee markets adopted larger drinks sizes, which require significantly larger doses. For example, if you’re a Starbucks barista serving 20oz (600ml) lattes, it would be reasonable to use doses of 20g or more. (Note: I do not know what dose size Starbucks uses.)
Australians have never warmed to the massive beverage sizes common in North America. Aussie cafes generally serve Italian-sized beverages with the occasional 250—350 ml (8—12oz) caffe latte on the menu. Serving smaller-sized drinks has allowed many Australian coffee bars to split shots, or pull two shots from one portafilter. In a country where few customers order batch brew and almost every coffee is espresso-based, splitting shots is critical to enhance efficiency and control labor costs. Of course, a few third-wave American cafes split shots, and a few Australians don’t, but they are exceptions to the rule.
Specialty shops in the US used to serve a variety of larger beverages, using massive espresso doses. However, as US third-wave shops have gradually adopted the smaller sizes common in Australia, American baristas now have a chance to improve efficiency by splitting shots, and, I believe, improve many beverages. I hope some US third-wave shops will consider splitting shots; as beverages have shrunk and extractions have increased, split shots have become more appropriate than they used to be. Half of a 20-gram dose is plenty for a straight shot of espresso, a 5-oz (150ml) cappuccino, a macchiato, and most hipster-sized drinks (cortados and gibraltars). The full 20g dose is plenty for a 12-oz latte, if a cafe chooses to serve one beverage that large.
The Upshot
While this post isn’t revelatory to anyone who has ordered coffee around Australian and the US, it does bring up some potential ways each country can benefit from the other’s practices. The part of the American market that offers smaller beverages is ready to split shots, which will cut coffee costs and improve labor efficiency and speed of service. Australian baristas have a chance to introduce their customers to batch brew at its best, which would greatly cut labor costs if widely adopted. But winning customers over to batch brew may require best practices and greater familiarity: Brew small batches in quality brewers. Brew into enclosed, appropriately sized thermal carafes with “brew-through” lids to conserve heat. Never brew more than one coffee at a time or two liters per batch. Ditch brewed coffee before it tastes sour and bitter. Feature batch brew at tasting events and demonstrations. Gently familiarize customers with batch brew.
ONLINE ALL-LEVELS ROASTING CLASS + FORUM
Nov 23, 2019
Show notes
I’m pleased to announce I will offer an online roasting course on January 4th, 2020. The class will be broadcast through a private Facebook group. All ticket holders will have access to the class video and discussion forum for one month after the class airs. Many students of previous online classes have said the month-long discussion forum improved their roasting more than any other class or resource.
Please note that it is not necessary to view the class when it airs live.
All ticket holders will have access to the class and forum for one month. During that month you can view the class as many times as you would like.
Please join us online, or if you’re in Southern California, we’d love to see you in person. Live seating will be limited, so claim your seat ASAP. The class will be held at Common Room Roasters in Costa Mesa from 1pm—4pm.
All ticket holders, live and virtual, will have access to the class video for one month through Facebook.
**ONLINE CLASS ACCESS WILL BE FROM JANUARY 4 -- FEBRUARY 3, 2020**
All ticket holders will also have access to a discussion forum on the private Facebook group for one month. I will field questions and comment on students’ curves every day on the forum. The forum will provide a safe, friendly space for a high-level discussion about roasting, something difficult to find anywhere else. Students of past online courses have found the forum helpful for solidifying the class lessons, have enjoyed the community feeling, and many have shared their roast-curve progress on the forum.
The course will be appropriate for roasters of all levels. Although I am calling it an “all levels” class, this course will touch on methods more advanced than anything in the level-three SCA roasting course (even their “advanced” classes are basic), and I guarantee your satisfaction.
The class will include:
Three hours of lecture and Q&A
Cupping and curve analysis of the "Roast Defect Kit" featuring good, baked, and underdeveloped roasts.
Methods to manage ROR curves
Advanced methods to prevent ROR crashes and flicks
How to modify roasting machines for better performance.
Pro tips to get the most out of Cropster and other roasting software.
How to adapt various strategies to different types of machines.
Online tickets are $125 USD, live tickets are $175. During the class we will cup samples from the upcoming Roast Defect Kit. If you buy a virtual ticket and would like to receive the Roast Defect Kit in the mail to cup along with us at home, the kit will cost an additional $50 USD (making online and live tickets the same price.) The RDK is a great educational tool to share with your coworkers or staff. (Note: we are sorry but cannot ship the RDK to South Africa, China, Russia, Greece, or Brazil.)
TUNING YOUR ROASTING MACHINE
Nov 23, 2019
Show notes
The vast majority of machines I’ve worked on in my consulting career have needed what I call “tuning.” For example, just this past month, a client with a new Probat had far less airflow than he needed, due to his chimney configuration. Two experienced clients were operating with less than half of their respective machines’ optimal gas pressures. Several clients were operating machines with suboptimal drum RPMs or airflow levels. One client had both inadequate gas pressure and inadequate airflow, caused by an air leak at the loading funnel. Several roasters were using excessive software smoothing or slow thermocouples.
Proper gas pressure, drum RPM, airflow level, probe size and location, and software settings are all necessary before one can roast great coffee with impressive consistency. My experience implies that most roasters reading this post likely have tuning problems of which they are not aware. All of the issues below can be remedied quickly or cheaply. Fixing any of them will provide an excellent return on the invested time or money.
Gas Pressure
Every gas burner is designed to work safely and efficiently in some range of gas pressures. For example, your machine’s manufacturer may recommend a range of 3–5 kpa (12–20 inches of water column). The recommended range should be listed on a badge on the side of your roaster or on the manufacturer’s website. What almost no one tells roasters is that pressure at the top of the recommended range offers a lot more power and efficiency than pressure at the bottom of the range. Suboptimal gas pressure forces many roasters to roast smaller or slower batches. I’ve seen increases in gas pressure lead to 50% increases kg per hour of roasted coffee.
Drum RPM
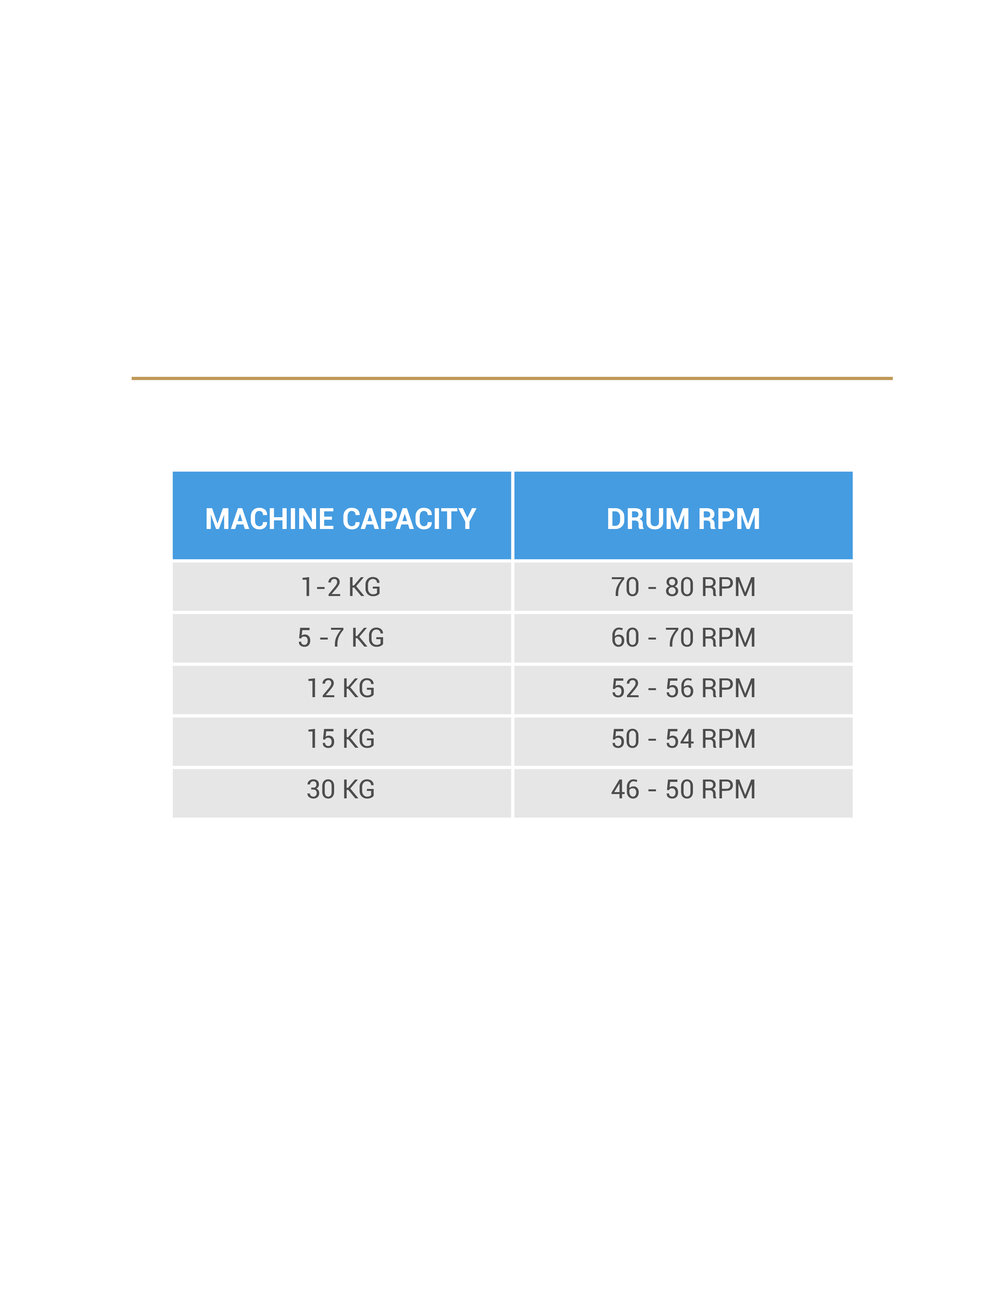
Even if your machine is brand new and the manufacturer installed it for you, check its drum RPM. A few major manufacturers deliver machines of a given model with widely varying RPMs (often a difference of 20 RPM machine to machine). Some whom I’ve asked to fix it for my client have claimed “it doesn’t matter” (one of those same manufacturers has told me that ROR crashes don’t matter, so be careful where you get your roasting advice!) Please count your drum RPM over the course of one minute. If your machine’s RPM are either too high or too low, it will cause more conductive heat damage and harsher coffee. Very low RPM can also contribute to ROR crashes.
My RPM recommendations are in the chart below. If you have a 12kg roaster with, say, 35 RPM (a frequent problem from one manufacturer), you will not be able to avoid ROR crashes and excessive conductive heat transfer. You may be satisfied with roasts from a low-RPM machine, but the coffee will be noticeably better when you adjust the RPM to the proper range.
Airflow
There are many causes of improper airflow levels in roasting: air leaks, such as loading hoppers that don’t seal well, fans spinning in the wrong direction (more common than you would think), chimneys that are too tall or have too many 90-degree angles, or simply roasters adjusting fans and dampers improperly. If your roasting-exhaust and cooling-air chimneys merge before passing through the roof it may cause back pressure in the roasting drum and shifts in roasting airflow depending on whether the cooling fan is on.
If your RORs decline with a relatively constant slope, your ET curve should stop rising somewhere just before or around the beginning of first crack (there are too many factors to be more specific here). If your ET peaks more than two minutes before first crack begins, you probably have too much airflow. If your ET curve rises all the way through the end of a roast, you are probably using too little airflow. And of course, if lots of smoke or chaff pours out of the drum when you drop a light or medium roast, the airflow is probably set too low.
Probes and Software
This probe is slow enough to make the data almost worthless.
Quality data collection and presentation are essential to quality, consistent roasting. If the turning points of your roasts are routinely later than 1:30, your probe is probably too slow. If your RORs look very noisy when viewed in the 15-second averaging interval in Cropster RI3 (or the 15s delta span in Artisan), you may have excessive noise in your system. (I covered this issue more thoroughly in my July 4, 2019 post.) If your RORs are smooth, rather than jagged, curves, your smoothing settings are too generous.
Please don’t assume that if you like the way your coffee tastes or your machine is new that it doesn’t need tuning. Few of the roasters I’ve worked with whose machines needed tuning knew there was a problem, but all were happier with their roasts after we tuned their machines.
Q&A COFFEE PODCAST, EPISODE 2: BREWING
Aug 01, 2019
Show notes
As of today’s podcast, I ‘ve begun separating the podcasts by theme: brewing, roasting, coffee & health, etc. My hope is to help listeners decide which episodes may interest them most. Today I fielded questions with Vassily about brewing, with a few coffee-business questions in the mix as well.
EPISODE TWO (also available on iTunes):
EPISODE QUESTIONS & TIMES
Mirko Thamm (1:10)
1: concerning the CO2 level of the beans. Is it better to degas after grinding (30-45min) or to grind and brew directly after grinding. Which way will get better (sweeter or more consistent) results?
2: Sieving the grind. I sieved my grind and if I used just a small range of particles (like 400-500 micrometer) the coffee was not as complex as the whole range. Should we sieve the course particles (bigger than 500microns), the fines or just a small range? Thanks
From Jonathan Mitchell (5:20)
#1 Business - I have a few potential office/law firm clients that want to become a wholesale partner but they are reluctant to keep a grinder on hand. They want me to pre-grind the coffee. I am already a little hesitant to have my coffee represented in this area but it feels like an untapped arena and a decent source of revenue. What are your thoughts?
#2 Any tips on partnering/raising money for future expansion? I am so scared of losing ownership, as I never want to compromise profit sharing with my employees, but I am also scared to dip into my personal savings for a new shop.
Benjamin Byrd , Due South Coffee Roasters (09:55)
I have a Breville precision brewer on the way and I was wondering if you had any tips on programming it for the best results, or if the batch brew rules blog was directly applicable to it. Thank you for your time and for all you do to save the industry from underdevelopment!
Ghazi Almoayed (12:30)
Hey Scott
I have 2 questions for you about espresso brewing:
1. What are you thoughts on lowering pressure to 5 or 6 bar? Is this beneficial for better extractions + consistency regardless of roast level
2. For lighter roasts I have heard about extracting 1:3 . So 18g in with 54g out. Is this only possible with an EK grinder or can a Baratza Forte still pull this off? What sort of timings should one aim for when attempting those ratios ?
Nuno Cristiano de Sousa (19:48)
Hi Scott!
First of all, thanks for taking the time to answer questions of the community - How do you scale up your filter recipes?
I can make my extractions pretty aromatic and balanced with a 2 pours recipe, comandante 25clicks, pouring at an average 2.5ml/sec (measured in acaia). If the flow rate is higher, the total time is lower, and that messes up the extraction.
However when I tried to scale up to 500ml/17oz, i changed the grind to 28 clicks, kept flow rate, and the average extraction time raised to 3:30.
Q&A COFFEE PODCAST WITH SCOTT RAO
Jul 14, 2019
Show notes
Photo credit: Norman Mazel (@normanito)
I get an endless stream of unsolicited coffee questions in my inbox. In the past I’ve tried to reply to every such email and instagram message, but it became a bit too time consuming. I decided recently to try to answer some of these questions in podcast format. The podcast will air monthly(ish) and contain a mix of beginner and advanced questions about both brewing and roasting. Most podcasts will include a guest with whom I’ll discuss the questions and answers. I hope to share most episodes with coffee-pro friends who will be able to answer some of the questions outside of my wheelhouse, such as those about green processing.
This first episode is all about feedback. The podcast is 29 minutes. Is that too long? Too short? It’s a mix of brewing and roasting questions.. Should we have separated the roasting and brewing segments for those who are interested in only one or the other? I’m new at this, so please let me know what I can do better. Thanks
The podcast, Episode one (also available on iTunes):
Below is a link discussed in the podcast, the questions, and the time at which each question was addressed, in case you would like to skip around.
As far back as I can remember, I’ve been told to very quickly wiggle and rinse the portafilter under a running grouphead before drying and filling the basket. A friend recently told me that not only is this unnecessary, but actually flat out wrong.
I’ve been searching online for sources and test results to prove one method or the other, but to little result. Does simply wiping remove enough of the fines and coffee oils that might have baked into a portafilter between shots? If I rinse and flush after I pull a shot, is it unnecessary to do so before? Will the water from the grouphead cool quickly enough to cool the portafilter? If only wiping is the more reliable method, how many shots can you pull with wiping in between before rinsing is completely necessary
2. From GIORGOS PAPANTONIOU (6:00)
During a pourover, which is a preferred slurry temperature in your opinion?
You see, I recently bought a water boiler in order to fill my kettle for handbrews and to my surprise the water temperature was really low, because of the heat loss during transfer, and led to really low slurry temperatures as well. I didn't see that coming since so many coffee shops around the world are working that way. Filling the pourover kettle from a hot water source. It was really hard for me to accept that so many people are brewing coffee with hardly 90 degrees Celsius in their water kettle. And I think it's important to mention the slurry temperature and not the starting water temperature because depending on the brewing method, the first one may vary significantly.
3. From Meshal Alshehri (10:00)
I would like to know more about your methodology of developing a batch brew coffee recipe using Fetco or any other brand.
Trial and Error is costly especially when changing coffee types.
4. From Tarik (13:45)
Hi Scott, how do we measure tds for espresso in the refractometer without vst syringe filters? Thanks
5.FromGhazi Almoayed (18:58)
When building your own water for espresso , is the general rule if the water does not work on a filter brew that means it would also not work on espresso ? Can this be used as a guide to choosing a water for a given coffee ?
I have not had good results with the Barista Hustle recipe water on Kenyans , has this been something you noticed ? Might be to do with the fact that Kenyans need more buffer ?
6. From Jason Richter (23:11)
Hey Scott, here are two questions I have right now.
1. How do I make sure I'm choosing the right charge temp for an individual bean?
2. How does ambient air temperature affect the flavors you get in the cup.
Thanks to everyone who submitted questions, and thanks to everyone who listens and leaves feedback. I look forward to hearing from you.
Idle noise, ROR intervals, and analyzing roast curves
Jul 04, 2019
Show notes
Idle noise, ROR intervals, and analyzing roast curves
Recently, Marko Luther of Artisan published a fascinating blog post “On Idle Noise.” Marko’s post discussed how to diagnose and fix “idle noise,” or background noise present in one’s data collection and processing when using Artisan. Marko offered a simple test of noise by data logging bean-probe readings with a roasting machine off and with its motor on (with no beans in the machine). I’m pleased to have inspired part of Marko’s post and to also recognize him here for his brilliant work. Please read the post and do his idle-noise test on your machine .
Marko’s post is a little complicated, so I’d like to show a few simple curves illustrating various levels of bean-data noise and software smoothing of the noise. It is a little easier to see excessive noise in Artisan than in Cropster, so I will focus on Artisan curves here.
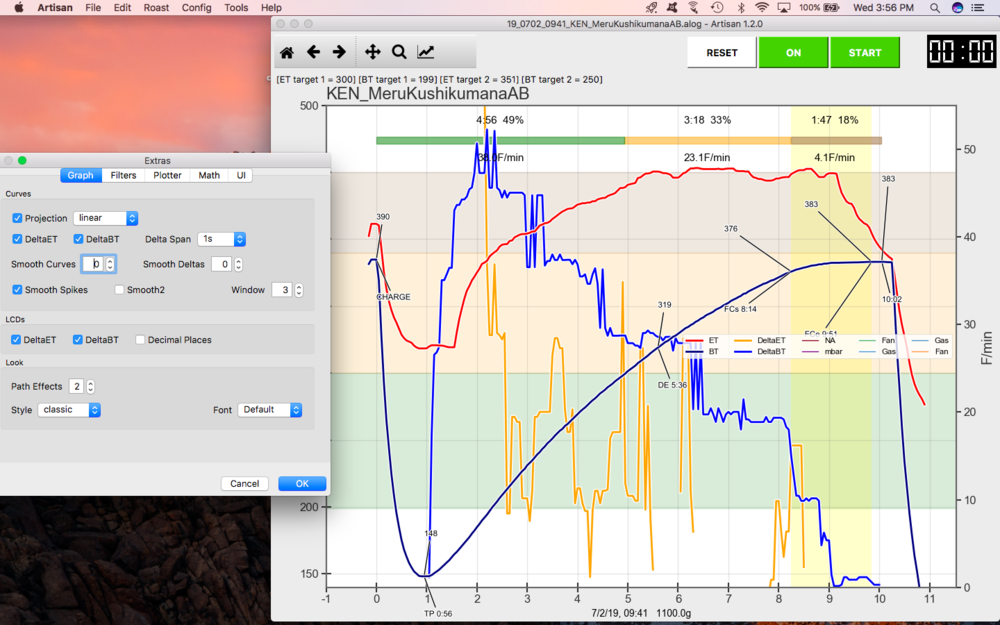
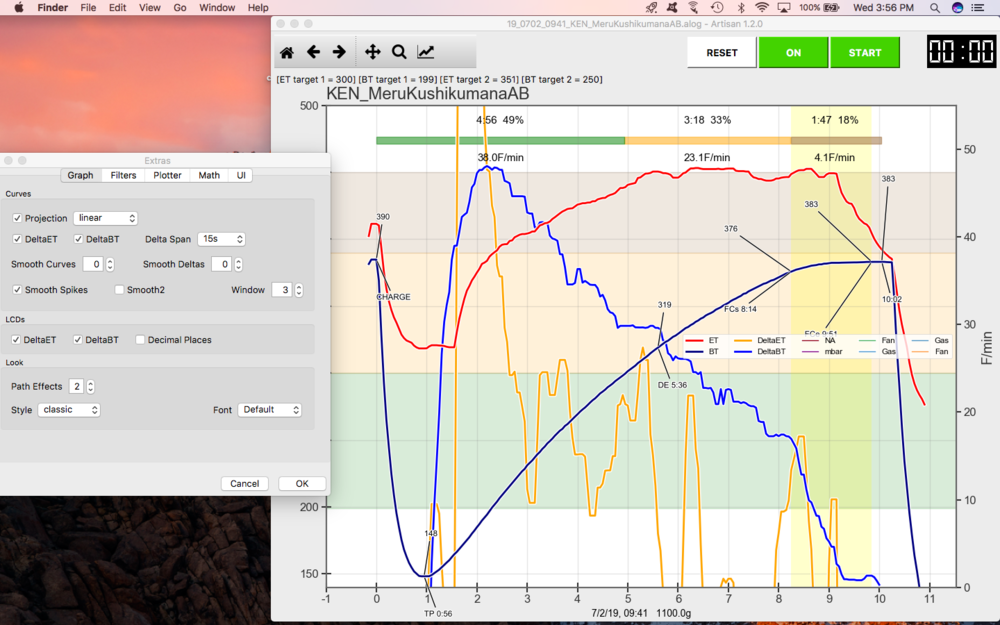
A few definitions before we begin: in each of the next few curves, there is a box on the left containing various settings. All of these curves had the following settings:
Sampling interval:1. Sampling interval is the amount of time between each point of data collection from the probe. For instance, a sampling interval of three seconds means that the software asks for data from the probe every third second. Here I have set the sampling interval to one second; Marko recommends three seconds. I used 1s to match the default sampling interval of Cropster, in order to help Cropster users better relate to these curves .
Smooth Curves/ Smooth Deltas: 0 I have set these to 0 in order to not artificially smooth the data. (Other than via the delta span.)
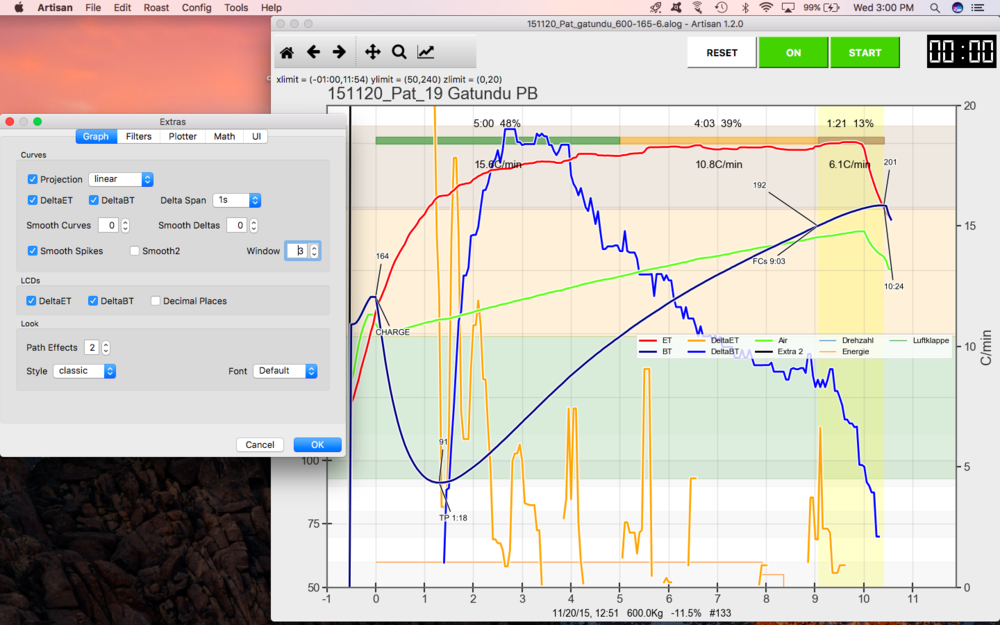
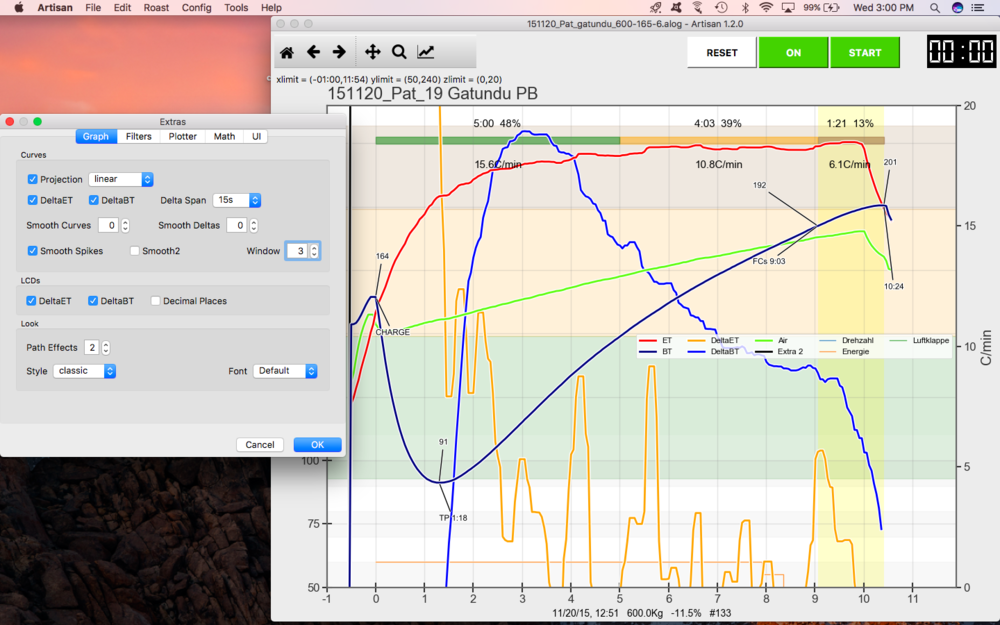
Delta Span: 1s or 15s Each curve is shown with the shortest (1s) and longest (15s) delta spans Artisan offers. The delta span is the time interval over which the ROR is calculated. In other words, any given ROR reading is the average of , respectively, the last one second or fifteen seconds of data. Longer delta spans make curves look smoother. Delta span is what Cropster calls ROR Interval.
Here is an ROR curve derived from very noisy data, with the delta span set to 1s and 15s. Note the intense vertical spikes in the 1s delta-span view; they are telltale signs of data noise.
Delta span of 1s: Note the spikes in the blue (ROR) curve. This is very noisy data.
Side note: you will rarely, if ever, see noise like this in Cropster. It’s not because the noise isn’t there, but because Cropster uses a different smoothing algorithm from Aritsan’s. Each system has its pros and cons.
Using 15s delta span artificially smooths the data from that same curve. This makes it easier to analyze (and helps roasters sleep better at night.)
The curves below are from a system with relatively little idle noise, shown in the 1s and 15s delta-span views again:
Delta span of 1s: Noisy and spiky but far less so than the Delta span of 1s: Noisy and spiky but far less so than the previous example with the 1s delta span.
Low-noise, high-quality data at 15s delta span
The Bottom Line
There is no universal set of optimal settings. You must customize the settings for your probe’s responsiveness, the level of background noise, and the software you use. Of course, you should attempt to minimize background noise and use the lowest practical delta span or ROR interval.
NB: Even if you don’t see obvious spikes in your ROR data, you may still have a serious problem with idle noise.
How to optimize software settings to analyze past curves
There are two types of data analysis I do on a roast curve: looking for a trend and looking for an event. By trend, I mean the shape, or changes in shape, of an ROR curve over a period of time. An event refers to a point in time, such as when an ROR crash or flick began. When looking at trends, i’ll make use of a higher ROR interval and when looking at events, I’ll typically use a lower ROR interval. .
Events
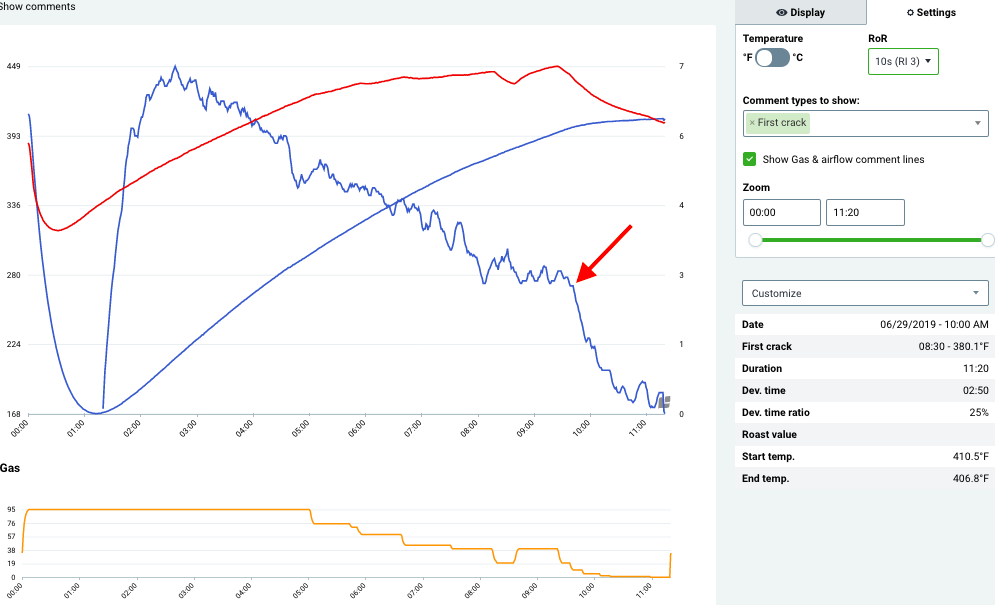
Let’s look at an event —an ROR crash— in Cropster. Cropster and Artisan calculate ROR curves differently, and at this time Crospter’s ROR-interval options range from 10s to 60s; quite a bit higher than those of Artisan. In this case, we’ll use a 10s ROR (the lowest in Cropster) to determine as precisely as we can when an ROR crash occurred.
The red arrow indicates the beginning of an ROR crash. Viewing such an event in the 10s ROR view can help a roaster more precisely determine how to time gas settings next time to prevent the crash.
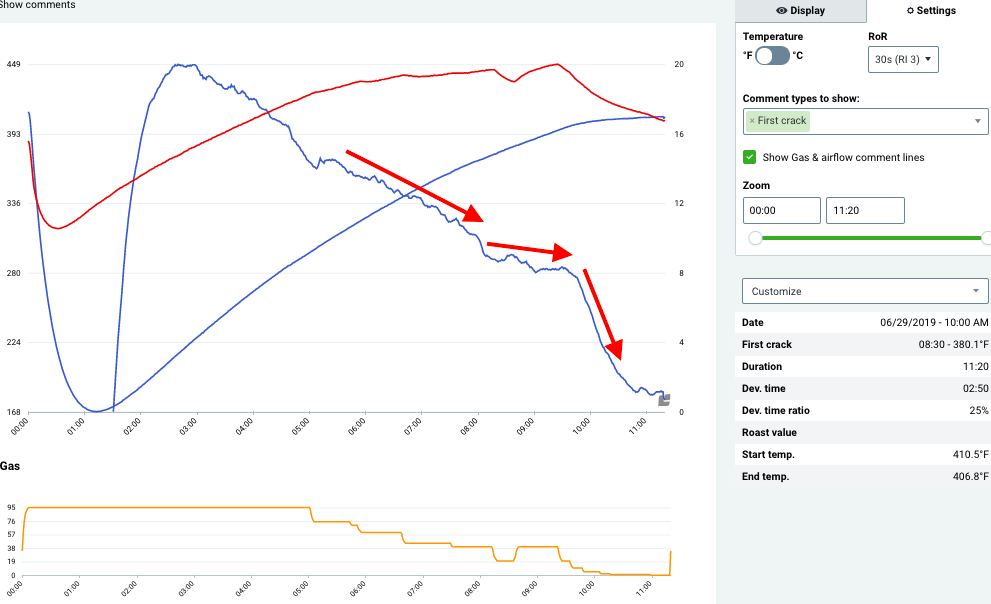
Here’s an example of looking at a trend in Cropster, looking at the same curve with a 30s ROR interval:
The arrows approximate the ROR’s slope at various parts of the roast. It’s easier to discern a trend such as an ROR slope in the 30s ROR view than in a shorter interval such as the 10s view.
Another event you may look for in a completed curve is the beginning of first crack. Here is an example of using a 10s ROR interval in Cropster to decide the precise beginning of first crack
Note that the roaster chose to mark first crack after the ETROR trough. If the trough seems to have been triggered by a decrease in gas, it is sometimes sensible to mark first crack after the trough. Details on this some other time.
Was it the green? The roast? The extraction?
May 18, 2019
Show notes
Was it the green? The roast? The extraction?
Photo credits: @andrewrizer
Often the most difficult part of improving a coffee is diagnosing how various inputs created a cup’s qualities. For every coffee I taste, I think about how the five main inputs (green, roast, grind, water, and extraction) contributed to the cup, and especially how any of them may have inhibited cup quality. My understanding of the role of each of those inputs is always evolving, and there is tremendous overlap among their effects.
Rather than simply being pleased with one’s own coffee, I wish every roaster and barista would default to thinking two thoughts immediately after tasting one’s own coffee in a work setting:
“How could we have made that better?”
“Which inputs (green, roast, grind, water, and extraction) should we change to improve the result?”
The effects of some inputs are sometimes easy to isolate and identify, and sometimes very difficult. Here are a few examples of ways to diagnose cause and effect in the cup.
Smokiness
Smokiness is always a result of roasting. Smokiness is distinct from “roast” or “char.” Roasts taste smoky due to insufficient airflow or excessively dark roasting (roast a batch dark enough for long enough, even adequate airflow won’t prevent some smokiness from creeping into the cup.) Some “clean” or “smokeless” roasting machines yield smoky coffee due to the beans dwelling in too much smoke for too long. Some such machines are better than others, but we can save that discussion for another time. Char and carbonized flavors are also always caused by roasting.
Acridity
A related flavor, “acrid” is usually created by roasting, but sometimes caused by excessively-hot brewing water. To taste acridity, set an espresso machine hot enough to deliver sputtering, hissing water. Ensure the portafilter is as hot as possible before brewing. Try pulling long (3:1) shots at that extreme temperature setting and look for a harsh, bitter, slightly stomach-turning flavor.
Flavor defects due to water chemistry
Certain “chemical” or “mineral” flavors are always due to water problems. Perhaps the most common is the classic defect “dish soap residue”. Sussing out the causes of these flavor taints is easy: you may use a quality bottled water as a control, and if dish-soap residue is a concern, taste the coffee in a paper cup instead of ceramic.
Vegetal flavors
Vegetal flavors usually come from roast underdevelopment, sometimes from low-quality green (especially wet-hulled coffees), and occasionally from poor water chemistry. For example, distilled water often produces vegetal flavors that don’t show up in the cup when using water with greater mineral content. To test whether vegetal flavors are inherent in a bag of green or due to roast underdevelopment, simply do a darker sample roast of the coffee and see if the vegetal flavors are still present.
Astringency
Astringency may be due to unripe cherry, an underdeveloped roast, or channeling. To find the source of astringency, I would do the following, in order:
To rule out channeling, cup the coffee— don’t taste it as a percolation brew. Immersion brews don’t channel.
If the coffee is still astringent, test roast development by sample roasting a darker batch of the coffee. Then cup it again.
If the coffee is still astringent, the likely culprit is underripe cherry.
Extremely low-TDS water can magnify astringency, but I’m honestly not sure if water can create astringency by itself.
Removing grind and water quality as factors
At a cafe or the QC lab of a roastery, if you always taste coffee by cupping (and thus avoid channeling) and have proof that your water quality and grind quality are excellent, then diagnosing the sources of cup qualities is easier, as you can focus merely on green quality and roast quality.
Side note: consider assuming your grind and water quality are suboptimal, and test them. When is the last time you blindly tasted coffee made using your water vs. various quality bottled waters or water recipes, such as the easy, excellent recipe favored by Barista Hustle? Did you invest a couple of hours to properly align your grinder when you last installed new burrs? And were those burrs installed in the past few months? Unless you can answer all of those questions favorably, please invest a few hours to test and improve your grind and water quality.
*
This post highlights a small sampling of ways the five inputs affect cup quality. There are countless such cause-and-effect relationships to consider the next time you make and taste a coffee. I hope this post offers a helpful starting point for diagnosing and improving your coffee.
Comments are welcome and encouraged.
Berlin Roasting Masterclass, June 8
Apr 28, 2019
Show notes
I’m pleased to announce I’ll be offering a roasting masterclass in Berlin on June 8, at the venerable Five Elephant roastery. This class will feature a few new, exciting elements, such as:
A comprehensive system to permanently banish ROR crashes, flicks, and underdevelopment.
A cupping of the upcoming Roast Defect Kit (if you can’t make it to Berlin, you can order the RDK through regalia.coffee to get on the list.)
Free slices of Five Elephant’s legendary cheesecake.
A second cupping of roast samples, both good and (intentionally) bad, of a few choice, pricey coffees. I may even roast a natural for this, but thankfully we have the cheesecake to cleanse the palate.
See you in Berlin, and please remember to stop by the Decent Espresso booth at WOC for an extraordinary tasting experience.
Why we care (or don’t care) about seasonality
Apr 28, 2019
Show notes
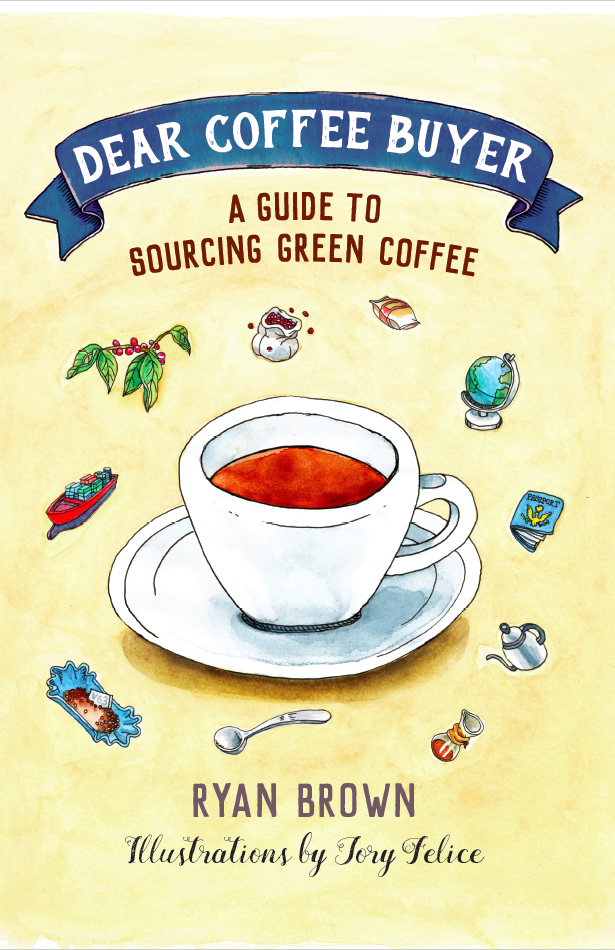
*A guest post by Ryan Brown, author of Dear Coffee Buyer*
I can’t help myself from occasional banter with baristas. Often this leads to playful arguments, and while I’d like to think that I usually win these arguments, I painfully remember a time I was wrong. In late fall, while visiting a cafe & roastery, I asked how they had come into possession of what was being marketed as a new crop Kenya.
The best Kenyan coffees typically begin harvesting in late November and arriving in February. Despite the esteem for the country’s quality, it may surprise you to learn that a huge majority of what you’ve ever tasted comes from a pretty small area surrounding Mt. Kenya, so there’s little fluctuation in this timing. It is entirely possible the coffee was from Kenya’s fly crop—its small, mid-season harvest that is rarely purchased by specialty buyers, as the quality is considered predictably lower than the main crop. But still, it was extremely unlikely that this was a new crop of Kenya being offered in early November. I insisted to the barista that it had to either be a fly crop selection or else a coffee from the previous year. A lengthy disagreement ensued with the barista, whom I would later learn was also the coffee buyer Whether the coffee was fly crop or old crop is beside the point. I was wrong to ask the question at all. (Granted, I wasn’t trying to make a point when I asked, it was merely curiosity.) As I note in Dear Coffee Buyer: A Guide to Sourcing Green Coffee: “I’ve generally been able to rely on coffees from Ethiopia and Kenya lasting a very long time after harvest.” But what about all of this talk of seasonality? Isn’t it important for me to buy the right coffees at the right time? I address these questions in DCB:
Seasonality in coffee is an attempt to apply standards to how fresh green can, or perhaps should, be. Most attempts at seasonality standards are based on duration of, or at least relation to, recurring harvest cycles. For example, some roasters may deem a coffee “seasonal” only if it is within six months of harvest.
This nomenclature is too arbitrary. Such rules don’t justify the presence on your menu of a coffee that’s only three months from harvest but has faded, lost its character, or, even worse, picked up papery, aged flavors. Likewise, the rules are cruel to a coffee that is twelve months old but still vibrant, clean, and free of any hint of past-crop flavor. In my early days as a coffee buyer, I attempted to create a schedule of origins and their corresponding seasonality calendar, but I realized that the best solution was to do away with any consideration of time, as it missed the point. We care about seasonality because we care about cup quality. Understanding the seasonal crop cycles will naturally inform your purchase decisions, but if you set strict rules for how long after harvest you should roast coffees, you’ll either be unfairly cruel to some, too lenient on others, or both. “A coffee should be considered seasonal so long as the cup is vibrant, shows structured acidity, and is free of any signs of age (paper, bagginess, astringency, etc). It doesn’t need to be any more complicated than that.”
Click on image below to learn more about Dear Coffee Buyer

 Our TOPPODCAST Picks
 Stay Connected