MacGyver is Alive and Well
Jun 11, 2022
Show notes
I’ve had access to an old Probat electric sample roaster recently at a friend’s roastery. The machine is a bit of a dinosaur, and needed some serious MacGyer-ing (if you don’t know MacGyver, look him up; you’re in for a treat.)
Hundreds or thousands of roasters and importers use a version of this machine (and similar dinosaurs) to roast samples. While I’ve had delicious coffee from these machines, I’ve always been suspicious of their consistency. Now that I have had my hands on one of these machines for a few days, I’m certain: it’s impossible to roast consistently on these machines with their standard design. That is obvious from both the data and cupping results.
Those using these machines in their green-buying process need to be concerned that they may often reject coffees due to unrecognized roast issues. If you’re using one of these machines and not noticing their wild inconsistency, I implore you to roast 10 batches of the same coffee on one of these machines, and to cup the coffees blindly. Unless you’re roasting the s**t out of your coffees, the differences between batches should be obvious.
These machines have a several design problems:
• The electric heating elements have high latency and lack precision control.
• The airflow cannot be controlled with precision.
• The small outlet for exhaust air from the drum gets clogged with chaff easily and often.
• The standard temperature probe is poorly positioned and very slow.
• The barrels affect each other’s performance
I’d like to discuss how we tackled these problems to modernize the roaster and have a fighting chance at quality, consistent roasts.
Key: Dark green circle: Analog temperature probe.
Purple: our MacGyver’d probe and clip
Blue: Wattage meter
Bright green: Airflow knob
Red: Power dial
The electric heating elements have very high latency and lack precision control
What this means is that when you increase or decrease the power setting, the heating elements heat or cool slowly. How slow is slow? Very slow. Here’s an example below. This is between batches, empty drum, raising the power from 250 watts to 600 watts (the maximum is 880w). Note that it took more than one minute for the BT to begin to rise!
The power settings are controlled with a simple dial, as seen in the photo above (red circle). That dial offers little precision, as we learned when we plugged the machine into a wattage meter.
The airflow cannot be controlled with precision.
The airflow control is a small knob (bright green circle, above) one pulls out (increase) or pushes in (decrease) to adjust the airflow. For reference, the difference between insufficient airflow and excessive airflow is less than 2cm on the knob. Even a 1mm adjustment in the knob has a significant effect on airflow.
The small outlet for exhaust air from the drum gets easily clogged with chaff.
On the back of the machine is a narrow grate, with a 2cm square hole, where the air gets sucked out of the roaster. Unless one shifts to high airflow late in a roast, chaff builds up and partially blocks the hole, decreasing the airflow. Unfortunately, moving the airflow knob during roasting is risky, given that there is no way to adjust it precisely or consistently.
Not only that, but those without proper data logging may not notice the profound effect of shifting airflow. Below we increased the airflow at approximately 1:50. When you see a shift in data like that, it’s difficult to know what is really happening. My goal with this machine is to avoid changing the airflow at all costs.
Our solution to the airflow problem was a combination of “set it and forget it” and measuring the airflow with an anemometer (blue circle), a device that measures wind speed (which is different from airflow; windspeed is m/s, airflow is m^3/s.) With a reasonably precise anemometer, we are able to reset the air level with consistency.
Measuring air speed
The standard temperature probe is poorly positioned and very slow.
The stock temperature probe is in the back of the drum, and meant to measure environmental temperature rather than bean temperature. The probe is very slow and feeds to a mostly-useless analog gauge that changes temperature at a snail’s pace. Let’s just say one should not roast by ET alone, and analog gauges and roasting without proper BT data are very 1920s. I’m pretty sure none of us want to drink coffee the way it was roasted in the 1920s. Our solution was to mount a clip on the front of the machine to hold and guide a 2mm BT probe in the optimal location.
The barrels affect each other’s performance
While this machine is a two-barrel roaster, the barrels share the same exhaust fan and duct and cannot be used simultaneously without affecting each other. If you desire precise, predictable results, this is effectively a single-barrel roaster.
The results
After our MacGyver’ing, the roasts are more consistent, though not up to modern standards. At least now the machine won’t ruin many samples. We haven’t addressed the high latency of the heating elements, so that will impair precision. It is still challenging to prevent the chaff from sometimes clogging the exhaust port, but we can live with that for the moment.
Late edit: We have attached digital manometer to the machine to have continual air-pressure readings, so we’ll know immediately if the exhaust duct is slowly clogging.
Thanks for reading
Thanks to Mark Benedetto for doing most of the hard work, and to Vajra Rich and Boxcar Coffee for the help and hospitality!
A WEEK IN THE LIFE OF A ROASTING CONSULTANT
May 22, 2022
Show notes
After a few weeks of hearing several online misconceptions about my work, I thought I’d take the opportunity to share what I do for clients on a weekly basis.
Being a roasting consultant is not about telling clients how their coffee should taste, telling them to end at a certain DTR, trying to influence them to roast lighter, etc.
Being an effective roast consultant is about giving clients the tools to consistently make their coffee taste they way they want it to.
When beginning work with new clients, I have them share information about their machine, installation, software, and current approach. There are almost always problems to fix related to machine tuning, warmup procedure, and between-batch protocol. It is necessary to solve those problems before attempting to optimize roast quality and consistency.
For example, in just the past week, I helped clients around the world with the following:
I helped client with a new Probat tune his burner, fan, and drum RPM, establish appropriate warmup and BBP, and troubleshoot some installation problems.
I helped a client learn how to find the optimal airflow level, between-batch protocol for his machine and batch size, how to log his warmups and BBPs in Cropster, and how to prevent massive flicks in his roasts.
I helped a client understand which noise in his temperature data is misleading, and which is relevant, as he was undermining his roasts by reacting to the misleading data.
I helped a client avoid spending money on a green loader he did not need.
I helped a client source a badly-needed digital manometer, manage a problem in his RORs, overhaul his BBP, and figure out how to manage problems caused by a merged chimney.
I helped a client improve his manual roasts so they are tastier and more consistent than his automated Loring roasts.
I helped a client tune his airflow and drum RPM to decrease conductive heat transfer and reduce roastiness in the cup.
I helped a client identify some problems in this green-buying system that were holding back his otherwise-excellent roasting.
All of that was in addition to working with dozens of clients on managing their roasts to be more consistent, and answering dozens of questions about roasting in my online roast-coaching forum.
Roasting isn’t just about cupping, or managing curves, or any other one thing. Anyone can roast a tasty batch here and there. Successful roasting is first about proper machine installation and tuning, second about having a system to ensure consistency, and finally about the day-to-day work of cupping and curve analysis and adjustment.
Boston masterclass announcement! Plus: Water chemistry, again
Mar 06, 2022
Show notes
Boston Masterclass
I’m pleased to announce my first in-person roasting masterclass in three years. The class will be held in Boston on April 8 from 8-11am during SCA Expo weekend.
The class will include:
Cupping and discussion of a new Roast Defect KIt
Tasting of a few exceptional coffees, impeccably roasted
A focus on roasting consistency, including designing and mastering one’s between-batch protocol— the cornerstone of a successful roasting system.
Discussions of numerous advanced topics you won’t find discussed anywhere else.
Those who have previously taken my online or in-person classes are eligible for a 50% discount. Please email me (scott@scottrao.com) for a discount code.
I’m inspired to discuss water chemistry yet again after having some recent disappointing coffee experiences due to cafe owners not using appropriate water-treatment systems.
There is a lot of information online about water for coffee. It can be confusing — almost every cafe owner I have spoken to about water has been confused in one or more ways. I’d like to discuss some common mistakes and offer a simple roadmap to ensuring you are using the appropriate, high-quality water for coffee.
Cafe owners and coffee enthusiasts often:
Focus solely on TDS when evaluating water for coffee.
Take advice from water-system vendors
Think Reverse Osmosis systems are always the answer.
Don’t bother getting their water tested properly by a lab.
Let’s talk about each of those issues.
Focus on TDS
TDS does not determine whether water is good for making coffee. In my consulting work and my seminars, I have often asked roasters and café owners to tell me about their water chemistry. 90% of the time, they quoted an estimate of their TDS, but had no other useful information to share. Unfortunately, TDS by itself is not much of a guide to the quality of your water for coffee brewing. The one minor exception is when TDS is so low that hardness and alkalinity are also necessarily too low. For example, if the tap water at a cafe in lower Manhattan has TDS of 25, the hardness and alkalinity are too low.
As I have written about on Instagram, this website, my books, and most recently in Standart Magazine issue 25, alkalinity, not TDS, is the single most important data point when considering water for coffee. If alkalinity is too low, coffee may be too sour or sharp, and if alkalinity is too high, coffee may be flat, chalky, or lifeless. Depending on your coffee and taste preferences, an alkalinity range of 20-50 ppm is reasonable for most. Of course, there are important factors beyond alkalinity, but if one wants to simplify the discussion of water chemistry, I recommend focusing on alkalinity first.
Taking advice from water-systems vendors
I have nothing against people who sell water-treatment systems. They often know a lot about water chemistry and treatment options. However, regardless of how nice and well-meaning they are, their job is to sell — and upsell — equipment. It defies common sense to get your purchasing advice from vendors. For example, a former client was planning a cafe in Manhattan, where the TDS was the aforementioned 25 ppm, and a vendor had talked him into getting a $3000 RO system. I explained to the client that he would be better off adding minerals to his water than removing them. He was confused at first, but also relieved to only have to buy a $500 carbon-filter system.
Reverse Osmosis systems are not always the answer
RO systems are often the answer, sometimes counterproductive (see above) , and always expensive. If one needs an RO system, one may want one with a bypass system, depending on the tap-water chemistry. RO removes approximately 90% of the minerals dissolved in water. If the tap-water alkalinity is, say, 100ppm, before RO treatment, it will be approximately 10ppm after RO. In such a situation, a bypass or blend-back system can increase alkalinity and hardness to desired levels by blending the RO water with carbon-filtered tap water.
As usual, there is no one-size-fits-all solution.
Test, don’t guess
A *appropriate* lab test of your tap water will cost approximately $100 — $150 and is essential for knowing with confidence what the best water-treatment system is for your needs. I say “appropriate” because most lab tests do not measure all of the important analytes. Please ensure your test measures ALL of these things:
TDS
General Hardness (bonus points if the test measures Ca+ and Mg+ separately)
Alkalinity
pH
Fluoride
Chloride
Ideally, along list of various metals
In my consulting work, I frequently recommend a $125 lab test that measures over 30 analytes precisely and leaves nothing to doubt. With the test results in hand, plus the Langelier Saturation Index formula, I help clients choose the appropriate water system with complete confidence the result will be great-tasting coffee without scale buildup in machinery.
Introducing CupWise
Feb 13, 2022
Show notes
For most of 2021, Ryan Brown and I offered Facsimile, a novel coffee subscription wherein each month we sent subscribers four coffees and Ryan and a coffee-expert friend cupped the coffees with subscribers via livestream. For many of us Facsimile filled a void created by not being able to cup with others due to the pandemic.
Shortly before we closed Facsimile, my friend Vladimir, a software developer, created an app to enhance the virtual tasting experience. I regret that Ryan and I didn’t have the chance to demonstrate Vladimir’s fantastic software for Facsimile subscribers. I told Vladimir I would like to help him introduce his software to roasters and coffee tasters everywhere.
What we were missing at Facsimile was interaction. The cupping videos were entertaining and educational, but opportunities for those cupping at home to interact with Ryan and friends was limited to a simple chat box.
With CupWise, Vladimir enhanced the chat feature and added a dynamic scoresheet. Tasters can enter their own scores and tasting notes in CupWise, and the software tallies the scores and creates word clouds from the tasting notes. The scoresheet is fully customizable, and roasting companies that host CupWise for their customers or for intra-company cupping can choose among the SCA Scoresheet, Cup of Excellence Scoresheet, or any custom format they wish. The CupWise host can hide scores until scoring is complete, and then “reveal” the average scores and notes. Vladimir has also added some fun statistical analysis, such as “polarizaton” that allow users to see how much agreement or disagreement there was about each score.
Sharing
One of Vladimir’s prime motivations in creating CupWise was his love of the shared tasting experience. There is something special about sharing and discussing great coffees with others. Sharing our impressions of coffees can be a bonding experience and helps us to learn and improve as tasters. Cupping with people like Ryan, Paolo, and Lance has made me a better coffee taster, and we are confident CupWise will improve our users’ experiences and skills.
See CupWise in action
I could try to describe CupWise all day, but it's best to see it in action to understand its power and how pleasant it is to use.
My partner Paolo at Regalia and I recently offered a new iteration of our Roast Defect Kit, and I thought cupping the RDK together, along with our friend Lance Hedrick of Onyx, would be a fantastic way to demonstrate CupWise.
Paolo, Lance, and I will demo CupWise live for RDK customers on Monday, February 21 at 10am NYC time (3pm in London). RDK customers will be able to chat, score, and enter tasting notes, and everyone else is welcome to watch the cupping and share the CupWise experience. The public can watch the event live, or saved, HERE.
Delicious Filter Coffee from an Espresso Machine
Sep 29, 2021
Show notes
Filter 2.0We’ve all tried to make good filter coffee in an espresso machine. It makes sense, right? Every espresso machine provides access to hot water, a spray head, a filter basket, and usually automatic volumetric dosing. Unfortunately, the flow and pressure provided by espresso machines is generally excessive for brewing great filter coffee.If cafes could brew amazing filter coffee in an espresso machine, it would be the Holy Grail of brewing coffee by the cup. After almost three decades of thinking and tinkering, I have finally found a method to brew extraordinary filter coffee in a (Decent) espresso machine in three minutes or less. I’ll call this Filter 2.0 until someone suggests a better name. Much credit goes to Jonathan Gagné for sparking part of this idea with his long-steep aeropress technique, and John Buckman for his relentless improvement of the DE1 machine. The pieces of the puzzleThe Long-Steep Aeropress TechniqueJonathan recently developed and wrote about his new aeropress technique that involves a steep of 10 or more minutes. The idea of improving and increasing extraction with a long bloom and removing the liquid extract gently from the coffee grounds is a cornerstone of Filter 2.0. In a cafe setting, I would limit the bloom phase to two minutes. At home, it’s worth experimenting with much longer blooms. The Filter SandwichIn May, 2019 I posted onInstagram about my “filter sandwich.” Many years earlier, Andy Schecter had posted online about putting an aeropress filter under his espresso pucks to absorb fats and possibly prevent his blood cholesterol from rising. Andy reported the interesting side effect that the filter allowed him to grind finer and extract (1.5%?) higher. In 2019 I built on Andy’s idea by adding a filter on top of the puck, in an attempt to decrease channeling. The filter sandwich decreases channeling, increases extraction, and also maintains puck integrity when applied pressure is released during the bloom. In the case of Filter 2.0, I recommend using a bottom filter with very small holes of 1—2 microns. More-porous filters will yield coffee with less clarity and possibly more astringency. The Blooming Espressoin late 2018, a few months after receiving my DE1, I created the “Blooming Espresso” profile, in which pressure and flow pause for 30 seconds (without opening a valve) to allow the grounds to “bloom” before percolation removes liquid from the puck. The bloom improves extraction quality and quantity, especially from the lower layers of the puck. Filter 2.0 is a filter-coffee variation on the Blooming Espresso with a longer bloom phase. The Profile Building Capabilities of the DE1The Decent allows a user to build profiles with as many steps as desired, with features such as temperature profiling, flow control, the ability to move from one step to the next based on a trigger (such as reaching a pressure or volume target) and countless other next-level options. In this profile I used 90°C during preinfusion and 85°C during percolation, a two-minute bloom phase, and a flat 3 ml/s flow rate during percolation. As a safeguard, I set a “pressure limit” of 3 bar during percolation, just in case my grind is too fine. I’m not yet sure whether that is necessary, but it can’t hurt. The ProcessInsert a two-micron 55mm paper filter in the bottom of a clean portafilter basketRinse the filter and basket with hot water or latch and flush with hot water. Fill the basket with finely ground coffee, not quite espresso grind, but far finer than any filter grind. I use settings 2a—2m on a Baratza Forte depending on the coffee. You might try something like #3 (out of 11) on an EK43 or #3 on a Ditting. I use 20g—22g in a 24g basket in order to have enough room for the Flair58 puck screen.Distribute the grounds, ideally using the Weiss Distribution TechniqueTamping is optional :0. Take a breath. It’s ok to not tamp this. Set a metal mesh screen such as the Flair58 puck screen on top of the grounds. Ensure the filter is level. Latch the portafilter on the espresso machine and pull the shot. Stop the shot at approximately a 5:1 ratioclick on the images below to enlarge View fullsize View fullsize View fullsize View fullsize View fullsize The profilePreinfusion: I set the pre-infusion time just high enough such that the entire puck will be saturated a few seconds after the preinfusion flow stops. If you are using a Bluetooth scale with the DE1, you can set the pre-nfusion time longer and set the maximum weight to something like 2g, which will cause the profile to move on to the bloom as soon as the scale senses a few drips. An easier solution might be to figure out the number of ml at which you’d like preinfusion to end. Experienced DE1 users will know there are several more sophisticated ways to program just the right amount of preinfusion. Bloom (pause): As noted, the bloom time is flexible. For use in a café, I think two minutes is adequate. Longer bloom times are marginally beneficial. For use at home, you may want to experiment with much longer bloom times.Percolation (flat flow): my standard flow rate is 3 ml/s. I find a higher flow rates increase fruitiness of coffee but also increase the risk of astringency. The flow rate should ideally be scaled to dose size. For example, if you are using a small basket and does such as 12 g, you may want to use 2 ml/s but 3 ml/s would be appropriate for an 18g dose. Flow rate should scale more or less in proportion to the depth of the coffee bed .Pulling a shotNote that I limit these shots to 5:1 ratios. The shot you see here was made using 20g in a 24g basket with a Flair58 filter on top of the grounds and a 55mm, 2-micron filter under the coffee bed. To mitigate the risk of astringency, I don’t usually exceed a 5:1 ratio. After the shot is complete, I dilute it with hot water to my desired brew strength. The end result is a 20g dose and 100g extraction diluted with 225g—250g of water to yield a 23%—26% extraction with 1.4%—1.5% strength. Of course, all of these numbers are adjustable to taste.If you sense astringency, consider improving the puck prep, grinding coarser, or putting a finer-mesh filter under the puck. View fullsize View fullsize View fullsize View fullsize View fullsize View fullsize images: 1.5-micron bottom filter 2.ground coffee 3.tamped coffee (optional) 4.Flair58 puck screen 5.percolation phase 6.The finished, diluted brewThe CoffeeSo, how does it taste? It tastes like an incredibly-well-made filter coffee, the kind you hope the barista will make for you, but you rarely get, when you order a pourover. I recommend tinkering with the Filter 2.0 profile to influence acidity and fruitiness and tone down undesirable flavor. For example, one might lower the temperatures when using darker or defective roasts. One could extend the bloom phase to increase extraction when not in a hurry. And one could increase the percolation flow rate to enhance fruitiness, though that may increase the risk of channeling.What’s Next? I hope this post inspires others to give this a shot (sorry) and make improvements. I have only been using this profile for a few days, and I’m sure others will make many incremental improvements. I have one caveat, however: please do not try this shot with a standard, traditional espresso machine. It’s just not going to work well. It is possible to approximate this profile with a lever machine or with an E61 machine with low line pressure, though it’s easiest and best with the DE1. Every part of this profile is important and works together to produce a great end result. Before experimenting or modifying, please test this profile the way it was designed, using the filter sandwich, DE1, preinfusion, long bloom, low temperature, and low ratio. Skipping or modifying any of these parts is likely to damage extraction quality and enjoyment. Thank you. NB for DE1 users: John has added this profile to the profile library on the DE1. Simply update your app and you will see it.
Should you omniroast? The answer is not so simple
Sep 18, 2021
Show notes
Roasters often debate the merits of “omniroasting” but I have never heard someone discuss what I think is the most important determinant of whether one should omnniroast: quality of espresso extraction.
Omniroasting refers to using the same roast profile for both filter and espresso. Of course, espresso roasts have traditionally been darker than filter-coffee roasts. And I am all for using lighter-than-traditional roasts for espresso. But with the advent of third-wave roasting and the sometimes obsessive desire of roasters to roast as light as possible — whether they can do so successfully or not — many have decided to roast their espresso coffees as light as they do their filter coffees.
Unfortunately, espresso made from very light roasts is often unpalatably sharp, sour, and imbalanced. However, it is not always due to the roast, it is often due to the espresso extraction.
Until the past few years, a “god shot” was something coffee pros expected to experience perhaps once per year. I don’t fault baristas — or a deity — for the infrequency of god shots. I fault the limitations of the equipment we have had at our disposal until now.
Prior to using the DE1 from Decent Espresso, I had tasted perhaps five truly great espresso extractions in my life. For 20+ years, almost every espresso I tasted was imbalanced, too sharp, and too bitter, and usually astringent. The exceptions were usually shots made from low-acid coffees, but those coffees were not of good enough quality for me to enjoy as straight espresso. However, it makes a lot of sense that darker, low-acid coffees have been the rule in most countries for many decades. Every other type of bean pulled as espresso was guaranteed to be too sharp and imbalanced for most palates.
The first day I pulled blooming espressos on the DE1 was the first time I tasted several great extractions in one day. The blooming espresso profile consists of a flow-controlled preinfusion (note: there is no such thing as preinfusion controlled by pressure) followed by a 30-second “bloom” during which the flow stops but the machine applies a modest pressure on the puck to prevent it from expanding or losing its integrity. With the right grind setting, a few drops will fall during the bloom. After the bloom the machine executes a 2.2 ml/s flow profile to extract the coffee. Much like when making a pourover, but more dramatically, the bloom phase increases and improves the temperature of the lower layers of the coffee bed, ensures all of the grounds are saturated with liquid before extraction, and increases extraction level. The higher, more uniform extractions of the blooming espresso soften the flavor profile, decreasing sharpness and bitterness. They also produce very high extractions, allowing one to use less grounds if desired.
A well-executed blooming espresso shot approaches the extraction quality of good filter coffee.
With the blooming espresso and similar profiles on the DE1, as well as with the allongé, another high-extraction profile I have written about extensively, I happily (and exclusively) pull shots of very lightly roasted washed coffee. While baristas have historically avoided shots of lightly roasted Kenya because of their inevitable sourness and sharpness, lightly roasted Kenya and Ethiopian coffees are now my go-to espresso beans, just as they are for filter coffee.
So, should you omniroast? If you are using something like a Mazzer Robur and an LM Linea, without true preinfusion, definitely not. If you are using a better grinder such as a Mythos with a machine that offers proper preinfusion and/or pressure profiling (E61, Strada, etc) you may be able to pull nice shots of light omniroasts. And if you have a DE1, you can mold the flavor of your espresso to your liking.
My advice is to not allow the platonic ideals of super-light roasting or omniroasting to get in the way of producing the best end product. I believe it is best to adapt to, and optimize for, the limitations of your equipment, or upgrade your equipment, and roast appropriately for it.
One simply cannot discuss omniroasting without considering the quality of espresso extractions. Comments always welcome.
5 Things Learned in 5 Cuppings
Aug 05, 2021
Show notes
5 Things Learned in 5 Cuppings
by Ryan Brown, Founder of Facsimile Coffee
I selfishly started Facsimile because I wanted a good excuse to cup with experts from around the world. We recently completed the fifth live cup-along, and I’m in awe of how much I’ve learned already.
I took a moment to reflect on the past several months and a handful of the takeaways. Here’s what I found.
1.Consistency is king
The purpose and namesake of Facsimile is to provide coffee enthusiasts an exact copy of the experience of cupping side-by-side with experts. We take efforts in preparation to ensure that each set of samples is identical. We provide as much instruction as is reasonable so that each cupping bowl of a sample tastes the same.
But it’ll never be precise, and we know that. However, you can control that each of your samples is prepared and handled the same way. Ground the same, brewed the same, and evaluated the same.
This is especially important on any given cupping table of green samples, but also important from table to table, session to session. Eliminate all variables apart from the samples themselves, and you’ll have a more successful evaluation.
A song may sound different on different speakers, but you should still be able to tell the difference between “Hey Jude” and “Smells Like Teen Spirit,” no matter what you have available to you.
2. Sensory evaluation is comparative evaluation
As a coffee brewing method, cupping is inherently cynical. It readily trades quality of brew for reproducibility and assumes that defects are everywhere if you just look close enough.
Yes, cupping is designed 1) as an easily repeatable extraction process, and 2) as a means of more easily detecting defects and inconsistencies (by way of several, smaller brews).
But there’s a pleasant, perhaps unexpected byproduct of this pessimistic outlook. Cupping is hands down the best way to brew many samples at once, and brewing many samples at once creates a magical context for comparative tasting. This is no small matter. Drink a cup of any coffee and you will be immersed in its qualities, you’ll be very much seeing its trees, and not the forest. Give yourself several other coffees to taste before and after, and you’re giving yourself a broad view of the forest.
This comes up again and again during our live cup-along: the first sample often just smells like and tastes like, well...coffee. This isn’t some affliction of the novice. With my 20 years of coffee tasting experience, I habitually return to sample #1 to complete my evaluation. If I ever need to cup just one sample, I’ll find one or two other samples to put on the table alongside it to be sure that I obtain the benefit of comparison.
This is also why I cup incognito and scatter bowls across my cupping table. I gain very little from knowingly tasting the same sample three or four times in a row. I gain so much from unknowingly tasting them throughout the table in different contexts. (After I grind each sample, I place the same color sticker under each bowl and on the card or bag with the coffee’s information. Having done this to every sample’s bowls, I randomly scatter the bowls around the table, then reassign them numbers for my cupping notes. Upon completion of the evaluation, I check the sticker of each bowl, sort out any discrepancies, and finalize my scores.)
3.Official cupping forms aren’t used much
I’ve been using a Cup of Excellence form as long as I can remember for all coffee scoring. But, I don’t use it properly. I rarely score all individual attributes, and instead hack it to fit my needs. This was reinforced by the habits of the Stumptown cupping lab circa 2011, where we all did the same.
I had a sneaking suspicion that I wasn’t alone and that there were other cuppers who didn’t use official cupping forms at all, or who used them in a hacky way, or who had designed their own.
If the Facsimile guest cuppers are any indication, I underestimated. While most of them have formal cupping training of one sort or another and all of them know how to use a standard 100-point scoring system and the SCA cupping form, not one of them routinely uses an official cupping form for evaluating green coffee.
Scott Rao tends to capture notes and intuit a score based on a nearly unconscious evaluation of the cleanliness, sweetness, acidity, and flavor. Gabby Wright is Q certified and has memorized the SCA cupping form. When she scores, she uses a notebook to capture coffee notes and a final score. Zakiya Mason and Charles Babinski use a proprietary form that separates sweetness, acidity, and then buckets everything else under “structure”. Petra Veselá and Gwilym Davies use a 6-point smiley-face system modified from barista competition scoring, with which they have abundant, diverse experiences.
And yet, I have been in sync with these experts across a variety of origins and qualities in cupping after cupping, in coffees ranging from 82 to 89 points.
4.Be clear about your goal for each cupping
A reason why official cupping forms are seldom used is that they don’t expressly address the goal of a given evaluation.
For example, Zakiya and Charles were coming to the cupping table looking for coffees they’d be proud to share with visitors of their cafés. The customized form they use instead of an official form is designed to answer--and explicitly asks--the question, “Would you serve this?”
Gabby cups with her roasting clients in mind. Scott cups to better understand how to approach roasting and extraction. Petra and Gwilym primarily cup in order to evaluate the success of their roasting.
If your goal is to give the coffee an official SCA or Cup of Excellence score, then I know just the cupping form for you to employ. If you’re cupping to purchase, to understand how a coffee may fit into a blend, or to showcase a range of qualities to a customer, consider how that should affect your approach.
5.Cupping results are a form of communication
Sometimes the most obvious detail can be lost in an elaborate, intimidating ritual. For example, it took me an embarrassingly long time to fully grasp that coffee processing techniques--washed, natural, and nearly every other version--were each created with the straightforward goal of preparing coffee to be stable for storage and transit.
Cupping may appear to be a series of steps that you need to precisely follow to be “doing it right.” While there’s some truth to this, and certainly unavoidable parts of cupping, the steps are a means to an end, and that end is an accurate, concise description of a sample that can be understood by someone else.
Cupping results are a form of communication, whether the recipient of the message is a farmer, importer, roaster, customer, or even your future self who won’t otherwise remember what it was like to taste that coffee.
The magic of cupping with others (as we do in Facsimile) is the value of having that communication in real time while the cups are still warm and in front of you.
Best Practice Espresso Profile
May 18, 2021
Show notes
The most impressive, productive (and sometimes over my head) discussion about espresso these days is on the private Decent Diaspora forum. One of the wonderful things about the Decent community, besides its civility, is the way a group of impressively intelligent people collaborate to expand our understanding of espresso extraction.
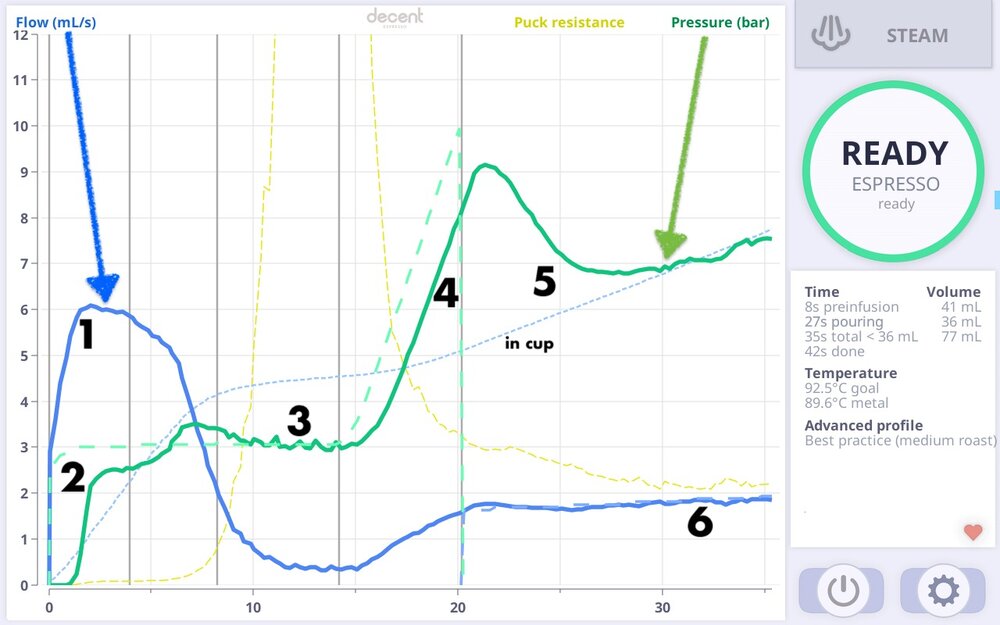
A recent development has been John’s new “Best Practice” espresso profile. Although it is a work in progress, as all of our profiles are, this development is worth discussing. If you’re not familiar with the Decent’s graphs, bear with me, it’s a lot simpler than it looks at first.
Longtime readers will notice this profile looks a lot like my “Blooming Espresso” profile. The Best Practice Profile includes a few improvements on the Blooming. The improvements come primarily from work by Damian Brakel and Jonathan Gagné.
Quick fill of group head at the start of preinfusion. Preinfusion starts hotter (not shown) than the rest of the shot, to compensate quickly for the cooling effect of the room temperature puck.
Low pressure preinfusion, to assist capillary action in fast, even wetting.
Pressurized bloom to maintain puck integrity. (The low-pressure bloom of the Blooming Espresso can work brilliantly but offers a greater risk of channeling when pressure is reapplied.)
Softened pressure rise to avoid channeling that a steep rise can cause.
Extraction phase switches to flow profiling for automatic channel healing.
Extraction phase has a linear flow-rate ramp over time, to keep constant water contact time, instead of using pressure profiling to approximate this.
Other notes:
The extraction phase uses a pressure limit, so as to never go above the set maximum pressure of 9 bar. This “failsafe” is now a feature many of us for all shots on the DE1, to salvage cup quality if the grind is a little too fine.
The BPP will soon implement Jonathan Gagne’s “adaptive profile” idea, in which the extraction phase will decide the steady-state flow rate relative to flow at peak pressure. This adapts the profile to the grind size, using
Accurate stop-at-volume closely matches scale weight, because of a fully successful preinfusion.
A smooth puck resistance curve is achieved.
While this may be a lot to digest, rest assured that when using the Decent, you can “set it and forget it.” If I were using a DE1 in a cafe, I would use this profile all day, and only adjust the grind as needed. While the Decent’s brain is complex, the user interface couldn’t be simpler.
Some of the "best practices" here were originally discovered on traditional machines:
- Several machines (such as Kees' Idromatic) have a quick fill, followed by a soft-pressure-rise feature built into the group, and manual lever machines have done this for years. (one great thing about the DE1 is it can mimic any feature from any other machine.)
- Pressurized preinfusion is fairly common in traditional machines, but to my knowledge, no traditional machine implements this by measuring puck pressure. Instead they measure pressure-behind-a-flow-constrictor, which gives different results.
To answer the inevitable question, yes, these shots can taste amazing.
I’d love to know your thoughts about this.
*******
Would you like to improve your cupping skills while enjoying delicious coffee? Subscribe to Facsimileand cup along live with Ryan Brown and his guest coffee experts each month. We offer a money-back guarantee, and no commitment is required.
Does the difference in the body of various coffees matter?
May 09, 2021
Show notes
Does the difference in the body of various coffees matter? The answer may seem obvious, but bear with me.
Let’s say you drink only specialty-grade coffee. How much does body vary from one bean to another? Not much, I would posit. Natural variation in body among different coffees is modest, but the ability to change body through roasting and brewing is much greater.
I believe that most perceived differences in body at the cupping table are due to not meticulously weighing both the ground coffee as well as the water used in cupping. While some modern green buyers and roasters weigh their cupping water, that is not a universal practice, and it was rarely if ever practiced until about fifteen years ago.
What is body?
Body is the tactile sensation of coffee on the tongue, produced by a combination of viscosity and insoluble particles. Body is related to mouthfeel, but most authorities attribute body primarily to insoluble particles, and mouthfeel to the presence of oils. Mouthfeel relates to the sensation of “butteriness” produced by suspended oils in coffee. Interestingly, body does not seem correlated with the proportion of fines various coffees produce when ground.
Body is indirectly related to brew strength as measured by TDS. I say indirectly because TDS is a measurement exclusively of dissolved particles, and body is produced by insolubles. But generally speaking, for a given brew method, increases in TDS correlate with increases in body. TDS is a measure of density, and a denser brew produced by the same method will typically have more body.
How to influence body in coffee
There are four ways I can think of to influence the amount of body in brewed coffee:
choice of green coffee
roast level and development
brewing method and filtration
brewing ratio
Choice of green coffee
The choice of green coffee probably has the least capacity to affect body. Recently I was talking about body with Ryan Brown, cofounder of Facsimile Coffee. Ryan noted that body has probably never been a decisive factor him when buying green coffee. That remark struck me and sparked my interest in writing this post.
While coffee origin and processing can affect body, the choice of origin or processing has less impact on body in the cup than do the following factors.
Roasting and body
Roast level and development, as well as the ratio of conduction to convection used in roasting influence body. Darker roasting, greater development, and coffee roasted with more conduction have the capacity to increase body. Perhaps few of us would choose to roast darker simply to increase body, but learning to increase roast development without roasting darker can be a useful tool for manipulating body as well as flavor.
Brewing method and filtration
The choice of brewing method, and especially filtration, have the greatest capacity to influence body. Immersion brews and other unfiltered brews produce the most body. Percolation methods in which the coffee bed acts as a form of filtration to trap fine particles produce less body. Percolation methods using filters with low porosity and high capacity to trap fines produce the least body.
Brewing ratio and strength
Increasing the ratio of grounds to water and/or increasing brew strength (density), all else being equal, will increase body.
The bottom line
Returning to the original question, it seems reasonable to ignore or discount body as a factor when choosing green coffee. Small changes in brewing method, recipe, and filtration have the capacity to alter body far more than one could achieve by choosing different green coffee.
Interested in improving your cupping skills while enjoying spectacular green roasted flawlessly?
Subscribe to Facsimile. We offer a money-back guarantee if you don’t love it.
"Solubility matching" and blending coffee
Mar 09, 2021
Show notes
A few years back there was a trend called “solubility matching,” an attempt to blend coffees of similar solubility. The idea was appealing but never seemed to gain traction or improve the quality of blends. What is solubility? And what is solubility matching? And does it matter?
Solubility is a property referring to the ability for a given substance, a solute, to dissolve in a solvent. Simple enough. It is estimated that just over 30% of a coffee bean’s weight is soluble in hot water. Roast development, coffee variety, and, I believe, coffee density, among other factors, influence the solubility of a particular bean.
Underdeveloped roasts tend to be less soluble than well-developed roasts. Very dark roasting decreases solubility by burning off some of a beans soluble mass. The most soluble roasts seem to be well-developed, light-to-medium roasts.
I have reached extractions as high as 28%—29% (most often with Kenyan and Ethiopian coffees) using extraction methods such as the Blooming Espresso, Vacuum-pot brewing, and the Tricolate brewer, all of which offer opportunities to achieve near-complete extractions. I imagine I’m still a few percentage points away from “complete” extraction, or exhausting a coffee’s solubility, without resorting to hydrolysis, as many instant-coffee manufacturers do.
“Solubility matching” is the appealing idea of blending coffees with similar solubilities. I believe the assumption behind solubility matching was that blending coffees of similar solubilities would improve flavor or extraction level. One difficulty of solubility matching was that it severely limited what coffees one could blend together. Recent efforts to revisit solubility matching have confirmed for me that blending two coffees of different solubility levels merely creates a resulting coffee with an extraction level that is approximately the weighted average of the extraction levels of the two blend components, and a required grind setting that is likewise similar to the component’s weighted-average grind sizes. (Jonathan Gagné recently confirmed for me that blending two coffees creates a blended version of their particle-size distributions.)
As for flavor, I have never found a formula or a shortcut to creating a great blend. Solubility matching hasn’t improved my results. Given that green coffee is always slowly fading and roast batches often vary in quality, I believe informed trial and error, with lots of blind tasting, is still the only practical way to create and manage a great blend.
The only shortcut I use to blend coffee is the well-known “spoon method”: pour a cupping bowl or brew a cup of each blend component you are considering using. Spoon some of each blend component into a separate, clean cup. For instance, if you have three blend components and want to taste a 3:2:1 blend, blend three spoons-full from the first cup, two from the second cup, and one from the third cup, and taste that. Repeat and taste with different ratios from each component.
I'd love to hear from you if you would like to share your experience with solubility matching and blending. Thanks for reading.

 Our TOPPODCAST Picks
 Stay Connected