What is Baked Coffee? (MOST PROS DON'T KNOW!)
Feb 26, 2018
Show notes
For years I’ve been promoting the idea of a steady decline in the ROR (rate of rise) during roasting. Recently I’ve heard of some "educators" publicly discrediting the idea of a steadily declining ROR, so I think it’s time to address this issue.
What is an ROR curve?
The ROR is the number of degrees per minute that the bean-pile temperature is increasing at any point during a roast. An ROR curve is a graphical plot of that data throughout a roast batch. The ROR tends to decline throughout a roast, primarily because the temperature gradient (differential) between the beans and the roasting environment decreases. Please note that the “real” ROR does not go up early in a roast as the curve shown here implies. The real ROR at the beginning of a roast is quite high and drops precipitously during the first minute; however, because the bean probe that recorded the curve was hot at the charge, and the probe took a few minutes to shed its heat and match the temperature of the beans, the curve incorrectly implies that the ROR began at a low negative number and increased for the first 2:30 of the roast.
What happens when the ROR “crashes”?
Somewhere around the beginning of first crack, the beans release a great deal of moisture from their cores in a short period of time. That moisture is cooler than the bean surfaces or the probe, and may cause the ROR curve to drop rapidly. This is known as an ROR “crash.”
What is “baked” coffee?
Despite what you may have heard about baked coffee being caused by long roast times (I used to believe that after hearing it for years, but ultimately did not find it true at the cupping table), negative RORs, or some strange combination of factors, the main cause of baked coffee is a pronounced ROR crash, or more precisely, a drastic change in the slope of the ROR. Relative to a well-executed roast, baked coffee seems hollower, flatter, and less sweet. Of course, there are degrees of ROR crashes and degrees of baking. A roast may be slightly baked or extremely baked, and the severity of the ROR crash will correlate with the degree of baked flavor. As brewed coffee or in a cupping, baked roasts will lose more of their tartness, sweetness, and warmth of flavor as they cool. Green buyers may make the mistake of blaming the green quality when a cup’s acidity and sweetness “fall apart” as it cools, when the real culprit is a baked roast. (That's not to say green quality doesn't affect the retention of sweetness and acidity as coffee cools; it's just not the usual cause.)
This roast is definitely baked. Note the change in the slope of the ROR from flat (or even rising a little) to nearly vertical.
This roast is definitely not baked. Note that the orange curve is the environmental-temperature curve.
The fine print
There are some nuances to consider when deciding whether an ROR curve indicates baked coffee.
The orange ROR curve came from a 10mm probe; the blue curve from a 3mm probe. The probes were installed 3cm from each other in the faceplate of a Probat G60.
The speed at which your bean probe reads temperatures will affect how “crashy” an ROR curve looks. For example, the Cropster graph above shows two ROR curves from the same roast batch; the blue ROR curve’s data came from a 3mm-diameter probe and looks slightly baked. The lower, round, orange ROR curve’s data came from a slow 10mm probe and doesn’t show the ROR crash. Please keep in mind that these two curves are data from the same roast batch, but the smoothing effect from the slower 10mm probe hides the ROR crash.
Below is a roast from a Probat with a slow, 6mm probe; note that the crash doesn’t look dramatic, but that same roast would look very baked had the probe been faster:
Note: the pale blue lines are the "reference" curves, or target curves, for the coffee shown.
I’ve come to believe that if a crash happens very late in a roast, for example in the last 30 seconds, the coffee will be less baked than if the crash had happened earlier. I see many “Nordic” style roasts with a high ROR at first crack followed by a brief crash just before the drop. Sometimes those batches taste a bit baked and sometimes they don’t.
This is fairly typical of many roasters' attempts at "Nordic style" roasting, wherein the ROR drops quickly in the last 30 seconds of a roast and may or may not show signs of baking.
How do I know this is true?
There are many “experts” who will mock the ideas in this post. And I'm sure many readers are thinking "my RORs crash but MY roasts aren't baked." All I can say is that if you ever master avoiding the crashes, you'll change your mind. Until then, rather than dismiss the ideas here, I hope you attempt to test them properly.
I’ve worked on this concept with several hundred clients over the past few years and not one of them has ever wanted to go back to crashing RORs once they had learned to avoid them. As well, almost all of them can now taste a roast blindly and know whether its ROR curve had crashed, which is strong validation of the idea. (If looking at curve can tell you whether a roast is baked, and tasting a roast can tell you about the general curve shape, that’s the definition of validation.) It's more difficult to detect baking in naturals or in coffees like Kenyas with massive amounts of ripe-fruit potential. I'm sure many readers have tasted Kenyan coffees that crashed hard yet tasted quite sweet and fruity. In my experience such coffees got even better when roasted without the crash.
Please try not to get confused, as many do, about the relationship of baking, underdevelopment, and roasty-ness. Crashed roasts are more likely to flick and more likely to be less developed, so many roasters are used to those issues coexisting in a single batch. That muddies the issue a bit, so please try to isolate and taste roasts that are definitely well developed and crash but don’t flick; train your palate on those roasts vs. roasts with smooth RORs and eventually you'll always know when a roast is baked.
I recommend that you trust your taste buds, not what I tell you (I mean you're welcome to, but...), and certainly not what the industry teaches in its certification courses — the "baked" samples in those courses are usually roasted with ridiculous methods that also cause roasty flavors, confusing students and not providing a clear demonstration of baked flavor. Instead I suggest you do the following if you want to learn to identify baked roasts:
If your bean-probe diameter is greater than 4mm, please replace it with a smaller probe before forming strong opinions about how “crashy” your RORs are. (If you have a "grounded" probe, >4mm may be fine, but that's an issue to discuss in a post some other time. For now, just check that your probe indicates the turn no later than 1:30.)
Ensure your probe is fast enough and your software settings are appropriate to provide useful ROR data.
Suggested settings would include sampling intervals of one second (standard in Cropster), an ROR interval ("delta span" in Artisan) of no more than 15 seconds, and no additional smoothing of curves when using software that offers various smoothing options. Those parameters, plus a fast probe, usually ensure quality data.
Cup blindly— always.
Find the correlation between ROR crashes and flatness vs. sweetness in the cup.
Always compare cupping results to ROR curves after you have tasted the cups and taken notes.
Thanks for reading. I'd love to hear some dissenting opinions and also your experiences with baked roasts and roast curves.
Decent Mice
Feb 25, 2018
Show notes
Good news, Melbournians! John and Bugs of Decent Espresso will be in Melbourne to demo the DE1+ machine during MICE. I'll be helping them (aka acting like I understand what John is talking about while I pull shots and keep the coffees dialed in) for a demo off site as well as at MICE itself.
Our friends from the St. Ali family have been kind enough to share space in their booth with us. Please stop by the St. Ali booth, say hello, and check out the future of espresso. Take a selfie with Matt P while you're there; he loves it :).
We'll also be serving coffee from the DE1+ at the Five Senses Training Centre at 300 Rosslyn St, Melbourne on March 22 at 8am-10am. Hopefully I'll get my hands on a roasting machine to roast some tasty Kenya for the event.
Drip vs. Immersion: We May Be Calculating Extraction Incorrectly! And, A Contest.
Feb 19, 2018
Show notes
Several readers recently requested a post explaining the differences in measuring extractions of drip vs. immersion brews. I have always wanted to write about this, but didn’t think anyone would want to read such a post :). I’m glad I’ve got a few geeky readers out there.
Writing this post got me to thinking, measuring, and questioning. What I found was shocking, so I discussed it with my friend Dan Eils, who's a brilliant scientist with a keen interest in coffee making. I think Dan and I are onto something, and it implies we all may be calculating extractions incorrectly. This post wouldn't have been possible without Dan's help and our enjoyable week-long debate over these issues.
This post will take some effort to fully grasp, but if you measure extractions, I think it's essential to read this and discuss it. Comments are welcome, and sharing this post with other coffee pros is also welcome, as I'd like to get feedback and ideas from many sources. My hope is that the ideas in this post reshape how we calculate extraction and also help users of the coffee refractometer understand the numbers a little better. I also hope that others will point out any errors in my thinking or calculations.
First, a little primer...
Concentration Gradient
When water mixes with coffee grounds, coffee solids dissolve in the water and move from the grounds to the surrounding slurry by diffusion. (This does not apply to espresso.) The rate of diffusion is determined primarily by the concentration gradient: the difference in solids concentration between the grounds and the slurry. The higher the gradient, the faster extraction will occur.
Immersion Brewing
During immersion brewing, upon water contacting the grounds, the concentration of coffee solids in the slurry increases rapidly, and then continues to increase at a progressively slower rate, asymptotically, for the rest of the brew. An example of this is how the color of coffee in a French press hardly looks much darker from a few seconds into the brew until a few minutes later. Another example is how in cupping, brew strength doesn’t change much in the time window of 9:00–-20:00 in which you likely slurp and spit.
Brew and serve a French press, and you’ll notice that the strength of the coffee left behind in the grounds (the “interstitial liquid”) is nearly identical to the strength of the coffee in the cup. If you were to squeeze the grounds at the bottom of a French press after decanting, the strength of the liquid that oozes out would be approximately the strength of the liquid in the coffee served, or perhaps slightly stronger.
Percolation brewing
Percolation refers to brews in which liquid extracts coffee solids by passing through the bed of grounds. Just to be clear, I’m not referring to those nasty old “percolators” you may remember your mom breaking out for large gatherings when you were a kid. And trust me, there are few more memorable aromas than baked-in, rancid robusta oils from a dirty percolator in 1977.
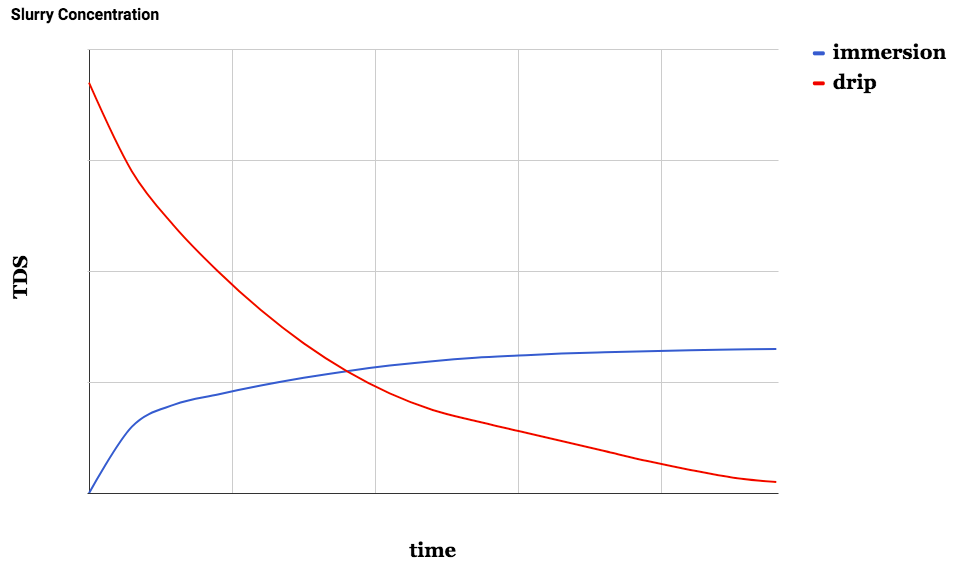
In a percolation method such as batch brew, during most of the brewing cycle, fresh, clean water is added to the slurry while solids-packed liquid leaves the slurry. That causes the slurry’s solids concentration to decrease throughout the brew. So, while the strength of the slurry of a French press is always getting stronger, the strength of a slurry during percolation is always getting weaker. This is important, and is the primary reason percolation is a more efficient extraction method than immersion.
Curves are for conceptual purposes only; they were not derived from real-world data
Why your software has separate modes for drip and immersion
This is a short version of what I was taught years ago:
At the completion of a percolation brew, the slurry’s TDS is extremely low. Therefore, when considering how much coffee solids extracted during a percolation brew, you can more or less ignore the dissolved solids remaining in the slurry liquid. That is why Extract Mojo software (aka Coffee Tools) uses the brewed-coffee weight as the multiplier for the TDS to determine total extraction-- almost all of the extracted solids are in the cup.
Standard percolation extraction measurement:
When measuring the extraction of an immersion brew, the liquid left in the slurry is full-strength coffee (or possibly a tad stronger). Even though those solids still seem to be in the grounds, a good deal are in the interstitial liquid, which is really liquid packed with extracted solids that just never made it into the cup. That is why the software uses the brew-water weight to calculate the extraction of an immersion brew: the slurry liquid is just like brewed coffee left behind in the filter.
Standard immersion extraction measurement:
Theory vs. Reality
Here's the surprising part: I decided to sample a few ml's of liquid from the spent grounds of a few v60s and batch brews, and they measured anywhere from 0.8%--1.3% TDS. For reference, the brews were all in the 1.3%--1.4% range. This shocked me: you know how the last bit of liquid flowing from the basket in a batch brew looks like very weak coffee? It is, but whether due to channeling or the slowness of diffusion or some other reason, it's apparent that the liquid left behind in the slurry is stronger than the last, weak bits of coffee that flow from the basket during a brew.
Let's say the slurry liquid of a percolation brew is 1.0% TDS. If the slurry liquid weighs approximately twice as much as the dry grounds, counting the extracted solids in that liquid would have a big impact your extraction calculations. I think our calculation method may need adjusting.
Two liquids in the slurry
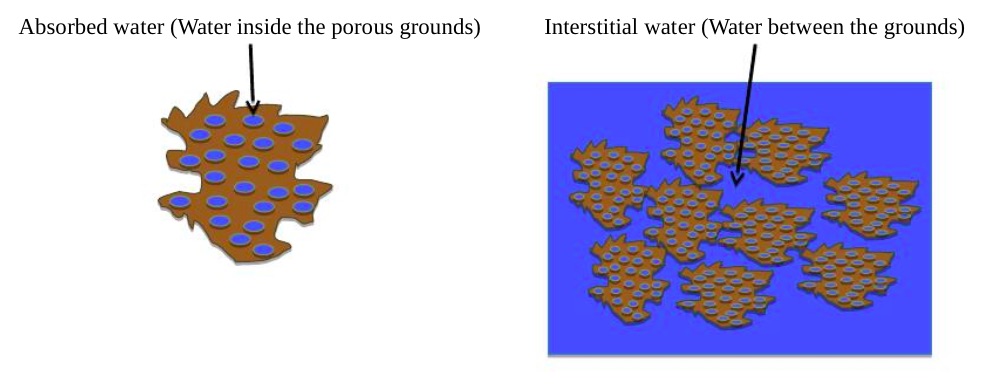
If you use Coffee Tools software, you've seen the term LRR: liquid retained ratio. LRR varies with brewing method: the coarser grind of a batch brew holds a touch less liquid than the finer grounds of a v60, and a siphon has a very low LRR due to suction literally vacuuming the interstitial liquid from the coffee bed. For the sake of this discussion, let's keep it simple and assume a percolation LRR of 2g/g of dry grounds.
It's speculative, but Dan and I agree that the liquid trapped within the grounds at the end of a brew is probably pretty strong, or at least stronger than the interstitial liquid. If you begin with one gram of dry grounds, you may end up with approximately one gram of strong liquid trapped in the grounds and one gram of weaker interstitial liquid. The solids in the liquid trapped within the grounds are, by definition, not extracted, so they should not be a part of any extraction calculation. The relevance of the solids within the interstitial liquid is more debatable.
A Proposal
For the five of you who made it this far, thanks for hanging in there. And I'm sorry you don't have better things to do than to read my blog. :)
I propose that we consider changing the way we calculate extraction. I think we should try to count the interstitial slurry liquid, but not the liquid trapped within the grounds, in our calculations. The current equation to calculate immersion extraction counts the solids-packed liquid still trapped within the grounds, but it probably shouldn't. Likewise, the percolation calculation doesn't count the extracted solids in the interstitial liquid, but it probably should.
Modified extraction calculations
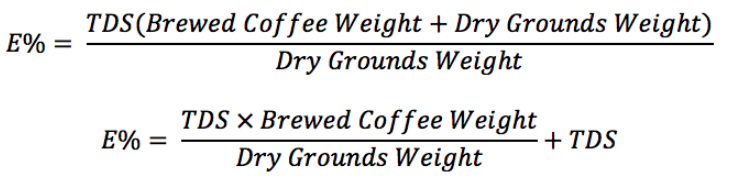
Percolation (we've added the weight of the interstitial liquid)
The two equations above are the same, the second is just the reduction of the first.
We have added the dry-ground weight to the multiplier here because that happens to be about the weight of the interstitial liquid. This modification is flawed in that the interstitial liquid's TDS is likely a little lower than that of the brewed coffee. I don't have enough data to say how much we should adjust that liquid's TDS; it's likely that its TDS will typically be about 75% of that of the brew's, and perhaps we should use .75 x the dry coffee weight instead, which would make the total adjustment + .75*TDS. The jury is out. (Please realize the extraction increased by a tidy 1 x TDSsimply because of our assumption about the amount of interstitial liquid.)
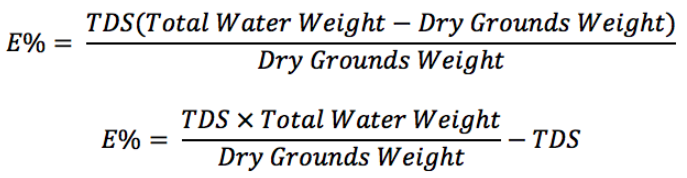
Immersion (we've subtracted the weight of the liquid trapped within the grounds)
The second equation above is a reduction of the first. We have subtracted the dry ground weight from the multiplier because that is also the approximate weight of the liquid trapped within the grounds.
Two examples
Percolation: Let's say you measure a v60 made from 20g grounds and 360g water, with a brewed-coffee weight of 320g and TDS of 1.4%.
By the old method, the extraction would be 22.4% (320 x 0.014 / 20 = .224 = 22.4%)
By the new formula, the extraction calculation would be 23.8% (just add the TDS to the extraction %)
Immersion: Let's say you brew a French Press with 20g grounds, 360g water, and TDS = 1.4%
By the old formula, the extraction would be 25.2%
By the new formula, the extraction would be 23.8%
The Fudge Factor
This method is not precise, given that we're estimating, and probably overstating, the TDS in the slurry liquid of percolation brews, and we're assuming a very tidy scenario of LRR=2 with exactly half of it in the grounds, half in the interstitial liquid. In other words, the fact that both methods showed 23.8% is mostly a fudge. The calculations would have to be adjusted for brewing methods like siphon or espresso, as they have a LRR of approximately 1, so I would use the old percolation formula for them. Dan and I have wrestled with this issue for a few days, and we agree that any extraction numbers are only relevant in context (grinder, brewing method, etc) and that there is no perfect method for doing this. Some cynics will say that calculating extraction is worthless because the numbers are a somewhat malleable, or because they need context. Those same people must prefer to roast without a bean probe or Cropster, as roasting data suffers from even more imprecision and need for context. There will always be doubters, and that's okay. Those of us who have been diligently measuring extractions for years have reaped tremendous benefits in our understanding of coffee making and our ability to communicate about brewing.
Conclusion
I'm sure the two people still reading are wondering things like "do we really need this complication" and "why doesn't Rao have a life?" Both are excellent questions and I don't know the answer to either. I like that this new method resolves the differences in the extraction calculations of drip and immersion brews. It's also possible, though I don't have any experience to confirm this, that your subjective ideal extraction numbers for a drip and immersion brew for a given coffee will get closer. That's not too important, but it would be a nice perk. (sorry)
Map it Forward: Beginner's Roasting Workshop (1/7)
Dec 18, 2017
Show notes
My friend Lee Safar has spent the past year developing “Map It Forward,” a workshop to help coffee professionals plan their coffee careers. Lee wanted help to offer a similar workshop for those interested in mapping a career in roasting, so last week at the Copa Vida roastery in Pasadena (thanks Steve!) I spoke at the first Map It Forward: Roasting workshop with Lee and Sumi Ali. The workshop was a success, with dozens of people attending in person as well as virtually. We received heaps of positive feedback, and many attendees requested a beginner’s class on roasting.
We’ll be offering a beginner’s roasting class at 11am PST on January 7, 2018 at Common Room Roasters in Newport Beach, CA (thanks, Ed!). We have space for about ten students to attend in person, and many more to tune in online.
The workshop is what I would consider a beginner’s class, though given the current, abysmal state of roasting education, the industry would probably consider this an “all levels” class. I’ve yet to meet someone who had attended a beginner’s roasting class and walked away with any accurate, practical knowledge. I’m frustrated each time I hear about what was “taught” in standard, industry roasting classes. We’d like to fix this problem, and my goal is to help new roasters learn good habits and proper theory from day one.
The workshop will be three hours, and will consist of lecture, hands-on roasting demonstration, an extensive cupping, and all the Q&A you can handle. Both present and virtual students will be welcome to submit questions ahead of time as well, and we’ll do our best to answer them.
The cost will be $99. Details and tickets and are available here.
The 2:1 Ratio
Dec 18, 2017
Show notes
If third wavers are good at anything, it’s following trends and adopting new dogmas. If I didn’t know any better, I would say that most young baristas are glued to Instagram all day, just waiting to see what trend they should unquestioningly follow next. Call me crazy.
One of the stickier trends in the past couple of years has been the near-religious adherence, at least in the US, to the 2:1 espresso-brewing ratio. I’d like to discuss what an espresso-brewing ratio (EBR) is, why it’s relevant, and why it’s a little silly for so many cafes to latch on to this suspiciously harmonious ratio.
What is an Espresso-Brewing Ratio?
Simply put, it’s the ratio of an espresso’s beverage weight to the weight of the dry grounds used to make the shot. For example, if a barista pulls a 36g shot from 18g of grounds , the ratio would be 2:1.
Why EBR is relevant
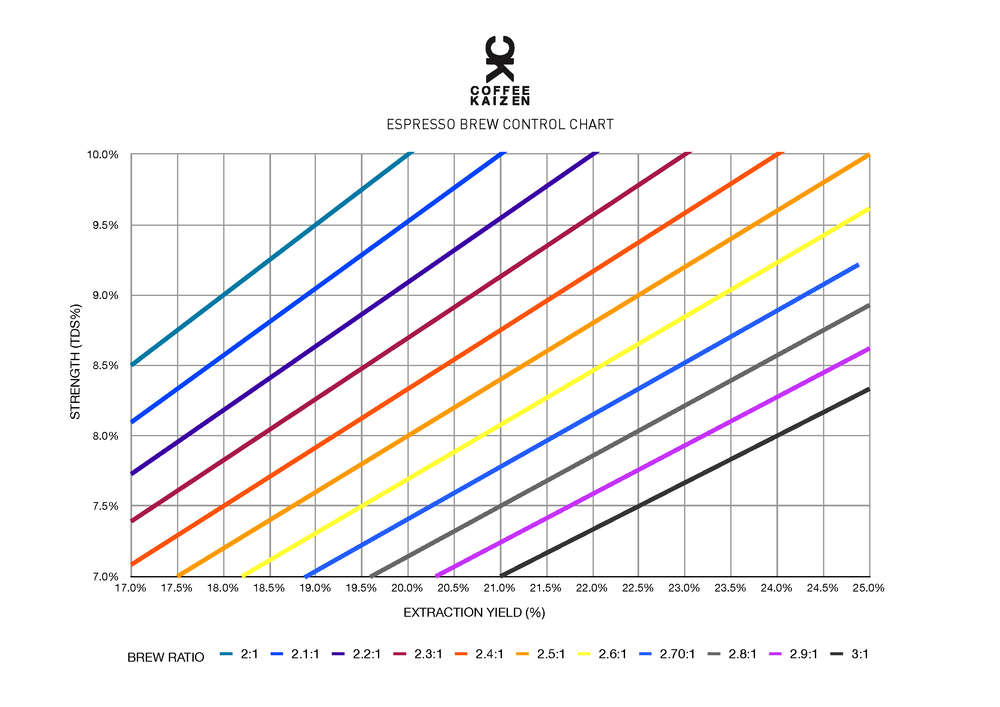
I suspect most baristas do not realize this: if you have exact targets for extraction % and TDS, there is only one EBR that can produce a shot that achieves both targets. For example, let’s say you desire a 20% extraction and 10% TDS. Using a slightly simplified calculation, the only EBR that can produce a 20% extraction/10% TDS shot is a 2:1 ratio.
For example, with a 20g dose and 40g shot:
10% TDS = 4g of coffee solids (10% x 40g shot = 4g) 4g of coffee solids extracted from a 20g dose = 20% extraction
A 2:1 EBR can yield a spectrum of extraction/TDS combinations; for example 8% TDS/16% extraction or 9%TDS/18%ext. But no other EBR can produce any of the combinations mentioned above.
What if you want 10% TDS and a 22% extraction? That requires an EBR of 2.2:1.* And so on. (Note that your EBR also happens to approximate the ratio of your chosen extraction% to TDS.)
*These calculations are slightly simplified to help illustrate the concept; please don’t get hung up on the imprecision.
Sam Sgambellone of Coffee Kaizen generously shared this chart showing the possible extraction%/TDS combinations possible with various EBRs. Thanks, Sam!
Why it’s a mistake for most cafes to get hung up on the 2:1 ratio
I’d like to offer three assertions:
1. A cafe should choose its EBR, ground dose, and shot weight as a system, based on the style and size of drinks it serves. 2. The “best” extraction % using a given set of brewing parameters (e.g. shot time, ratio, temperature, etc.) is usually the highest that one can achieve. Various combinations of grinder and espresso machine may call for different EBRs and extraction levels to yield the best-tasting shots. (i.e. better machinery can yield higher extractions at lower EBRs.) 3. Most cafes using a 2:1 ratio serve underextracted espresso and should explore higher EBRs to make their espresso riper, less sour, and less sharp.
Based on these assertions, the “one size fits all” approach to EBR seems a little unreasonable.
How to choose an appropriate dose and EBR
Let’s look at three espresso shots:
The first shot is destined to be drowned in a 16oz (450ml) latte in the US. For the coffee flavor to not disappear in the milk, the barista may want to cram as much coffee solids as reasonably possible in the drink. The barista may choose a large, 20g dose and a higher EBR, of let’s say 2.5:1. At a 21% extraction and 8.4% TDS, the baristas has added 4.2g of coffee solids to the latte.
The second shot is pulled by a barista in Rome, and is destined for a 5oz (150ml) cappuccino. The Italian barista will likely use 7g of coffee and a 2:1 ratio to yield a 19% extraction and 9.5% TDS. He will have added 1.3g of coffee solids to the drink. (It’s surprising but true: large lattes in the US and cappuccini in Italy are typically of similar strength. Italian capps likely often seem stronger due to frequent use of darker roasts and lots of robusta.)
The third shot is pulled by a barista in Melbourne as a “short black.” To provide high extraction and good flavor clarity using a light-roast geisha (washed, of course), the barista may choose a high ratio such as 3:1 and modest TDS. For example, most Australian baristas “split shots” (pull two separate shots per portafilter) and may use 20g of grounds and a 3:1 ratio to yield two short blacks, each a 30g shot from a 10g dose. Such a shot may have an extraction of 22% and TDS of 7.3% to optimize flavor and clarity at the expense of strength and body.
The best extraction is the highest extraction, within reason
I can’t tell you what the “best” extraction level is for your espresso shots. But I will tell you that you’ve probably never had an overextracted espresso. What?? Yes, it's true. Sure, you’ve had shots that were channeled, bitter, or had overextracted flavors. But when’s the last time you accidentally pulled, say, a 26% extraction, without doing something extreme, like using a 10:1 ratio? The “overextracted” shots you’ve pulled were channeled, or perhaps your burrs were dull or misaligned, but your shots were not overextracted in the mathematical sense. If you’re pulling 21% shots using an EK and you think they’re overextracted, check your burrs and your puck prep prior to lowering your extraction target.
NB: Your shots may not look channeled, but when you finally pull shots on a Decent Espresso Machine next year and get to see the volatility in the flow-rate graphs of your shots (the volatility indicates channeling), you’ll see that all shots channel. The DE1+ tells me that my shots channel, and so do those of several friends who have won the WBC. We’ve just never had the data and feedback needed to recognize and fix the problem. Maybe one day when we all have roller mills, Decent Espresso Machines, better puck prep, and perfectly-developed coffee, we’ll be able to routinely pull non-channeled, 30% extractions and decide our shots really are overextracted. Until then, you’re generally better off doing whatever increases your extractions. (As an aside, John Buckman of Decent is now possibly the world’s best barista at avoiding channels, as he has pulled more shots on the DE1+ than anyone else, and the machine’s feedback has made John’s learning curve nearly vertical. He also now knows more than anyone about shot dynamics and the effects of different puck-prep methods.)
Baristas should usually aim for the highest extraction possible when using standard EBRs (very high EBRs will always channel extensively, and in such cases maximizing extraction may not be wise.) If you taste symptoms of overextraction, work on your puck prep and ensure you’re using adequate preinfusion (very few baristas do).
Most cafes attempting to use a 2:1 ratio are underextracting their espresso.
The most important reason most baristas should question the 2:1 ratio is that they may be serving underextracted espresso. By “underextracted” I simply mean the coffee would taste better if the extractions were higher.
Simply put, if you’ve got a setup such as a Mazzer grinder (low extractions) and a La Marzocco Linea (no proper preinfusion, no pressure decline), and you use a 2:1 ratio, you’re likely underextracting. Using an espresso machine that offers slow, low-flow preinfusion, or a well-programmed pressure-profile machine, and/or using a higher-extracting grinder, such as a Mythos or a Peak, can each significantly boost extraction quality and quantity. Unfortunately, equipment selection is another area where baristas and shop owners do more trend following than analytical thinking, but more on that some other time.
How to test whether your coffee would taste better at a higher extraction
This is not a foolproof test, but it’s worth trying, and takes only a few minutes. Let’s say you typically pull shots with 2:1 EBRs using 18g in/36g out in 30 seconds. Try this instead: set your grinder one small notch coarser. Purge a couple of doses from the grinder. Pull a 3:1 ratio shot (18g in/ 54g out) in 30—35 seconds. You've now likely increased extraction by more than one percentage point. Assuming the shot did not channel more than usual, taste the coffee and evaluate whether you prefer the flavor to that of your 2:1 ratio shots. If you were underextracting at 2:1, you’ll likely find the 3:1 shot is juicier, less sharp, and less sour.
The test is imperfect, primarily because we’ve changed the flow rate, but almost all baristas who have done this test with me preferred the flavor of the 3:1 shot over the 2:1 shot.
The Upshot
When choosing an EBR, consider factors such as your preferred extraction level, TDS, shot weight, beverage size, the quality of your equipment, and the purpose of the shots (will it be served black? how much milk does it have to balance?). One factor to not consider is what everyone else is doing. Sure, if an expert such as James H. or Matt P. makes a recommendation, give it serious consideration and a fair trial. But if you make brewing and equipment choices based on what everyone else does, you’ll likely make average coffee (by definition, if you just follow the herd, your results will be average) and you may do something silly like spend ten years serving 1:1 ristrettos (remember those days?)
Thanks for reading. Please share your thoughts.
The Lucia Update (AKA The Yeast-Fart-Coffee Update)
Dec 18, 2017
Show notes
Thanks to all of you who have expressed interest in tasting some of Lucia’s coffee. Our original intent was to offer coffee from her project in El Salvador, but the crop was late and we decided that ultimately it wasn’t the best choice to showcase her work. Lucia has instead chosen a coffee from Huehuetenango, Guatemala that should be available in January.
When the details are finalized, I’ll post them here and will also directly email those who have inquired about purchasing her coffee. The coffee will be roasted and shipped by the soon-to-be-famous Regalia Company in NYC.
More on this soon.
Looking Beyond Origin for Flavor Diversity
Oct 26, 2017
Show notes
**************************
Recently I’ve had the pleasure of meeting Lucia Solis, a fermentation expert who cut her chops in the wine industry. Lucia has been working in coffee for the past three years as a “coffee-fermentation designer”: she helps mills rationalize, improve, and customize their fermentation process.
The old (and current) view of fermentation is that it offers no opportunity for flavor enhancement, only risk. The new view (Lucia’s) is that it’s best not to leave fermentation up to chance, but rather to manage it in a way that helps enhance the final product while decreasing the risk of subpar batches.
Surprisingly, some green buyers have criticized Lucia's efforts, and seem scared that intentional fermentation design will either decrease the diversity of coffee flavors available, or somehow "ruin" coffee. Many new ideas are a little scary at first, but I'll support any new idea that promises to protect farmers from some risk, makes one small step in processing more predictable, and gives a processor a new tool in her toolbox.
Please read what Lucia has to say and decide for yourself. We’d love to hear from you.
Scott
P.S. I've arranged with an excellent roaster-friend in NYC to provide 250g bags of roasted coffee from Lucia's upcoming project in El Salvador. The beans will be roasted and available for sale around the first week of December. Please send me an email at scott@scottrao.com if you'd like to buy a bag. I do not have specifics yet about pricing or date, but I will get back to you as soon as I do. Supplies will be limited.
*********
By Lucia Solis
My work as a winemaker and now as a coffee-fermentation designer centers on one simple truth: fermentation creates chemical compounds with sensory characteristics. I was primed to focus on microbes due to my background in winemaking. I got my degree in Viticulture and Enology at UC Davis and worked for nearly a decade in wineries in Napa Valley, California before my background in microbiology and fermentation brought me to the coffee industry. Today, I travel to mills and coffee farms across Central and South America where I work directly with producers to change the way they process coffee.
One way that roasters show diversity of flavor is to offer coffees from different parts of the world. This practice emphasizes regional differences that highlight the effect of geography but minimize the role of post-harvest processing in flavor development. Most of the difference between coffees is usually attributed to cultivars, climate and growing conditions, but the contribution by microbes is frequently overlooked. The tiny microbes (yeast and bacteria) that transform the cherry fruit into parchment have the potential to impact flavor in a big way.
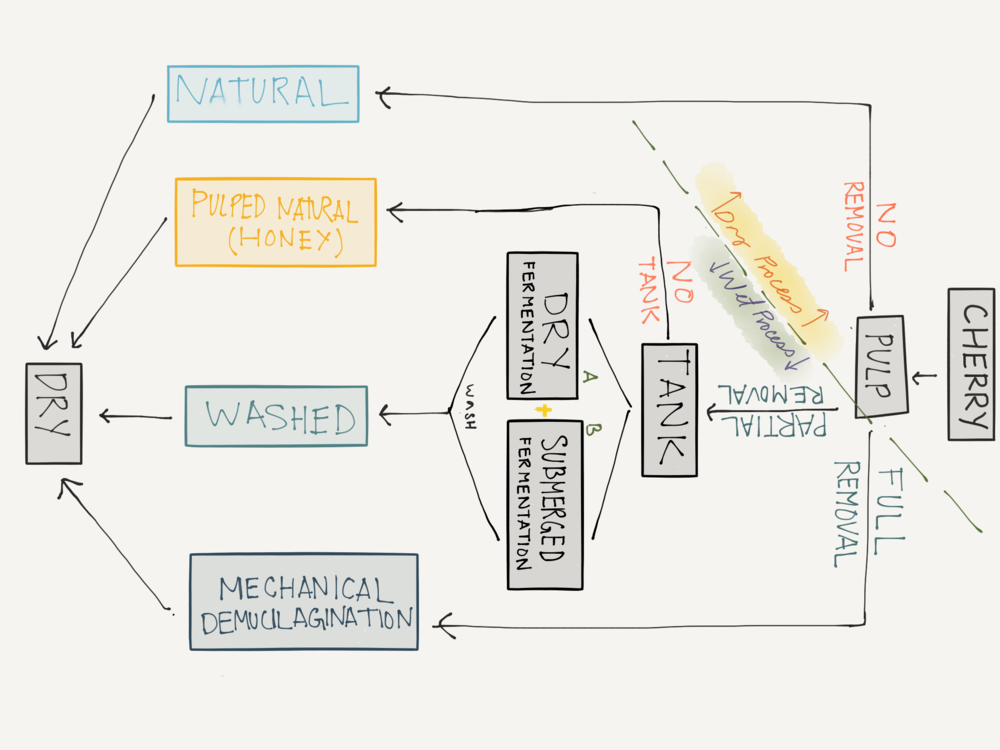
Turning the cherry into green coffee ready for roasting is a multistep process. Each step provides an opportunity to impact flavor and quality.
We have only a handful of words to describe processing methods, for example washed, wet, honey, or natural, but each of these words can encompass very different and complex steps. The steps and time involved in what someone would describe as “washed” process vary wildly based on the climate, altitude, cultivar, ripeness, tank design and myriad other variables impacting fermentation kinetics. A coffee could spend anywhere from 8 hours to 72 hours in contact with the mucilage (fermenting) before it is washed. The words “fully washed” might not even mean that a coffee was fermented – but even if you know with certainty that it had been fermented, a coffee dry-fermented for 8 hours will likely taste different from one fermented underwater for 40 hours; or one fermented at 700 meters altitude (MASL) at 80°F versus 1500 MASL and 55°F; or one fermented in wood versus ceramic tanks. And so on.
Not only do the words we use to describe the process lack specificity, there is little known about the flavor effects of different processes’ steps or the microbes involved during those steps. This is the focus of my work.
Before I could change the way coffee was physically processed by highlighting the effects of the microbes involved, I had to update producers' definition of “fermentation”. I had been trying to educate producers about the flavor effects of different strains of yeast and bacteria, but I was getting nowhere. I finally realized few people understood the value of fermentation in the first place.
I was using the word “fermentation” to describe a metabolic process whereby yeast and bacteria transform sugars into energy and flavor compounds. Yet the most common working definition for coffee purposes was “the step where the pulped coffee sits in a tank until the mucilage falls off”. This was like trying to teach roasters to roast with a declining rate of rise and realizing that they don’t understand the effect the thickness of the probe has on that curve.
In the wine industry, fermentation is extensively studied because it is a necessary step in winemaking: you can’t have wine without it. I noticed the coffee industry used the same word, but it had a very different meaning to almost everyone I talked to. I think the main reason for the discrepancy is that “fermentation” is optional in coffee; it’s just one method of isolating the seed from a cherry.
In addition to being optional, it is also not restricted to a single process as commonly thought. Fermentation is not only happening in tanks with wet process/washed coffees, it is an element in honey and dry/natural processed coffees as well. In every process where fermentation occurs there is the opportunity to impact flavor. Fermentation begins the moment that microbes, which exist on virtually every surface, find an entry point into the fruit. The opportunity for fermentation happens as soon as the fruit is picked or when there is damage to the skin (exposing juice) while the cherry is still on the tree.
To address the risk of a spontaneous fermentation in winemaking, some wineries pick at night (the coolest part of the day, to slow down microbial action), spray their grapes with sulphur dioxide to inhibit the wild yeast population coming in from the field, or store picked grapes in dry ice until they are ready to begin the fermentation with known and selected microbes.
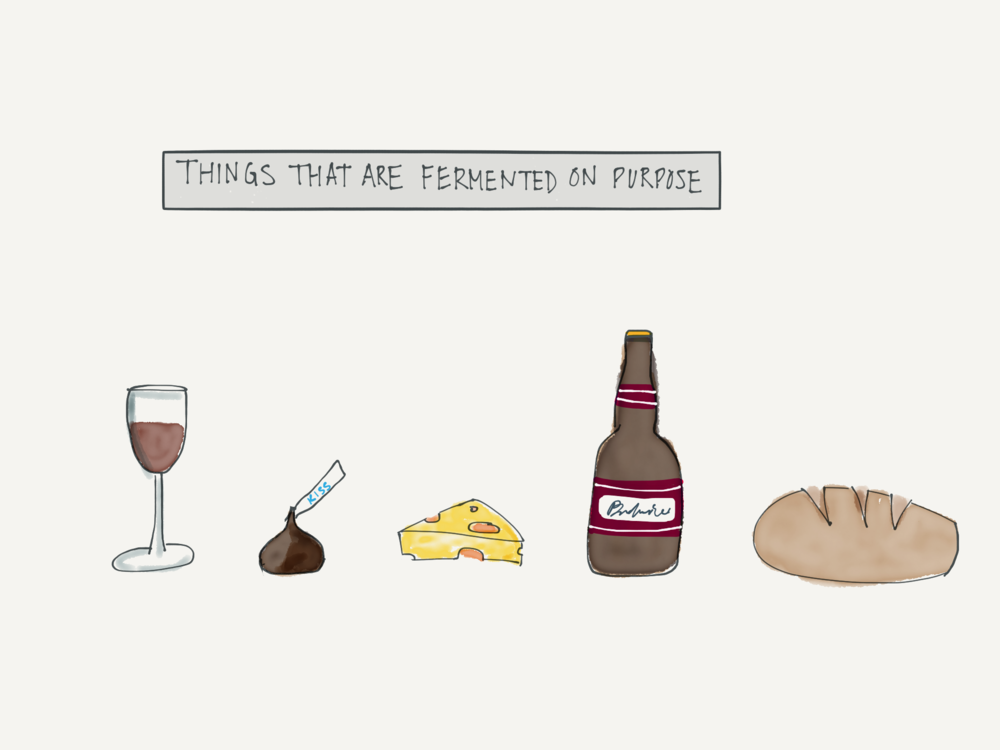
Fermentation is a natural process that happens without human intervention. Winemakers actively chose whether they will risk a spontaneous fermentation or select their microbes and control the process. Even if they choose to use wild yeast and not commercial yeast, they are still making a decision that actively impacts flavor. Most commercial producers of fermented products (wine, bread, cheese, beer, chocolate) inoculate their fermentation. Inoculation is rare in the coffee industry because the focus has been on reducing the risks of processing, and the rewards have been poorly understood.
Wine, chocolate, cheese, beer and bread, a few examples of other industries that harness the power of microbes to achieve a desired outcome.
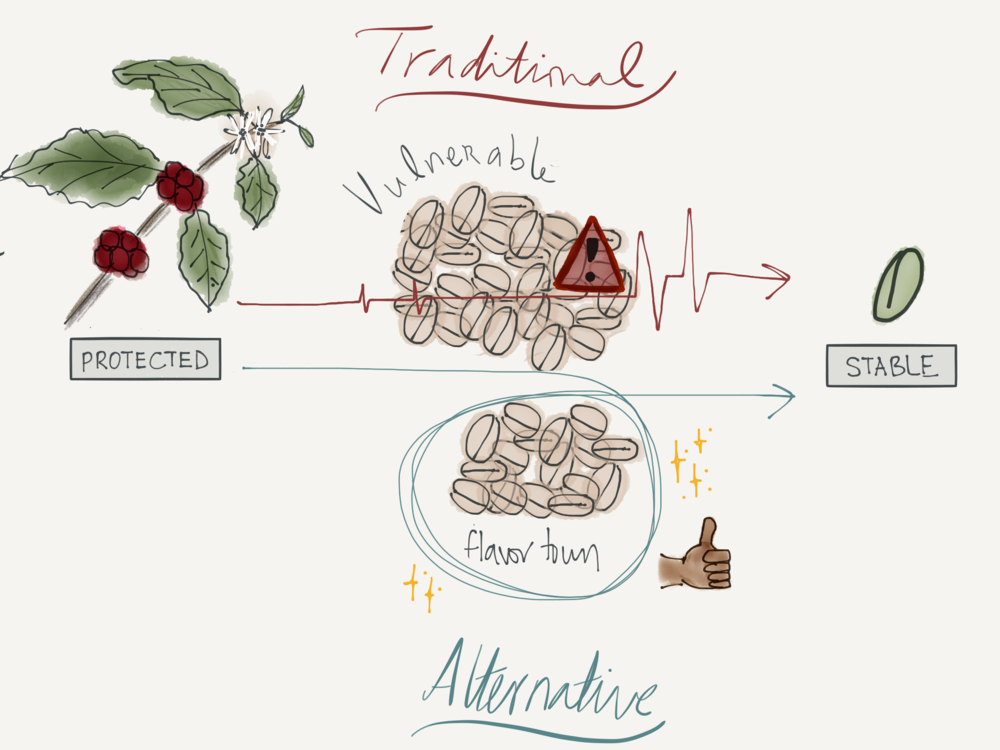
The coffee industry defines “processing” as the time between picking a cherry and sending it to dry, usually in the form of either a whole cherry (dry/natural process) or as parchment (wet process). The cherry skin serves as a protective boundary for the seed, and once removed it leaves the coffee seed vulnerable to spoilage. Most literature stresses the importance of expediting processing to reduce the likelihood of damaging or lowering the quality of the coffee. Extending the time between cherry and dried seed is seen as risky for quality. That is: the traditional paradigm suggests that fermentation offers no opportunity for flavor enhancement, only risk.
Traditionally the path from coffee cherry to dried green coffee was fraught with risk. The conventional wisdom has been to minimize fermentation time in order to reduce the vulnerability of the seed. An alternative method is to control and extend fermentation to yield positive flavor attributes while mitigating risk.
Though we can’t see microbes with the naked eye, we know they influence taste and aroma because we notice their impact when the fermentation goes wrong: we taste this in the form of cup defects. This explains the push for mechanical demucilagination by some experts such as Sivetz and Flavio Borem. At best, in this view, processing merely maintains the inherent quality of the fruit.
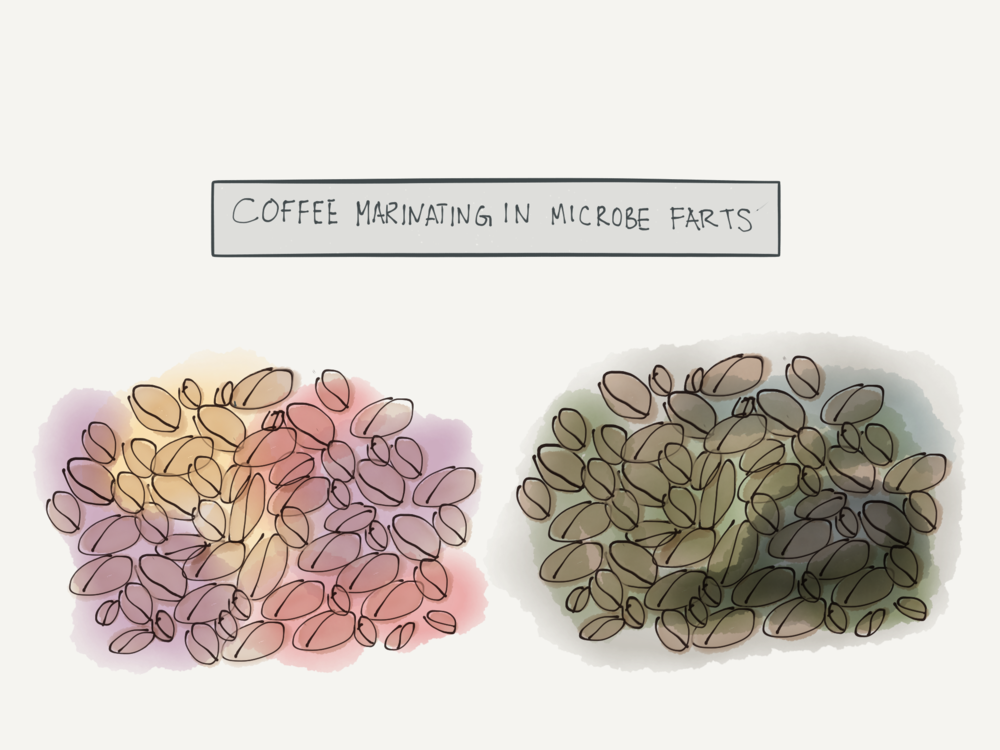
Flavor metabolites are basically yeast and bacteria farts. Which would you rather your coffee marinate in?
But what are the rewards? We know that processing can impact flavor in positive or interesting ways: this explains the ubiquity of honey-processed coffees and the presence of dry-processed coffees on offering sheets. That is to say, we know dry-processed coffees taste different from wet processed coffees, so clearly, processing impacts flavor – enough that some people reject all coffees processed by particular methods.
Producers can continue to rely on luck or choose to harness the power of the microbes that influence flavors in the cup. Let me alleviate the fear that if more producers select their microbes, coffee flavors would be homogenized. The cultivar, sugar and nutrient levels in the fruit, shape and material of the tank, ambient temperature, water quality, length of contact time and other factors will still impact fermentation. This means that we don’t eliminate diversity of flavors–but we decrease the occurrence of undesired flavors.
I reject the view that processing is simply about maintaining quality or reducing defects. I believe that certain practices like controlled fermentation can enhance and add value to coffee. Properly fermented coffee is a more complex and valuable product than coffee that has been mechanically demucilaged. Fermentation fundamentally transforms the raw materials by creating new flavors.
Like brew masters, instead of waiting a year with a barrel open to the environmental conditions and not knowing whether the results will taste delicious or like skunk water, producers can treat their coffee like a kettle sour and get the same flavors consistently. We use microbes to break down the nutrients in the mucilage and produce desirable metabolites. We brew a delicious “wort” and allow the coffee to sit in it past the point of a traditional ‘fermentation’, allowing the seed to absorb the wort and those flavors. Careful choice of microbes can protect the coffee from spoilage and pre-select the metabolic products we want – the ones that taste and smell good.
Controlling fermentation is key to harnessing the power of processing to create positive attributes. Fermentation, a biological process that occurs in every form of processing, is an opportunity to impact flavor, and all the steps from the farm to the patio can impact the quality and consistency of coffee. By understanding the power of fermentation and processing, producers and roasters can ensure diversity of flavors while improving the consistency and quality of coffee.
To see Lucia's coffee-processing photos, visit her on IG @lluciasolis
LA Roasting Cooperative
Oct 23, 2017
Show notes
I know it's not a novel concept these days, but I'm opening a co-op roastery in Los Angeles. I had first attempted to partner with a friend to open a cooperative roastery in LA about six years ago, and that fell through, but I'm happy to announce that I've formed a new team ready to change roasting in LA forever. And it only took me 10 years :0. We've secured a great space near downtown LA to offer the highest quality cooperative roasting operation in the US.
Among the goodies we'll offer include:
Probat G45 roaster
Probat UG22 roaster
Mill City 15kg roaster
DE1PRO espresso machines
Various sample roasters analytical equipment (moisture, density, and aW meters, etc), and packaging machinery, etc.
All of our roasting machines will have the most advanced, proprietary software out there for any degree of roasting automation our users desire. I've used almost every roast-control system in the world, and I have to say: almost all of them are not worth using. We're going to offer best-in class controls and excellent, optional automation systems, as well as free consultations for anyone who joins and wants to up his or her roasting game.
We also have a few novel, exciting machines, features, and interesting neighbors up our sleeves. We'll publicly announce when we're ready to open our doors sometime in mid-2018.
Fines: October 23, 2017
Oct 23, 2017
Show notes
Among the more interesting things that happened in my coffee life this week:
Seasoning my grinder with parboiled rice! Based on the online comments of Tom Chips in a 2013 home-barista.com post, I decided to try using parboiled rice (not raw rice) to season a new grinder I received last week. It worked like a charm. Tom is one of the most sensible people on that forum, so i felt confident in trying the parboiled rice trick. It saved a lot of time and money-- thanks Tom! (NB: Please don't ask me how much rice or where to get parboiled rice-- I don't consider my n=1 data to be worth sharing publicly.)
I signed a lease on a space in Los Angeles for a cooperative roastery (see recent post)!!
I tasted some stellar Rwandan coffee processed using fermentation methods custom-designed by my new friend Lucia Solis. The Rwanda was delicious, and easily the most interesting coffee I've tasted in months. Lucia has been applying to coffee what she learned during a career in wine fermentation, and the results are exciting. Look for a guest post by Lucia here in the next few weeks. I'm learning so much from Lucia and look forward to her sharing her ideas with my readers.
Stay tuned!
Immersion vs. Percolation: Have We Been Calculating Extraction Incorrectly?
Oct 23, 2017
Show notes
Several readers recently requested a post explaining the differences in measuring extractions of immersion vs. percolation (drip) brews. I have always wanted to write about this, but didn’t think anyone would want to read such a post :). I’m glad I’ve got a few geeky readers out there.
Writing this post got me to thinking, measuring, and questioning. What I found was surprising, so I discussed it with my friend Dan Eils, my frequent partner in coffee debates. I think Dan and I are onto something, and it brings into question the way we have all been calculating extractions. This post wouldn't have been possible without Dan's help and our enjoyable weeks-long debate over these issues.
Comments are welcome, and sharing this post with other coffee enthusiasts is also welcome, as I'd like to get feedback and ideas from many sources to gauge whether it may be worth pursuing some new extraction equations.
First, a little primer...
Concentration Gradient
When water mixes with coffee grounds, extraction occurs by two mechanisms: first the water washes exposed solids off the ground surfaces, and then coffee solids dissolve in the water and move from the grounds to the surrounding slurry by diffusion (surface washing dominates espresso extraction, while drip and immersion methods favor inner-particle diffusion.) The rate of diffusion is determined primarily by the concentration gradient, the difference in solids concentration between the grounds and the slurry. The higher the gradient, the more quickly extraction will occur.
Curves are for conceptual purposes only. They were not derived from data.
Immersion Brewing
During immersion brewing, upon water contacting the grounds, the concentration of coffee solids in the slurry increases rapidly, and then continues to increase at a progressively slower rate, asymptotically, for the rest of the brew. An example of this is how the color of coffee in a French press hardly looks much darker from a few seconds into the brew until a few minutes later. Another example is how in cupping, brew strength doesn’t change much in the time window of 9:00–-20:00 in which you likely slurp and spit (the lower temperatures of a long immersion also contributes to the slowing extraction rate.)
Brew and serve a French press, and you’ll notice that the strength of the coffee left behind in the grounds, the “interstitial liquid," is nearly identical to the strength of the coffee in the cup. If you were to measure the drips from a French press after decanting the liquid that readily poured out, you'll find the strength of those drips would be approximately the strength of the liquid in the coffee served, or perhaps slightly stronger.
Percolation brewing
Percolation refers to brews in which liquid extracts coffee solids by passing through the bed of grounds. Just to be clear, I’m not referring to those nasty old “percolators” you may remember your mom breaking out for large gatherings when you were a kid. And trust me, there are few more memorable aromas than baked-in, rancid robusta oils from a dirty percolator in 1977.
In a percolation method such as batch brew, during most of the brewing cycle, fresh, clean water is added to the slurry while solids-packed liquid leaves the slurry. That causes the slurry’s solids concentration to decrease throughout the brew. So, while the strength of the slurry of a French press is always increasing, the strength of a slurry during percolation is always decreasing. This is important, and is the primary reason percolation is a more efficient extraction method than immersion.
The very slow addition of water to the slurry in percolation makes the initial TDS very concentrated. The late-extraction TDS of normal brews won't be as divergent as these curves imply, but if you were to brew each long enough, the curves would continue to diverge as shown. Curves are for conceptual purposes only.
Why your software has separate modes for drip and immersion
Standard percolation extraction measurement
This is a short version of what I was taught years ago: at the completion of a percolation brew, the slurrys TDS is extremely low, almost zero. Therefore, when considering how much coffee solids extracted during a percolation brew, you can more or less ignore the dissolved solids remaining in the slurry liquid. That is why the VST Coffee Tools app (née Extract Mojo) uses the brewed-coffee weight as the multiplier for the TDS to determine total extraction-- almost all of the extracted solids are assumed to be in the cup.
Standard immersion extraction measurement:
When measuring the extraction of an immersion brew, the liquid left in the slurry is full-strength coffee (or possibly a tad stronger). That is why the software uses the brew-water weight to calculate the extraction of an immersion brew: the slurry liquid is just like brewed coffee, left behind:
*Please note: this equation is slightly incorrect-- to be precise, you should increase the total water weight by the weight of the solids dissolved in the water. For example, if the total water poured is 100g and final TDS is 1.5%, then the total-water weight should really be 101.5g, not 100g. The difference in calculated extraction will be about 0.3% (eg. 20.3% vs. 20.0%).
Theory vs. Reality
Here's the surprising part: I decided to sample a few ml's of liquid from the spent grounds of several v60s and batch brews, and they measured anywhere from 0.8%--1.3% TDS. For reference, the brews were all in the 1.3%--1.4% range. This shocked me-- you know how the last bit of liquid flowing from the basket in a batch brew looks like very weak coffee? That had always fooled me into not questioning what I had been taught about the slurry liquid TDS being extremely low.
Two liquids in the slurry
If you use Coffee Tools software, you've seen the term LRR: liquid retained ratio. LRR varies with brewing method: the coarser grind of a batch brew holds a touch less liquid than the finer grounds of a v60, and a siphon has a very low LRR due to suction literally vacuuming the interstitial liquid from the coffee bed. For the sake of this discussion, let's keep it simple and assume a percolation LRR of 2g/g of dry grounds.
It's speculative, but Dan and I agree that the liquid trapped within the grounds at the end of a brew is probably pretty strong, or at least stronger than the interstitial liquid. The dissolved solids in the liquid trapped within the grounds are, by definition, not extracted, so they should not be a part of any extraction calculation. Therefore, we may be overstating the extractions of immersion brews. The relevance of the solids within the interstitial liquid is more debatable. In my view, the solids in the interstitial liquid have been extracted, they just never made it into the cup. Given the revelation that the TDS of the interstitial liquid is rather high, if you believe the solids dissolved in the interstitial to be "extracted", as I do, then its arguable that we've been understating the extraction levels of percolation brews. .
Computer art by Dan :). Note the ratio of inner-particle liquid to interstitial liquid is not to scale. Any resemblance to cartoon amoebas is purely coincidental.
A Proposal
For the five of you who made it this far, thanks for hanging in there. And I'm sorry you don't have better things to do than read my blog. :)
I propose that we consider changing the way we calculate extraction: perhaps we should count the solids in the interstitial liquid but not the solids still trapped within the grounds. The current equation to calculate immersion extraction counts the solids-packed liquid still trapped within the grounds, but it probably shouldn't. Conversely, the percolation calculation doesn't count the extracted solids in the interstitial liquid, but it probably should.
The original draft of this post proposed new extraction equations, adjusted to reflect the solids remaining in the interstitial liquid but not the solids dissolved in the liquid still trapped within the grounds. I’m hesitant to share them publicly without first gathering some feedback about this post. I imagine many coffee professionals won’t want to change the way they calculate extraction, and others may be excited by equations that would potentially harmonize the results of immersion and percolation brews. Currently, a "20%" percolation and a "20%" immersion brew don't taste as similar as most of us would like. If the new equations were to make the relationship of extraction numbers and coffee flavor more similar for the two types of brews, that would be a huge win. If the numbers don't harmonize the flavor/number relationship, then it's probably not worth going to the trouble of adjusting the system we use to calculate extractions.
I’d love to hear from you, even though there are no contest prizes on offer this time :).

 Our TOPPODCAST Picks
 Stay Connected