TopPodcast.com
Menu
  • Home
  • Top Charts
  • Top Networks
  • Top Apps
  • Top Independents
  • Top Podfluencers
  • Top Picks
    • Top Business Podcasts
    • Top True Crime Podcasts
    • Top Finance Podcasts
    • Top Comedy Podcasts
    • Top Music Podcasts
    • Top Womens Podcasts
    • Top Kids Podcasts
    • Top Sports Podcasts
    • Top News Podcasts
    • Top Tech Podcasts
    • Top Crypto Podcasts
    • Top Entrepreneurial Podcasts
    • Top Fantasy Sports Podcasts
    • Top Political Podcasts
    • Top Science Podcasts
    • Top Self Help Podcasts
    • Top Sports Betting Podcasts
    • Top Stocks Podcasts
  • Podcast News
  • About Us
  • Podcast Advertising
  • Contact
Not in our directory?
Add Show Here
Podcast Equipment
Center

toppodcastlogoOur TOPPODCAST Picks

  • Comedy
  • Crypto
  • Sports
  • News
  • Politics
  • True Crime
  • Business
  • Finance

Follow Us

toppodcastlogoStay Connected

    View Top 200 Chart
    Back to Rankings Page
    Games & Hobbies

    Matt’s Basement Workshop Video Feed

    This is the video only feed for Matt’s Basement Workshop Podcast. If you prefer to watch your woodworking content this is the feed for you!

    Advertise
    • Apple Podcasts
    • Google Play
    • Spotify

    Latest Episodes:
    529 Scrap wood magnet clips Aug 13, 2014
    Show notes

    If you haven't noticed yet there's a bit of a theme to my videos this summer. Have you figured it out? It's "Scrap wood projects!"
    scrap wood magnet clips
    Continuing along with the last couple of episodes this one is no different. For today's project all you need are some Metal Hinge Clips, Magnet discs, and scrap wood.
    What I find great about this project is that it's an opportunity to use some of your smallest scraps and you're truly only limited by your imagination when it comes to shape and size. Okay, maybe you're a little limited also by the strength of the magnet, but that's easy to fix too with the purchase of a rare earth magnet or two.
    And just like all the other scrap wood projects we've seen over the years, this is a great opportunity to not only use material that might ordinarily get tossed or burned, but it's an inexpensive way to familiarize yourself with a new species or two.
    If after watching the video you decide to make some yourself, please feel free to share pictures. I'd love to see what you create!

    Help support the show - please visit our advertisers

    528 Hip photo clipboards Jul 25, 2014
    Show notes

    In the never-ending quest to answer the timeless woodworker question "what do you do with your scraps?" I have yet another answer, photo clipboards!
    small wood clipboard
    Actually, this one came directly from my beautiful and amazing wife Samantha, who was looking for something new to present to her wedding photography clients.
    The concept is simple. Take a beautiful piece of scrap wood, shape it a little if necessary, clean up its surfaces so there's no splinters, apply a simple finish to protect it and attach a clip to one face.
    The result is an amazingly simple project that can be as big or small as you need for your presentation and a great way to clean out your scrap pile (or to just experiment with some pricey exotics without breaking the bank.)

    Help support the show - please visit our advertisers

    527 Another bottle opener? Jul 10, 2014
    Show notes

    Short of having a bottle opener in every room of the house I don't really have a need for another one. But when inspiration strikes, who am I to stand in its way?
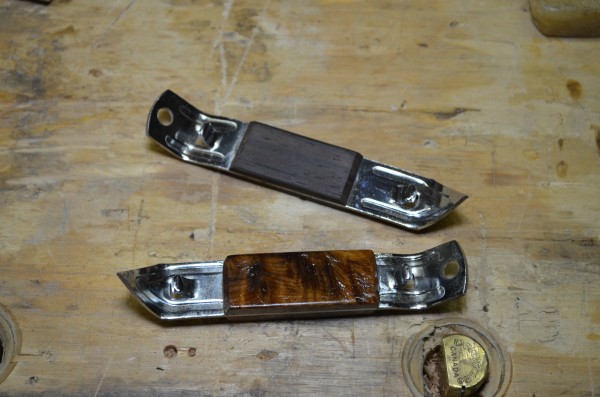
    small bottle openers
    So on today's episode we're making another bottle opener. Except this time, I know for a fact you can easily find this version just about everywhere (even Amazon.com), and in most cases for under a $1.
    Plus, with this style of opener, there's a lot of ways you can dress it up or have a little a fun with the scraps you'll be using.
    In fact, you can use scraps that might ordinarily be tossed simply because they're practically the size of cutoffs and chips that probably go flying across the room when you use your mitersaw.
    So crack open a cold one (grape-soda or otherwise) and kickback for a quick project you can knock out in an hour or two and literally for just a few dollars.

    Help support the show - please visit our advertisers

    526 A bottle opener's wooden makeover Jun 28, 2014
    Show notes

    For sure the warm days of summer are upon us in the Northern hemisphere, and as I mentioned in a recent post, that means it's time for me to start spending more time out of the shop.
    I'd love to say all that time outdoors is devoted to hanging with the family; swimming in the big lake, riding bikes and just all around having fun. But typically the summer is usually filled with plenty of yard work and home repairs too.
    While shop time can get limited in the summer, I still manage to head into the basement during the hottest parts of the day to escape the heat and enjoy this shared passion of ours for woodworking by tackling smaller projects I can knock out in an hour or two or over a few evenings during the week.
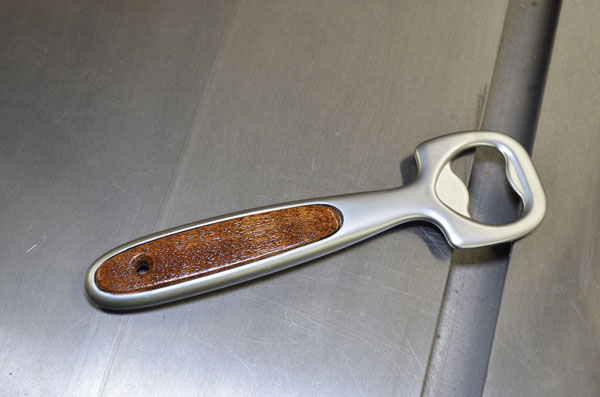
    Last year, around the 4th of July, I built the six-pack made of scrap wood that was lying around the shop. This year I'm taking some of my smaller cutoffs and scraps that I bought from the folks at Bell Forest Products and decided to spruce up a rather ordinary rubber gripped bottle opener I picked up at my local big box grocery store.
    [caption id="attachment_12198" align="aligncenter" width="600"]Wood handled bottle opener So many wood scraps to choose from...I guess I need to make more of them![/caption]
    This is one of the projects that reminds me how much fun it can be to be a woodworker. Being able to take something that looks rather plain and ordinary and making it my own.
    I was looking around at the store where I originally bought it and I can't find any more. I also looked online and at the manufacturer's website, but apparently this must be a discontinued item?
    However, I did see this model is available from the same manufacturer, and it looks like it could work just as easily. Perhaps another video in the making?


    In the meantime, I hope you enjoy this little project and it inspires you to do something similar with items laying around your house.
    Help support the show - please visit our advertisers

    525 Bathroom cabinet part 4 “Skinny legged base" Jun 13, 2014
    Show notes

    I've finally navigated my way through the quagmire that is "the loose ends" of the final steps to completing a project. It was a rough trail with a few pitfalls along the way. But regardless of the route I took to get here, the final video of the bathroom cabinet project is complete.
    view from the inside
    In today's episode we're covering the basics of the construction of the base upon which the cabinet will sit. And I have to admit, it looks good from the front, but from the side it appears I may have misread my own dimensions?
    At just under 8 feet tall, the combination of the cabinet and the base are pretty amazing, but it leaves me wondering if I should construct a step stool to reach the top shelf!
    Regardless of the height or any of the details that bogged me down, the dark chocolatey color of the finish and the beautiful grains of the cherry veneers in the cabinet doors and sides make this cabinet absolutely gorgeous!
    glass for cabinet door

    Help support the show - please visit our advertisers

    524 Bathroom cabinet part 3 May 02, 2014
    Show notes

    After what felt like forever I finally completed the pre-finishing process for the body of the bathroom cabinet. A brown dye with a few coats of poly and it's now ready for assembly. If you’re curious how this first attempt at a pre-finish went, checkout my earlier blog “Confessions of a first time pre-finisher”.
    Cherry plywood cabinet
    In today’s episode we’re concentrating on getting the doors installed. At this point it's all about finessing the fit to get the desired reveal I like for inset doors.
    While I like to think I have enough experience to be able to hang the doors without a lot of effort, the truth is I rely a lot on the adjustability of the European-style hinges I'm using in this build.
    Installation of this style of hinge looks complicated at first, but in reality it's a lot easier than you may expect. But to make it even easier we’ll cover the construction of a story stick to make it quick and easy to layout all the hinges quickly and accurately.

    Help support the show - please visit our advertisers

    Get your MBW t-shirts, click here to order

    523 Bathroom cabinet part 2 Apr 21, 2014
    Show notes bathroom cabinet construction
    In today’s episode we’re moving along on the bathroom cabinet by constructing all three doors. The two on top and the flip down version below.
    All three are a form of frame and panel construction, but the biggest difference is in how I chose to assemble them. For the two larger doors up top, the panel is actually 3/4” plywood glued to the stiles creating one large piece.
    Then for the flip-down door I used a more “traditional” construction technique and turned to a rail and stile router bit set to create the joinery.
    Once all the doors were constructed, we also need to drill the holes that will make up the adjustable shelving system behind the two doors on top.
    Help support the show - please visit our advertisers


    522 Bathroom cabinet part 1 Apr 04, 2014
    Show notes

    My next big project is already underway, a “commission” piece for an old neighbor. After they did a little bathroom renovation, there’s now a need for a cabinet that can store towels and all those things you don’t necessarily want hanging out making the place look all cluttered.
    The cabinet itself is a pretty good sized piece. In fact a lot bigger than I had originally envisioned, but so far it’s coming together rather nicely.
    The body of the cabinet is being constructed of a premium cherry veneered plywood, so the big question on my mind was what would I cover the exposed plies with? Veneer edge-banding or a thicker solid wood edge-banding?
    I chose the thicker solid wood version and decided to try a technique to cut it repeatedly and accurately on the table saw that I hadn’t tried before.

    Help support the show - please visit our advertisers

    521 Thickness planer “Death Match” Mar 15, 2014
    Show notes

    Now that I lured you in with that “misleading” title here’s what today’s episode is really all about, a side-by-side comparison of my old Rigid 13” thickness planer and the new-to-me Steel City Tool Works 13” thickness planer with helical-style cutter head.
    Actually that description is also a little misleading considering the only thing being compared are the cutter heads. The Rigid planer has a traditional 2 straight-blade cutter head while the SCTW has a helical-style cutter head, which features numerous smaller cutters laid out in a helical pattern.
    Really my goal today was to demonstrate (to myself and you of course) that there is a noticeable difference between these two styles of cutter heads. So to achieve this goal I grabbed some scrap highly figured curly-maple, ripped it in half and fed one through each machine. The result? I guess you’ll have to watch to find out.
    ***FOR THE SAKE OF COMPLETE TRANSPARENCY: I originally received the Steel City Tool Works 13” planer for a review segment in 2013. Then after working with the staff of SCTW for an event at their Head Quarters, I received the tool as partial payment for my time and assistance. But I can assure you, my opinions on the tool are completely my own and cannot be altered by the manufacturer***
    Looking to purchase either of these machines? You can find them at the following retailers (please remember, purchases made through these links help support the show while getting you the tools and supplies you need for the projects in your own shop):
    Amazon.com - Steel City Tool Works 40200H 13-Inch Planer with Helical Cutterhead
    Highland Woodworking - Steel City thickness planer

    Help support the show - please visit our advertisers

    520 Veneered smart phone case Mar 01, 2014
    Show notes veneered smart phone cases
    Looking for a fun project in the shop that doesn't take long and you can carry it around in your pocket where ever you go? Here's one for you, a custom veneered smart phone case.
    One of the benefits of being a woodworker is that we can frequently customize everyday items. Whether it's building them from raw materials or adding a little flair to an existing item, it's relatively easy to find a way to spruce them up a bit.
    In today's episode I'll show you a little fun I've been having lately when I combine some inexpensive pre-manufactured plastic smart phone cases I picked up at Amazon.com with some veneers I bought at Woodcraft.com.
    The process is simple, it can be relatively quick and more importantly it's a great way to have fun in the shop and maybe even impress your friends and family (unless they're like mine who just roll their eyes and walk away...with the item in hand.)
    Links to items mentioned or used in the episode:
    Smart phone cases at Amazon.com
    Veneer Variety Pack 20 Sq. Ft.
    Crown Veneer Saw
    Nexabond 2500 Instant Wood Glue (regular formula)

    Help support the show - please visit our advertisers

    Previous 1 2 3 4 5 6 15 Next

    Related Podcasts

    The Joe Rogan Experience

    1

    The Joe Rogan Experience Comedy
    Casefile True Crime

    2

    Casefile True Crime Games & Hobbies
    Reply All

    3

    Reply All Games & Hobbies
    You Must Remember This

    4

    You Must Remember This Games & Hobbies
    Real Time with Bill Maher

    5

    Real Time with Bill Maher Games & Hobbies
    Last Podcast On The Left

    6

    Last Podcast On The Left Comedy
    footer-logo

    Contact Us

    Toll Free: 844-670-7747

    Links

    • Home
    • Top Charts
    • Networks
    • Apps
    • Independents Podcasts
    • Podcast Advertising
    • Podcast News
    • Contact Us
    • About Us
    • Analytics & Insights

    Stay Connected

      Privacy, Terms of Use & Our Code of Ethics Protecting Content Creators Copyrights