TopPodcast.com
Menu
  • Home
  • Top Charts
  • Top Networks
  • Top Apps
  • Top Independents
  • Top Podfluencers
  • Top Picks
    • Top Business Podcasts
    • Top True Crime Podcasts
    • Top Finance Podcasts
    • Top Comedy Podcasts
    • Top Music Podcasts
    • Top Womens Podcasts
    • Top Kids Podcasts
    • Top Sports Podcasts
    • Top News Podcasts
    • Top Tech Podcasts
    • Top Crypto Podcasts
    • Top Entrepreneurial Podcasts
    • Top Fantasy Sports Podcasts
    • Top Political Podcasts
    • Top Science Podcasts
    • Top Self Help Podcasts
    • Top Sports Betting Podcasts
    • Top Stocks Podcasts
  • Podcast News
  • About Us
  • Podcast Advertising
  • Contact
Not in our directory?
Add Show Here
Podcast Equipment
Center

toppodcastlogoOur TOPPODCAST Picks

  • Comedy
  • Crypto
  • Sports
  • News
  • Politics
  • True Crime
  • Business
  • Finance

Follow Us

toppodcastlogoStay Connected

    View Top 200 Chart
    Back to Rankings Page
    Games & Hobbies

    Matt’s Basement Workshop Video Feed

    This is the video only feed for Matt’s Basement Workshop Podcast. If you prefer to watch your woodworking content this is the feed for you!

    Advertise
    • Apple Podcasts
    • Google Play
    • Spotify

    Latest Episodes:
    488 Shop Accessories Aug 23, 2015
    Show notes

    Following up on the last episode, where I revealed recent changes made to my shop to improve work flow and efficiency...at least in theory...,today's show is a closer look at some of the "accessories" and little shop helpers I've added all around it.
    We've all heard the cliche "it's the little things that matter". In this case, it really IS the little things that make all the difference...in how I feel about working at my various tools.
    As much as we want to justify buying all kinds of new fangled jigs and shop accessories the one issue we run into eventually is where to put them, and more importantly, how will we find them when we need them the most?
    Being organized shouldn't just refer to having a set of well thought out plans to build a project. Being organized should also refer to where and why things are laid out also. I don't know the statistics off hand but I think it's safe to say that many of the shop accidents that occur regularly each year, both big and small, probably have to do with someone not taking the extra time to use a safety accessory simply because it wasn't close at hand.
    Surprisingly, it doesn't cost a lot of money to get well organized, nor does it take a lot of time. The accessories I talk about in today's episode took me longer to figure out exactly where to place them than it did to purchase OR put them in their new homes.
    You don't have to go as far as building fancy cabinets or caddies (although that could be fun) when you decide "now I'm ready to be organized", being organized is a state of mind and a way of life. The payoff at the end of the day will make a huge difference in how we work in the shop.
    Of course the second half of being organized is remembering to put things back in their place...but that's for another episode!
    Featured items in today's show:
    Magswitch and accessories
    Bench Dog Feather-Loc Featherboard with Bar
    Bench Dog Push Bloc Push Stick
    Tormek Rotational Base
    Micro-Jig Grrripper
    Fast Mount Shelving System
    All of these are also available at Amazon.com too!

    Help support the show - please visit our advertisers

    489 Hello Router Table Aug 23, 2015
    Show notes

    At the heart of my workshop's redo is the massive Bench Dog Router Table system I reviewed with ToolSelect.com - see the review HERE. Compared to previous router tables in my shop, this version is a beast! Of course it's not really a fair comparison, given its predecessors were all bench top models, but that's beside the point.
    The Bench Dog ProMax RT router table system provides woodworkers with a number of great options for customizing their own version. The system in my shop is a cast-iron top on an enclosed cabinet, but it could easily be a phenolic top instead. Or I could choose to have either one of those tops on an open stand.
    For me, what really makes this new router table system so invaluable in my shop IS the cabinet. The enclosed cabinet has enough storage space built into it that it's become my all-in-one router center.
    All my router bits, router accessories and even my routers can be stored in it and there's still room for more. What it takes up in floor space, it makes up for with overall storage space…I actually have some empty shelves…I wonder what I can put on those?
    The beauty of the system is the fact it has options! And speaking of options, one that will be making a dramatic change in my operations at the router table is the addition of a router lift. In the realm of router table upgrades this one is like going from a bicycle to a jet plane! See my review of it on ToolSelect.com HERE.
    Everyone who's used a router table knows the frustration there can be when dialing in just the right height between cuts. Having a router lift allows you to raise or lower your router from the top of the table where you can easily see what's happening versus the old method of reaching underneath and often blindly making the adjustments. How many times have you done this only to realize the bit is much higher or lower than you wanted?
    Router lifts are pricey, and to be honest I always had one on my list but I never considered it a necessity as far as I was concerned. But after using this one just for some test cuts and demonstration purposes, I wouldn't hesitate recommending it get bumped up to the top of the list for anyone who uses their router table frequently. The accuracy and ease of adjustability it provides will dramatically help with router operations in my shop.
    And then there's the fence system. Regardless of which table top, base or whether you choose to go with a router lift or traditional insert plate, if you don't have a good fence system it won't matter. The Bench Dog Fence system is worth the money!
    Links for items mentioned in today's show:
    Bench Dog 40-300 ProMax RT
    Bench Dog Tools 40-150 ProLift
    Bench Dog Featherboards
    Kreg PRS3090 3" Dual Locking Caster-Set

    Help support the show - please visit our advertisers

    490 Sharpening options Aug 23, 2015
    Show notes

    Over the years, I've done my fair share of experimenting with sharpening. From the early days of sandpaper on glass to waterstones and now on to my Tormek, I had one goal in mind...to create the scariest sharpest edge anyone could ever imagine!!!
    I won't claim to have achieved that dream yet, but I've managed to create edges that were sharp enough to draw blood with very little effort, usually also at the worst possible moments too.
    In today's episode I'll show you some of the tools and equipment I've used over the years to accomplish this goal. It's not an episode on HOW TO SHARPEN but instead an episode on options for WHAT TO SHARPEN WITH.
    From sandpaper to power sharpening and a few in between, I'll show you what I've tried in the past, what I'm using now and a little bit of why on each method. Just like our woodworking, sharpening methods are a personal thing, there's nothing wrong with experimenting until you find that one technique that's right for you.
    Tools mentioned in today's episode:
    Tormek Sharpener & Accessories
    Veritas MK II Honing Jig
    Waterstones
    Shapton glass stones
    Abrasive grit powders
    DMT Diamond Plates
    Granite surface plates

    Help support the show - please visit our advertisers

    491 Resawing Options Aug 23, 2015
    Show notes

    I've been doing a lot of resawing lately in my workshop. Not for the purpose of making my own veneers instead it's all about milling thin stock for the boxes I'm making for my wife's photography clients (shameless plug...www.shuttersam.com).

    Resawing thick stock into thinner pieces is a great way to save materials and money too! As a beginning woodworker my assumption was that thin stock, anything thinner than 3/4", was a rare item and either you settled for the warped and over-priced stuff at the home center or you repeatedly ran the stock through a thickness planer until it was the dimension you desired. Then one day the light bulb went off (actually I read an article) and I discovered resawing.
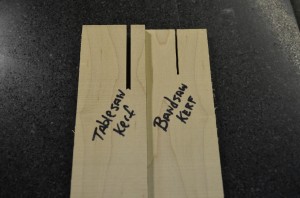
    In today's episode, I'll share with you a few options I've experimented with when it comes to resawing. I've tried it on the tablesaw and I've had some success with a handsaw, but my preferred way is on the bandsaw. And even that has changed slightly over the past year. Regardless of which route you choose for whatever reason; limited tools, experience or self-loathing, learning to resaw can open a whole new set of options for you in the shop and with your projects.
    Items mentioned in today's show:
    Kreg Precision Bandsaw Fence - Woodcraft.com or Highland Woodworking
    Kreg Resaw Guide - Woodcraft.com or Highland Woodworking
    Magswitch Resaw Guide - Woodcraft.com
    Wood Slicer Resaw Band Saw Blade - Highland Woodworking
    BANDSAWBLADESDIRECT.COM

    Help support the show - please visit our advertisers

    492 Hello new saw Aug 23, 2015
    Show notes

    As table saws go, I've had an opportunity over the years to use one from each of the three body types; benchtop, contractor and cabinet. While they're all tablesaws and do the same job, the specifications of each are very different. Where benchtop and contractor saws are portable in their own ways, the cabinet saw is one you probably won't be throwing in the back of a trailer or truck and hauling around from site to site. In fact, the cabinet saw is a beast of a saw and is designed with the serious hobbyist and professional woodworker in mind. I've been using my granite topped Steel City cabinet saw for a couple of years now and have been loving the features and specifications that came with it. But just recently, an opportunity came up to try another make and model of cabinet saw that has some upgraded features and specifications I didn't think we're all that important at first, but now that its here I can't wait to test them out and share the results with all of you. In today's episode I'm introducing my brand new SawStop PCS175-TGP236 1.75HP 10" Professional Cabinet Saw. In the interest of complete transparency, the opportunity to try out this model of saw and all the accessories and upgrades that accompany it was in exchange for a sponsorship and advertising deal on my website and in the show. I'm under no obligation what-so-ever to gloss over any warts I may think the saw has as I use it over time. As of the time that I'm posting this episode, I haven't had an opportunity to put the saw through it's paces yet. But that should be remedied very shortly as we get ready to start a series of projects that will have plenty of cuts being made on the saw. Then in about 6 months, I'll come back and give it as thorough a review of what I've experienced with the saw as I possibly can. I don't expect all of you to be as excited about this opportunity as I am, and I imagine some of you will express your opinions about it with me rather loudly. But I'm interested in hearing what your concerns are regarding the specifications when compared to other manufacturers and maybe even some of the myths you've heard too. So without further delay..."Hello New Saw!" Help support the show - please visit our advertisers


    493 Table saw sled Aug 23, 2015
    Show notes

    ENOUGH TALK ABOUT THE NEW SAW, LET'S BUILD SOMETHING WITH IT!!! I'd love to tell you it would be something über cool, ultra modern and hip...but then it wouldn't be on this show if it were. Instead, the first project on the new saw is something FOR THE NEW SAW; it's a very basic, no frills crosscut sled. [caption id="attachment_6965" align="aligncenter" width="300"] Basic Table Saw Sled[/caption] The entire sled is built from scraps and cutoffs laying around the shop, the only thing I didn't make myself was the Micro Jig ZeroPlay Guide Bars. I maybe doing this on the cheap, and can easily just toss it on the burn pile and start all over, but why worry about loose miter bar guides when I can spend the money on these reusable and adjustable manufactured ones that take all the worry our for me? (In full disclosure, when we gave away a few pairs of these over the summer, I snagged myself a set from the pile...don't worry...Micro Jig already knows) If you follow the show on either Facebook or Google+ I mentioned getting ready to build one and asked what the ones look like that you've built. A number of you responded with some really interesting ideas, both simple and WAY tweaked out. I'd love to see and hear more of your creations, please send them in and I'll put together a gallery on the website to share with everyone. Email them to mattsbasementworkshop@gmail.com. Items mentioned in today's show:Micro Jig ZeroPlay Guide Bars Help support the show - please visit our advertisers


    494 The Good The Bad Its Ugly Aug 23, 2015
    Show notes

    On today's show I'm walking you through the steps of building a very basic, utilitarian shoe organizer. And I'll admit it, I obviously didn't pay close enough attention to the warning signs when things started to go bad! It started out great. The components were milled in near record time, even with just having 30 minutes here and there during the week. I just never thought I'd be the victim of a glue-up catastrophe on this project! But even if the glue-up had gone perfect, this is the kind of project that gets tucked away in a closet or in the backroom where it gets used more than it gets seen. Which isn't a bad thing! Sometimes we don't want our projects just admired from a far, WE WANT THEM USED. This project was also just the kind of thing that let us take the new SawStop table saw out for a spin to see what we think about it. So far? It's a really nice table saw! And in the show today I even take a moment to demonstrate how easy it is to swap out the brake cartridge when switching from a regular 10" blade, to a 8" stacked dado set. The construction of the shoe organizer included a few joinery techniques; mitered corners, thru dadoes and even the use of dowels. In hindsight, it was a glue-up nightmare, but when tackled with a little strategy (apparently better than the one I used) it's possible to get the job done correctly.


    495 Bedside Tables Pt 1 Aug 23, 2015
    Show notes

    I'm sure you've heard the trope "The cobbler's children have no shoes"? Well the same thing in the Vanderlist household can be said about furniture. Around here it feels like I'm always making something for someone else's house (or more than likely for my shop). For a long time now my wife Samantha has been asking me to build us a matching set of bedside tables. I keep asking if she wouldn't prefer something bigger and more awe striking like a new dining room table. But while that would be nice, a bedside table that actually has room to set a book AND a lamp seemed to be a higher priority. So, starting on today's episode I'm finally building those bedside tables for her. The design is simple. Straight lines, no embellishments and something with a drawer and a shelf. Samantha also asked that they be painted too. That's fine with me, I have a decent stash of Poplar that's been waiting to be used for quite a while now. I'll get us started by roughing out the stock that will be the 20"x18" tops and the 16"x16" shelfs. These dimensions are a little too big for my jointer and thickness planer, so it's a great excuse to break out the hand planes and flatten them by hand.


    496 Bedside Tables pt 2 Aug 23, 2015
    Show notes

    Welcome back to part 2 of the Bedside Table Build. We again have some wide panels that will make up the sides of the tables and they need to be milled and glued up. But rather than tackling the task by “going ALL hand plane” on the wide boards like last week I decided to mix it up a little and use both hand planes AND power tools. In other words, living up to my claim to be a “hybrid woodworker”. The task is a pretty simple one. It’s a matter of knocking down the high spots of the concave side of the board with my Jack plane until it lays flat and doesn’t rock. Then it’s over to the thickness planer to do the rest of the work. Typically it takes more time to run it through the thickness planer than to knock down those high spots, but of course the board I chose for the video was the only one of the 8 pieces that decided to be difficult and took much longer than the others. The other tasks we complete in this episode are gluing up these wide panels, including a quick touch up of the edges with my Edge Trimming Plane and then prepping the stock that will become the legs for each table. In the next episode, we’ll start working on the joinery and begin to assemble the entire project from that point forward. Help support the show - please visit our advertisers


    497 Bedside Tables Pt 3 Aug 23, 2015
    Show notes

    At this point in the project I've milled all the components I need to get things started for the joinery work, so it's time to move on. The first joinery task to tackle is cutting dovetails for joining the top front and back rails to the legs.

    But before moving on to the dovetailed ends of the rails, I need to cut them to length and then define the shoulders of the dovetails. This is a simple task, but when you're not paying close enough attention to your setup things can go wrong, as you'll see in today's video.
    As for the dovetails themselves - because they're not thru dovetails, and instead half-blind dovetails, removing waste material can be a little tricky. Rather than sticking to my usual technique that involves using a dovetail saw and a chisel or two, for some reason I decided to try something different.
    I'm a huge advocate of "trying something different" every now and then, but this time I should've stuck to my tried and true method. In the end the result was good, the joint is solid, but the route I took to get there was a little too windy.
    Plan on seeing a special excerpt video coming later this week where I demonstrate my tried and true technique.


    [haiku url="http://blip.tv/file/get/Mattvan-497BedsideTablesPt3885.mp3" title="MBW497"]
    Download Video
    Download HD 720 Video
    Download Audio
    Help support the show - please visit our advertisers
    [adrotate banner="5"]
    [adrotate banner="26"]Help support the show - please visit our advertisers


    Previous 1 6 7 8 9 10 15 Next

    Related Podcasts

    The Joe Rogan Experience

    1

    The Joe Rogan Experience Comedy
    Casefile True Crime

    2

    Casefile True Crime Games & Hobbies
    Reply All

    3

    Reply All Games & Hobbies
    You Must Remember This

    4

    You Must Remember This Games & Hobbies
    Real Time with Bill Maher

    5

    Real Time with Bill Maher Games & Hobbies
    Last Podcast On The Left

    6

    Last Podcast On The Left Comedy
    footer-logo

    Contact Us

    Toll Free: 844-670-7747

    Links

    • Home
    • Top Charts
    • Networks
    • Apps
    • Independents Podcasts
    • Podcast Advertising
    • Podcast News
    • Contact Us
    • About Us
    • Analytics & Insights

    Stay Connected

      Privacy, Terms of Use & Our Code of Ethics Protecting Content Creators Copyrights